Table of contents
Turns out my previous attempt at this build had a faulty CPU! With the CPU replaced, the machine now is stable and fast! 🚀 In this article, I’ll go into a lot more detail about the component selection, but in a nutshell, I picked an Intel 285K CPU for low idle power, chose a 4TB SSD so I don’t have to worry about running out of storage quickly, and a capable nvidia graphics card to drive my Dell UP3218K 8K monitor.

Components
Which components did I pick for this build? Here’s the full list:
| Price | Type | Article |
|---|---|---|
| 140 CHF | Case | Fractal Define 7 Compact Black Solid |
| 155 CHF | Power Supply | Corsair RM850x |
| 233 CHF | Mainboard | ASUS PRIME Z890-P |
| 620 CHF | CPU | Intel Core Ultra 9 285K |
| 120 CHF | CPU fan | Noctua NH-D15 G2 |
| 39 CHF | Case fan | Noctua NF-A14 PWM (140 mm) |
| 209 CHF | RAM | 64 GB DDR5-6400 Corsair Vengeance (2 x 32GB) |
| 280 CHF | Disk | 4000 GB Samsung 990 Pro |
| 554 CHF | GPU | MSI GeForce RTX 3060 Ti GAMING X TRIO |
Total: 2350 CHF
…and the next couple of sections go into detail on how I selected these components.
Case
I have been a fan of Fractal cases for a couple of generations. In particular, I realized that the “Compact” series offers plenty of space even for large graphics cards and CPU coolers, so that’s now my go-to case: the Fractal Define 7 Compact (Black Solid).
My general requirements for a PC case are as follows:
- No extra effort should be required for the case to be as quiet as possible.
- The case should not have any sharp corners (no danger of injury!).
- The case should provide just enough space for easy access to your components.
- The more support the case has to encourage clean cable routing, the better.
- USB3 front panel headers should be included.
I really like building components into the case and working with the case. There are no sharp edges, the mechanisms are a pleasure to use and the cable-management is well thought-out.
The only thing that wasn’t top-notch is that Fractal ships the case screws in sealed plastic packages that you need to cut open. I would have wished for a re-sealable plastic baggie so that one can keep the unused screws instead of losing them.
With this build, I have standardized all my PCs into Fractal Define 7 Compact Black cases!
Power Supply
I wanted to keep my options open regarding upgrading to an nvidia 50xx series graphics card at a later point. Those models have a TGP (“Total Graphics Power”) of 575 watts, so I needed a power supply that delivers enough power for the whole system even at peak power usage in all dimensions.
I ended up selecting the Corsair RM850x, which reviews favorably (“leader in the 850W gold category”) and was available at my electronics store of choice.
This was a good choice: the PSU indeed runs quiet, and I really like the power cables (e.g. the GPU cable) that they include: they are very flexible, which makes them easy to cable-manage.
One interesting realization was that it’s more convenient to not use the PSU’s 12VHPWR cable, but instead stick to the older 8-pin power connectors for the GPU in combination with a 12VHPWR-to-8-pin adapter. The reason is that the 12VHPWR connector’s locking mechanism is very hard to unlock, so when swapping out the GPU (as I had to do a number of times while trouble-shooting), unlocking an 8-pin connector is much easier…
SSD disk
I have been avoiding PCIe 5 SSDs so far because they consume a lot more power compared to PCIe 4 SSDs. While bulk streaming data transfer rates are higher on PCIe 5 SSDs, random transfers are not significantly faster. Most of my compute workload are random transfers, not large bulk transfers.
The power draw situation with PCIe 5 SSDs seems to be getting better lately, with the Phison E31T being the first controller that implements power saving. A disk that uses the E31T controller is the Corsair Force Series MP700 Elite. Unfortunately, said disk was unavailable when I ordered.
Instead, I picked the Samsung 990 Pro with 4 TB. I have had good experiences with the Samsung Pro series over the years (never had one die or degrade performance), and my previous 2 TB disk was starting to fill up, so the extra storage space is appreciated.
Onboard 2.5GbE Network Card
One annoying realization is that most mainboard vendors seem to have moved to 2.5 GbE (= 2.5 Gbit/s ethernet) onboard network cards. I would have been perfectly happy to play it safe and buy another Intel I225 1 GbE network card, as long as it just works with Linux.
In the 2.5 GbE space, the main players seem to be Realtek and Intel. Most mainboard vendors opted for Realtek as far as I could see.
Linux includes the r8169 driver for Realtek network cards, but whether the
card will work out of the box depends on the exact revision of the network card!
For example:
- The AsRock Z890 Pro-A has rev 8125B. lshw:
firmware=rtl8125b-2_0.0.2 07/13/20 - The ASUS PRIME Z890-P has rev 8125D. lshw:
firmware=rtl8125d-1_0.0.7 10/15/24
For revision 8125D, you need a recent-enough Linux version (6.13+) that includes commit “r8169: add support for RTL8125D”, accompanied by a recent-enough linux-firmware package.
Even with the latest firmware, there is some concern around stability and ASPM
support. See for example this ServerFault
post by someone working on the r8169
driver. But, despite the Intel 1 GbE options being well-supported at this point,
Intel’s 2.5 GbE options might not fare any better than the Realtek ones: I found
reports of instability with Intel’s 2.5 GbE network
cards.
That said, aside from the annoying firmware requirements, the Realtek 2.5 GbE card seems to work fine for me in practice.
Mainboard
Despite the suboptimal network card choice, I decided to stick to the ASUS PRIME series of mainboards, as I made good experiences with those in my past few builds. Here are a couple of thoughts on the ASUS PRIME Z890-P mainboard I went with:
- I like the quick-release PCIe mechanism: ASUS understood that people had trouble unlocking large graphics cards from their PCIe slot, so they added a lever-like mechanism that is easily reachable. In my couple of usages, this worked pretty well!
- I wrote about slow boot times with my 2022 PC
build that were caused by
time-consuming memory training. On this ASUS board, I noticed that the board
blinks the Power LED to signal that memory training is in progress. Very nice!
It hadn’t occurred to me previously that the various phases of the boot could
be signaled by different Power LED blinking patterns :)
- The downside of this feature is: While the machine is in suspend-to-RAM, the Power LED also blinks! This is annoying, so I might just disconnect the Power LED entirely.
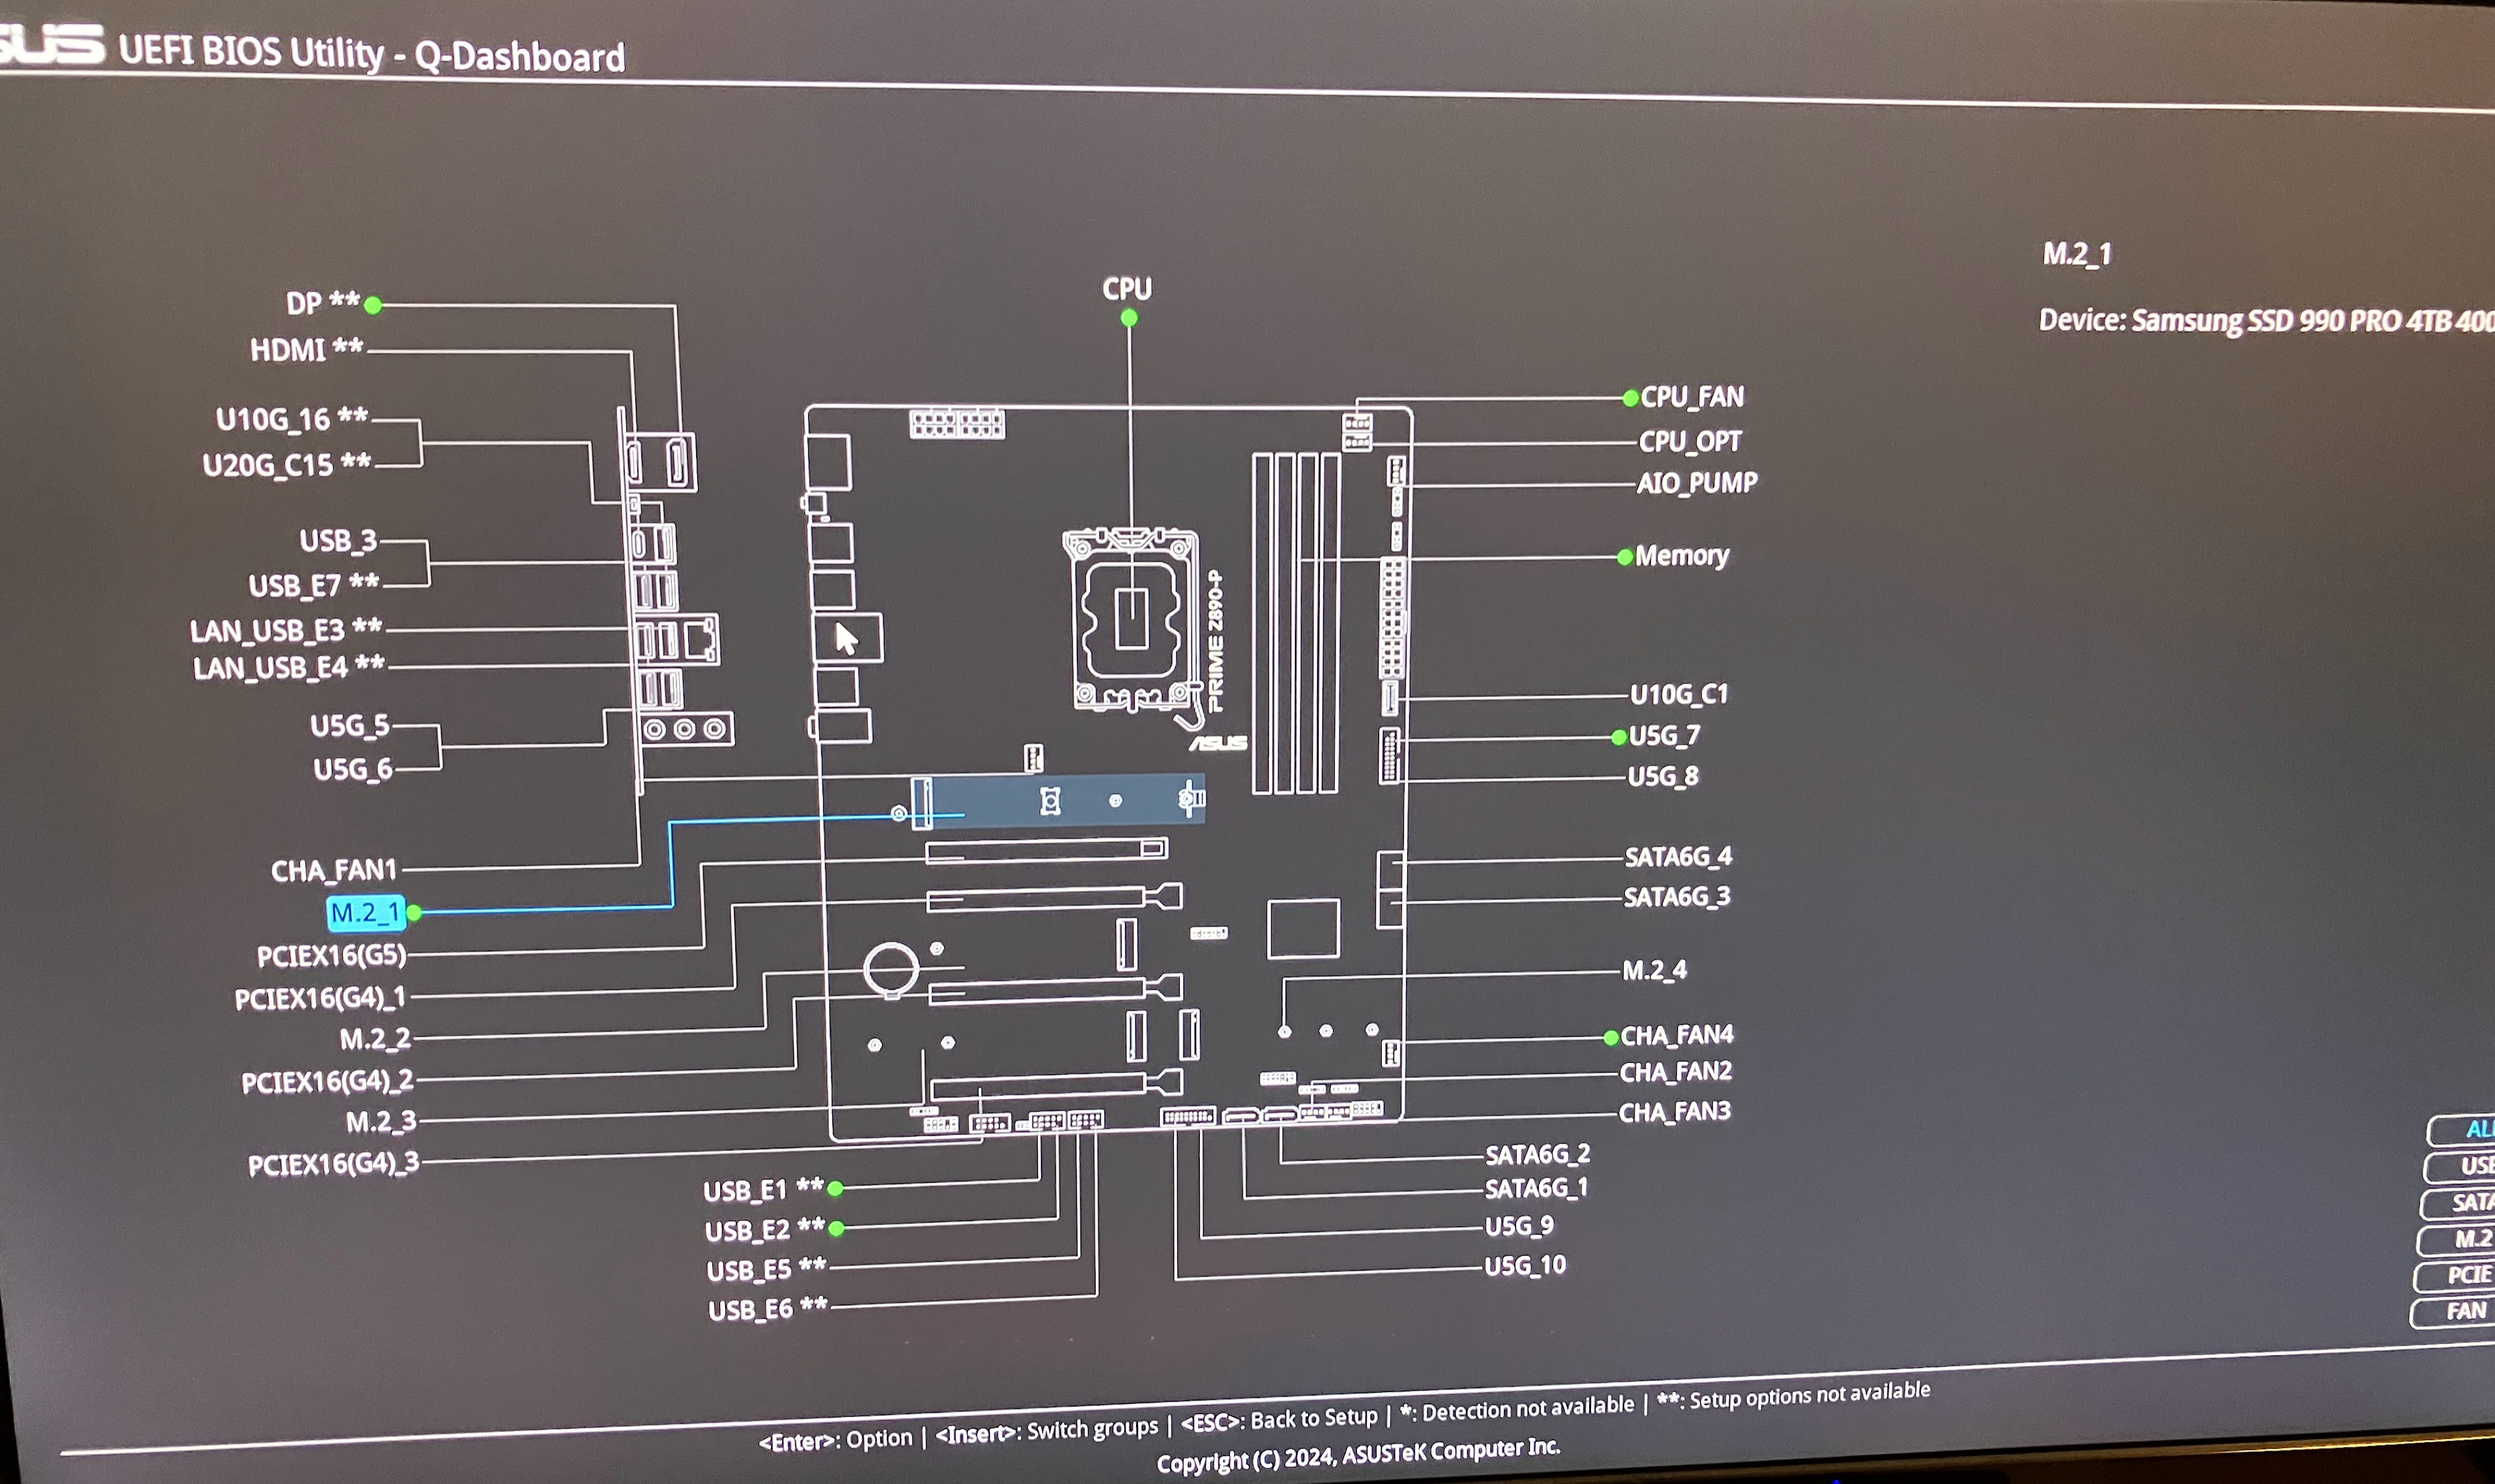
- The UEFI firmware includes what they call a Q-Dashboard: An overview of what is installed/connected in which slot. Quite nice:
One surprising difference between the two mainboards I tested was that the
AsRock Z890 Pro-A does not seem to report the correct DIMM clock in lshw,
whereas the ASUS does:
--- lshw-intel-285k-asrock.txt	2025-04-30 20:35:24 +0200
+++ lshw-intel-285k-asus.txt		2025-04-30 21:39:52 +0200
      *-firmware
           description: BIOS
-          vendor: American Megatrends International, LLC.
+          vendor: American Megatrends Inc.
           physical id: 0
-          version: 2.25
-          date: 03/24/2025
+          version: 1601
+          date: 02/07/2025
           size: 64KiB
-          capacity: 32MiB
+          capacity: 16MiB
           capabilities: pci upgrade shadowing cdboot bootselect socketedrom edd acpi biosbootspecification uefi
[…]
      *-memory
           description: System Memory
-          physical id: 9
+          physical id: e
           slot: System board or motherboard
           size: 64GiB
         *-bank:0
-             description: DIMM [empty]
+             description: [empty]
              physical id: 0
              slot: Controller0-ChannelA-DIMM0
         *-bank:1
-             description: DIMM Synchronous 4800 MHz (0,2 ns)
+             description: DIMM Synchronous 6400 MHz (0,2 ns)
              product: CMK64GX5M2B6400C32
              vendor: Corsair
              physical id: 1
@@ -40,13 +42,13 @@
              slot: Controller0-ChannelA-DIMM1
              size: 32GiB
              width: 64 bits
-             clock: 505MHz (2.0ns)
+             clock: 2105MHz (0.5ns)
         *-bank:2
-             description: DIMM [empty]
+             description: [empty]
              physical id: 2
              slot: Controller0-ChannelB-DIMM0
         *-bank:3
-             description: DIMM Synchronous 4800 MHz (0,2 ns)
+             description: DIMM Synchronous 6400 MHz (0,2 ns)
              product: CMK64GX5M2B6400C32
              vendor: Corsair
              physical id: 3
@@ -54,7 +56,7 @@
              slot: Controller0-ChannelB-DIMM1
              size: 32GiB
              width: 64 bits
-             clock: 505MHz (2.0ns)
+             clock: 2105MHz (0.5ns)
[…]
I haven’t checked if there are measurable performance differences (e.g. if the
XMP profile is truly active), but at least you now know to not necessarily trust
what lshw can show you.
CPU fan
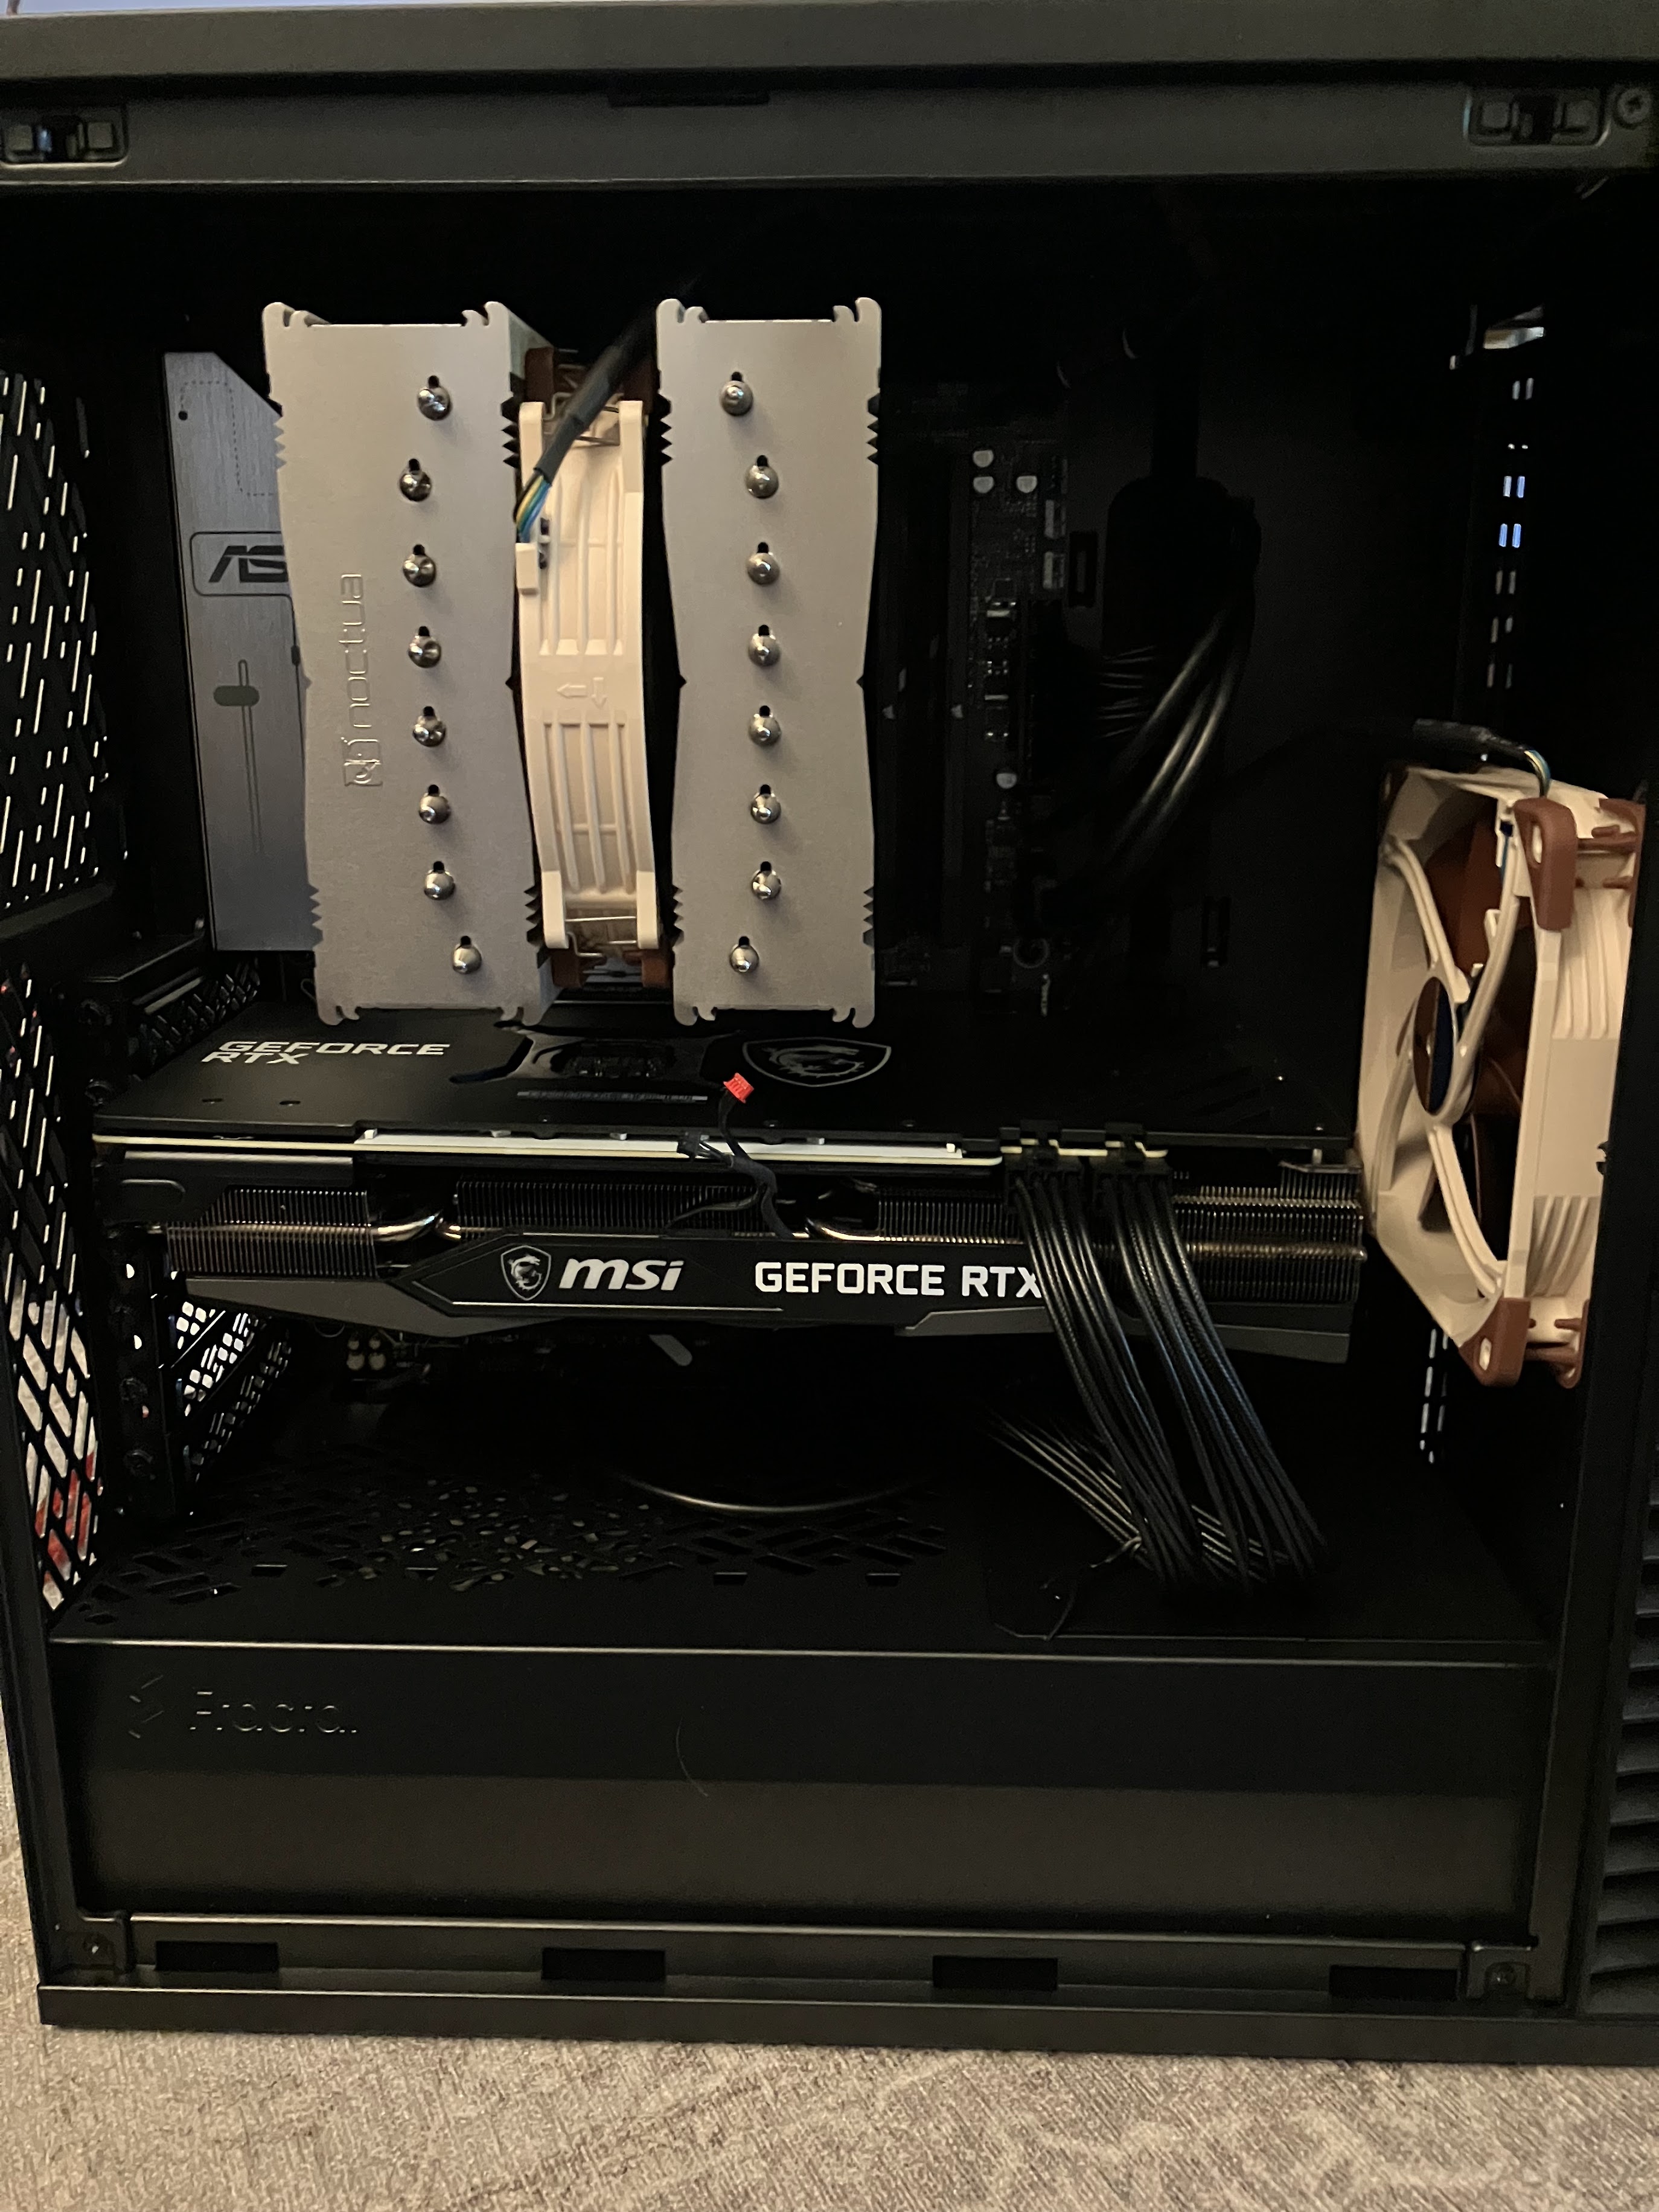
I am a long-time fan of Noctua’s products: This company makes silent fans with great cooling capacity that work reliably! For many years, I have swapped out all the fans of each of my PCs with Noctua fans, and it was always an upgrade. Highly recommended.
Hence, it is no question that I picked the latest and greatest Noctua CPU cooler for this build: the Noctua NH-D15 G2. There are a couple of things to pay attention to with this cooler:
- I decided to configure it with one fan instead of two fans: Using only one fan will be the quietest setup, yet still have plenty of cooling capacity for this setup.
- There are 3 different versions that differ in how their base plate is shaped. Noctua recommends: “For LGA1851, we generally recommend the regular standard version with medium base convexity” (https://noctua.at/en/intel-lga1851-all-you-need-to-know)
- With a height of 168 mm, this cooler fits well into the Fractal Define 7 Compact Black.
CPU and GPU: Idle Power vs. Peak Performance
CPU choice: Intel over AMD
Probably the point that raises most questions about this build is why I selected an Intel CPU over an AMD CPU. The primary reason is that Intel CPUs are so much better at power saving!
Let me explain: Most benchmarks online are for gamers and hence measure a usage curve that goes “start game, run PC at 100% resources for hours”. Of course, when you never let the machine idle, you would care about power efficiency: how much power do you need to use to achieve the desired result?
My use-case is software development, not gaming. My usage curve oscillates between “barely any usage because Michael is reading text” to “complete this compilation as quickly as possible with all the power available”. For me, I need both absolute power consumption at idle, and absolute performance to be best-of-class.
AMD’s CPUs offer great performance (the recently released Ryzen 9 9950X3D is even faster than the Intel 9 285K), and have great power efficiency, but poor power consumption at idle: With ≈35W of idle power draw, Zen 5 CPUs consume ≈3x as much power as Intel CPUs!
Intel’s CPUs offer great performance (like AMD), but excellent power consumption at idle.
Therefore, I can’t in good conscience buy an AMD CPU, but if you want a fast gaming-only PC or run an always-loaded HPC cluster with those CPUs, definitely go ahead :)
Graphics card: nvidia over AMD
I don’t necessarily recommend any particular nvidia graphics card, but I have had to stick to nvidia cards because they are the only option that work with my picky Dell UP3218K monitor.
From time to time, I try out different graphics cards. Recently, I got myself an AMD Radeon RX 9070 because I read that it works well with open source drivers.
While the Radeon RX 9070 works with my monitor (great!), it seems to consume 45W in idle, which is much higher than my nvidia cards, which idle at ≈ 20W. This is unacceptable to me: Aside from high power costs and wasting precious resources, the high power draw also means that my room will be hotter in summer and the fans need to spin faster and therefore louder.
People asked me on Social Media if this could be a measurement error (like, the card reporting inaccurate values), so I double-checked with a myStrom WiFi Switch and confirmed that with the Radeon card, the PC indeed draws 20-30W more from the wall socket.
Why Low Idle Power is so important
In the comments for my my previous blog post about the first build of this machine not running stable, people were asking why it is worth it to optimize a few watts of power usage. People calculate what higher power usage might cost, put it in relation to the total cost of the components, and conclude that saving ±10% of the price can’t possibly be worth the effort.
Let me try to illustrate the importance of low idle power with this anecdote: For one year, I was suffering from an nvidia driver bug that meant the GPU would not clock down to the most efficient power-saving mode (because of the high resolution of my monitor). The 10-20W of difference should have been insignificant. Yet, when the bug was fixed, I noticed how my PC got quieter (fans don’t need to spin up) and my room noticeably cooled down, which was great as it was peak temperatures in summer.
To me, having a whisper-quiet computing environment that does not heat up my room is a great, actual, real-life, measurable benefit. Not wasting resources and saving a tiny amount of money is a nice cherry on top.
Obviously all the factors are very dependent on your specific situation: Your house’s thermal behavior might differ from mine, your tolerance for noise (and/or baseline noise levels) might be different, you might put more/less weight on resource usage, etc.
Installation
UEFI setup
On the internet, I read that there was some issue related to the Power Limits
that mainboards come with by default. Therefore, I did a UEFI firmware
update
immediately after getting the mainboard. I upgraded to version 1404 (2025/01/10)
using the provided ZIP file (PRIME-Z890-P-ASUS-1404.zip) on an MS-DOS
FAT-formatted USB stick with the EZ Flash tool in the UEFI firmware
interface. Tip: do not extract the ZIP file, otherwise the EZ Flash tool cannot
update the Intel ME firmware. Just put the ZIP file onto the USB disk as-is.
I verified that with this UEFI version, the Power Limit 1 (PL1) is 250W, and
ICCMAX=347A, which are exactly the values that Intel recommends. Great!
I also enabled XMP and verified that memtest86 reported no errors.
Software setup: early adopter pains
To copy over the data from the old disk to the new disk, I wanted to boot a live
linux distribution (specifically, grml.org) and follow my
usual procedure: boot with the old disk and the new (empty) disk, then use dd
to copy the data. It’s nice and simple, hard to screw up.
Unfortunately, while grml 2024.12 technically does boot up, there are two big problems:
-
There is no network connectivity because the kernel and linux-firmware versions are too old.
- Kernel commit r8169: add support for RTL8125D is not included.
-
I could not get Xorg to work at all. Not with the Intel integrated GPU, nor with the nvidia dedicated GPU. Not with
nomodesetor any of the other options in the grml menu. This wasn’t merely a convenience problem: I needed to usegparted(the graphical version) for its partition moving/resizing support.
Ultimately, it was easier to upgrade my old PC to Linux 6.13 and linux-firmware 20250109, then put in the new disk and copy over the installation.
TRIM your SSDs
SSD disks can degrade over time, so it is essential that the Operating System tells the SSD firmware about freed-up blocks (for wear leveling). When using full-disk encryption, all involved layers need to have TRIM support enabled.
I think I saw the effect of an incorrectly configured TRIM setup in action back in 2022, when I copied my data from a Force MP600 to a WD Black SN850, which unexpectedly took many hours!
To make sure my disk has a long and healthy life, I double-checked that both
periodic and continuous TRIM are
enabled on my Arch Linux
system: The fstab(5)
file contains the discard
option (and mount(8)
lists the discard option),
and fstrim.service ran within the last week:
systemd[1]: Starting Discard unused blocks on filesystems from /etc/fstab...
fstrim[779617]: /boot: 10.1 GiB (10799427584 bytes) trimmed on /dev/nvme0n1p1
fstrim[779617]: /: 1.8 TiB (2018906263552 bytes) trimmed on /dev/mapper/cryptroot
systemd[1]: fstrim.service: Deactivated successfully.
Speaking of copying data: the transfer from my WD Black SN850 to my Samsung 990 PRO ran at 856 MB/s and took about 40 minutes in total.
Performance
Here are the total times for a couple of typical workloads I run:
| Workload | 12900K (2022) | 285K (2025) |
|---|---|---|
build Go 1.24.3 (cd src; ./make.bash) |
≈35s | ≈26s |
gokrazy/rsync tests (make test) |
≈0.5s | ≈0.4s |
gokrazy UEFI test (go test ./integration/...) |
≈30s | ≈10s |
gokrazy Linux compile (gokr-rebuild-kernel -cross=arm64) |
3m 13s | 2m 7s |
The performance boost is great! Building Linux kernels a whole minute faster is really nice.
Stability issues
In March, I published an article about how the first build of this machine was not stable, in which you can read in detail about the various crashes I ran into.
Now, in early May, I know for sure that the CPU was defective, after a lengthy trouble-shooting in which I swapped out all the other parts of this PC, sent back the CPU and got a new one.
The CPU was the most annoying component to diagnose in this build because it’s an LGA 1851 socket and I don’t (yet) have any other machines which uses that same socket. AMD’s approach of sticking to each socket for a longer time would have been better in this situation.
Stress testing
When I published my earlier blog post about the PC being unstable, I did not really know how to reliably trigger the issue. Some compute-intensive tasks like running a Django test suite seemed to trigger the issue. I suspect that the problem somehow got worse, because when I started stress testing the machine, suddenly it would crash every time when building a Linux kernel.
That got me curious to see if other well-known CPU stress testers like Prime95 would show problems, and indeed: within seconds, Prime95 would report errors.
I figured I would use Prime95 as a quick signal: if it reports errors, the machine is faulty. This typically happens within seconds of starting Prime95.
If Prime95 reported no errors, I would use Linux kernel compilation as a slow signal: if I can successfully build a kernel, the machine is likely stable enough.
The specific setup I used is to run ./mprime -m, hit N (do not participate in
distributed computation projects), then Enter a few times to confirm the
defaults. Eventually, Prime95 starts calculating, which pushes the CPU to 100%
usage (see the dstat(1)
-like output by my
gokrazy/stat implementation) and draws the
expected ≈300W of power from the wall:


In addition, I also ran MemTest86 for a few hours:

To be clear: I also successfully ran MemTest86 on the previous, unstable build, so only running MemTest86 is not good enough if you are dealing with a faulty CPU.
RMA timeline
- Jan 15th: I receive the components for my new PC
- In January and February, the PC crashes occasionally.
- Mar 4th: I switch back to my old PC and start writing my blog post
- Mar 19th: I publish my blog post about the machine not being stable
- The online discussion does not result in any interesting tips or leads.
- Mar 20th: I order the AsRock Z890 Pro-A mainboard to ensure the mainboard is OK
- Mar 24th: the AsRock Z890 Pro-A arrives
- Apr 5th (Sat): started an RMA for the CPU
- They ask me to send the CPU to orderflow, which is the merchant that fulfilled my order.
- Typically, I prefer buying directly at digitec, but many PC components seem to only be available from orderflow on digitec nowadays.
- Apr 9th (Wed): package arrives at orderflow (digitec gave me a non-priority return label)
- Apr 14th (Mon): I got the following mail from digitec’s customer support and had to explain that I have thoroughly diagnosed the CPU as defective (a link to my blog post was sufficient):
Händler hat dies beim Hersteller angemeldet und dieser hat folgende Fragen:
Um sicherzugehen, dass wir Sie richtig verstehen: Sie haben die CPU auf zwei verschiedenen Motherboards getestet und das gleiche Problem besteht weiterhin?
Könnten Sie uns mitteilen, welche Marke und welches Modell die beiden verwendeten Motherboards sind?
Wurde auf beiden Motherboards die neueste BIOS-Version verwendet?
Bestand das Problem von Anfang an oder trat es erst später auf?
Wurde der Prozessor übertaktet? (Bitte beachten Sie, dass durch Übertakten die Garantie erlischt.)
- Apr 25th (Fri): orderflow hands the replacement CPU to Swiss Post
- May 1st (Thu): the machine successfully passes stress tests; I start using it
In summary, I spent March without a working PC, but that was because I didn’t have much time to pursue the project. Then, I spent April without a working PC because RMA’ing an Intel CPU through digitec seems pretty slow. I would have wished for a little more trust and a replacement CPU right away.
Conclusion
What a rollercoaster and time sink this build was! I have never received a faulty-on-arrival CPU in my entire life before. How did the CPU I first received pass Intel’s quality control? Or did it pass QC, but was damaged in transport? I will probably never know.
From now on, I know to extensively stress test new PC builds for stability to detect such issues quicker. Should the CPU be faulty, unfortunately getting it replaced is a month-long process — it’s very annoying to have such a costly machine just gather dust for a month.
But, once the faulty component was replaced, this is my best PC build yet:
The case is the perfect size for the components and offers incredibly convenient access to all components throughout the entire lifecycle of this PC, including the troubleshooting period, and the later stages of its life when this PC will be rotated into its “lab machine” period before I sell it second-hand to someone who will hopefully use the machine for another few years.
The machine is quiet, draws little power (for such a powerful machine) and really packs a punch!
As usual, I run Linux on this PC and haven’t noticed any problems in my day-to-day usage. I use suspend-to-RAM multiple times a day without any issues.
I hope some of these details were interesting and useful to you in your own PC builds!
If you want to learn about which peripherals I use aside from my 8K monitor (e.g. the Kinesis Advantage keyboard, Logitech MX Ergo trackball, etc.), check out my post stapelberg uses this: my 2020 desk setup. I might publish an updated version at some point :)
Did you like this post? Subscribe to this blog’s RSS feed to not miss any new posts!
I run a blog since 2005, spreading knowledge and experience for over 20 years! :)
If you want to support my work, you can buy me a coffee.
Thank you for your support! ❤️