Table of contents
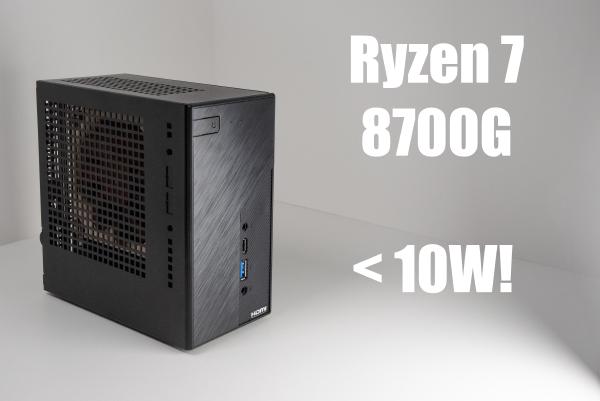
When I saw the first reviews of the ASRock DeskMini X600 barebone, I was immediately interested in building a home-lab hypervisor (VM host) with it. Apparently, the DeskMini X600 uses less than 10W of power but supports latest-generation AMD CPUs like the Ryzen 7 8700G!
Sounds like the perfect base for a power-efficient, always-on VM host that still provides enough compute power (and fast disks!) to be competitive with commercial VM offerings. In this article, I’ll show how I built and set up my DIY self-hosting VM host.

Component List
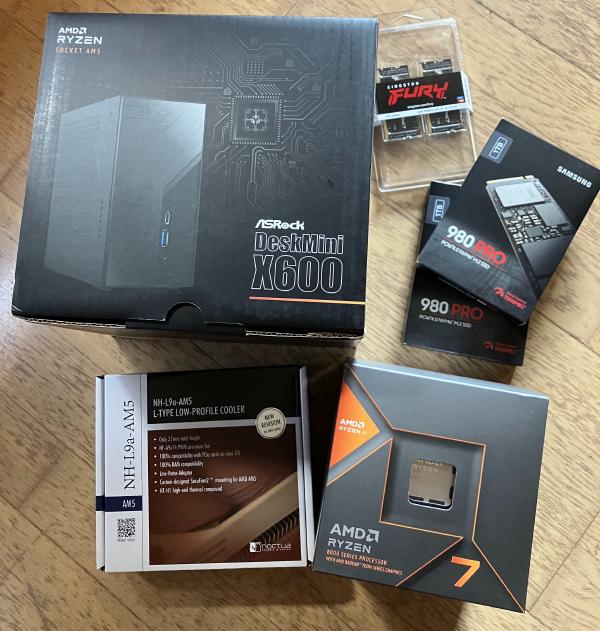
The term “barebone” means that the machine comes without CPU, RAM and disk. You only get a case with a mainboard and power supply, the rest is up to you. I chose the following parts:
| Price | Type | Article |
|---|---|---|
| 215 EUR | barebone | ASRock DeskMini X600 |
| 293 CHF | CPU | AMD Ryzen 7 8700G (AM5, 4.20 GHz, 8 Core) |
| 48 CHF | CPU fan | Noctua NH-L9a-AM5 (37 mm) |
| 195 CHF | RAM | Kingston FURY Impact (2 x 32GB, DDR5-5600 SO-DIMM) |
| 218 CHF | SSD | 2 x Samsung 980 Pro (1000 GB, M.2 2280) (for RAID-1) |
Total cost: 969 CHF
The CPU fan is not strictly required (the DeskMini X600 already comes with a fan), but I wanted the best cooling performance at lowest noise levels, so Noctua it is.
I read that the machine should support ECC RAM, too. Update: The Ryzen
8700G does not support
ECC-RAM
after all. Only the Ryzen 7 PRO 8700G supports ECC-RAM.

It took me about an hour to assemble the parts. Note that the M.2 SSD screws might seem a little hard to screw in, but don’t be deterred by that. When first powering on the system, be patient as the memory training will take a minute or so, during which the screen will stay black.
UEFI Setup
The UEFI on the DeskMini X600 comes with reasonable defaults.
The CPU fan setting alreadys defaults to “Silent Mode”, for example.
I changed the following option, which is typical for server usage:
- Advanced → ACPI Configuration → Restore on AC/Power Loss: Power On
And I disabled the onboard devices I know I won’t need, just in case it saves power:
- Advanced → Onboard Devices Configuration → Onboard HD Audio: Disabled
- SATA3 Controller: Disabled
Operating System Setup
I want to run this machine as a VM hypervisor. The easiest way that I know to set up such a hypervisor is to install Proxmox, an open source virtualization appliance based on Debian.
I booted the machine with the Proxmox installer copied to a USB memory stick, then selected ZFS in a RAID-1 configuration. The setup worked smoothly and was done in a few minutes.
Then, I set up Tailscale as recommended
and used tailscale serve so that I can access the Proxmox web interface on its
Tailscale hostname via HTTPS, instead of having to deal with certificates and
custom ports:
pve# curl -fsSL https://tailscale.com/install.sh | sh
pve# tailscale up
[…]
  follow instructions and disable key expiration
[…]
pve# tailscale serve --bg https+insecure://localhost:8006
(Of course I’ll also install Tailscale on each VM running on the host.)
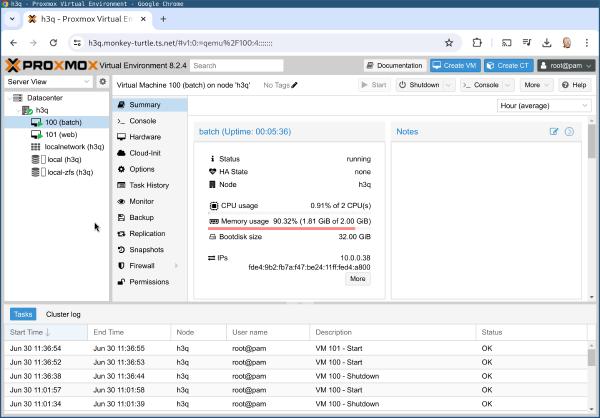
Now I can log into the Proxmox web interface from anywhere without certificate warnings:

In this screenshot, I have already created 2 VMs (“batch” and “web”) using the “Create VM” button at the top right. Proxmox allows controlling the installer via its “Console” tab and once set up, the VM shows up in the same network that the hypervisor is connected to with a MAC address from the “Proxmox Server Solutions GmbH” range. That’s pretty much all there is to it.
I don’t have enough nodes for advanced features like clustering, but I might investigate whether I want to set up backups on the Proxmox layer or keep doing them on the OS layer.
Fan speed monitoring
Sven Geggus shared how to make the fan speed sensors work in current versions of Debian:
pve# echo "options nct6683 force=1" >> /etc/modprobe.d/sensors.conf
pve# echo nct6683 >> /etc/modules-load.d/sensors.conf
pve# modprobe nct6683
pve# systemctl restart prometheus-node-exporter
Power Usage
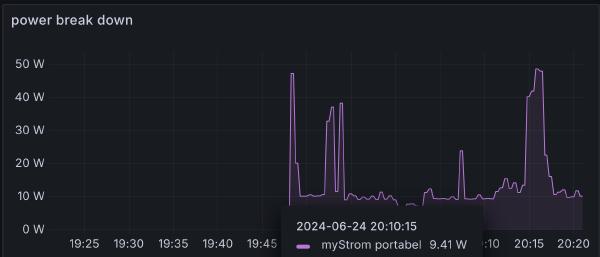
The power usage values I measure are indeed excellent: The DeskMini X600 with Ryzen 7 8700G consumes less than 10W (idle)! When the machine has something to do, it spikes up to 50W:

Noise
ASRock explicitly lists the Noctua NH-L9a-AM5 as compatible with the DeskMini X600, which was one of the factors that made me select this barebone. Installing the fan was easy.
Fan noise is very low, as expected with Noctua. I can’t hear the device even when it is standing in front of me on my desk. Of course, under heavy load, the fan will be audible. This is an issue with all small form-factor PCs, as they just don’t have enough case space to swallow more noise.
Aside from the fan noise, if you hold your ear directly next to the X600, you can hear the usual electrical component noise (not coil whine per se, but that sort of thing).
I recommend positioning this device under a desk, or on a shelf, or similar.
Performance comparison
You can find synthetic benchmark results for the Ryzen 8700G elsewhere, so as usual, I will write about the specific angle I care about: How fast can this machine handle Go workloads?
Compiling Go 1.22.4
On the Ryzen 8700G, we can compile Go 1.22.4 in a little under 40 seconds:
% time ./make.bash
[…]
./make.bash  208,55s user 36,96s system 631% cpu 38,896 total
For comparison, my 2022 high-end Linux PC with Core i9-12900K is only a few seconds faster:
% time ./make.bash
[…]
./make.bash  207,33s user 29,55s system 685% cpu 34,550 total
Go HTTP and JSON benchmarks
I also ran the HTTP and JSON benchmarks from Go’s x/benchmarks repository.
Compared to the Virtual Server I’m currently renting, the Ryzen 8700G is more than twice as fast:
% benchstat rentedvirtual ryzen8700g
name    old time/op                  new time/op                  delta
HTTP-2  28.5µs ± 2%                  10.2µs ± 1%  -64.17%  (p=0.008 n=5+5)
JSON-2  24.1ms ±29%                   9.4ms ± 1%  -61.06%  (p=0.008 n=5+5)
Of course, the Intel i9 12900K is still a bit faster — how much depends on the specific workload:
% benchstat ryzen8700g i9_12900k
name    old time/op                  new time/op                  delta
HTTP-2  10.2µs ± 1%                   7.6µs ± 1%  -25.13%  (p=0.008 n=5+5)
JSON-2  9.40ms ± 1%                  9.23ms ± 1%   -1.82%  (p=0.008 n=5+5)
Conclusion
What a delightful little Mini-PC! It’s modern enough to house the current generation of CPUs, compact enough to fit in well anywhere, yet just large enough to fit a Noctua CPU cooler for super-quiet operation. The low power draw makes it acceptable to run this machine 24/7.
Paired with 64 GB of RAM and large, fast NVMe disks, this machine packs a punch and will easily power your home automation, home lab, hobby project, small office server, etc.
If a Raspberry Pi isn’t enough for your needs, check out the DeskMini X600, or perhaps its larger variant, the DeskMeet X600 which is largely identical, but comes with a PCIe slot.
If this one doesn’t fit your needs, keep looking: there are many more mini PCs on the market. Check out ServeTheHome’s “Project TinyMiniMicro” for a lot more reviews.
Update: Apparently ASRock is releasing their X600 mainboard as a standalone product, too, if you like the electronics but not the form factor.
Did you like this post? Subscribe to this blog’s RSS feed to not miss any new posts!
I run a blog since 2005, spreading knowledge and experience for over 20 years! :)
If you want to support my work, you can buy me a coffee.
Thank you for your support! ❤️