Table of contents
init7 recently announced that with their FTTH fiber offering Fiber7, they will now sell and connect you with 25 Gbit/s (Fiber7-X2) or 10 Gbit/s (Fiber7-X) fiber optics, if you want more than 1 Gbit/s.
While this offer will only become available at my location late this year (or possibly later due to the supply chain shortage), I already wanted to get the hardware on my end sorted out.
After my previous disappointment with the MikroTik CCR2004, I decided to try a custom PC build.
An alternative to many specialized devices, including routers, is to use a PC with an expansion card. An internet router’s job is to configure a network connection and forward network packets. So, in our case, we’ll build a PC and install some network expansion cards!

Goals
For this PC internet router build, I had the following goals, highest priority to lowest priority:
- Enough performance to saturate 25 Gbit/s, e.g. with two 10 Gbit/s downloads.
- Silent: no loud fan noise.
- Power-efficient: low power usage, as little heat as possible.
- Low cost (well, for a high-end networking build…).
Network Port Plan
The simplest internet router has 2 network connections: one uplink to the internet, and the local network. You can build a router without extra cards by using a mainboard with 2 network ports.
Because there are no mainboards with SFP28 slots (for 25 Gbit/s SFP28 fiber modules), we need at least 1 network card for our build. You might be able to get by with a dual-port SFP28 network card if you have an SFP28-compatible network switch already, or need just one fast connection.
I want to connect a few fast devices (directly and via fiber) to my router, so I’m using 2 network cards: an SFP28 network card for the uplink, and a quad-port 10G SFP+ network card for the local network (LAN). This leaves us with the following network ports and connections:
| Network Card | max speed | cable | effective | Connection |
|---|---|---|---|---|
| Intel XXV710 | 25 Gbit/s | fiber | 25 Gbit/s | Fiber7-X2 uplink |
| Intel XXV710 | 25 Gbit/s | DAC | 10 Gbit/s | workstation |
| Intel XL710 | 10 Gbit/s | RJ45 | 1 Gbit/s | rest (RJ45 Gigabit) |
| Intel XL710 | 10 Gbit/s | fiber | 10 Gbit/s | MikroTik 1 |
| Intel XL710 | 10 Gbit/s | fiber | 10 Gbit/s | MikroTik 2 |
| Intel XL710 | 10 Gbit/s | / | 10 Gbit/s | (unused) |
| onboard | 2.5 Gbit/s | RJ45 | 1 Gbit/s | (management) |

Hardware selection
Now that we have defined the goals and network needs, let’s select the actual hardware!
Network Cards
My favorite store for 10 Gbit/s+ network equipment is FS.COM. They offer Intel-based cards:

-
(347 CHF) PCIe 3.0 x8 Dual-Port 25G SFP28 Ethernet Network Card (Intel XXV710)
FS.COM XXV710AM2-F2 #75603 -
(329 CHF) PCIe 3.0 x8 Quad-Port 10G SFP+ Ethernet Network Card (Intel XL710-BM1)
FS.COM FTXL710BM1-F4 #75602
Both cards work out of the box with the i40e Linux kernel
driver, no
firmware blobs required.
For a good overview over the different available Intel cards, check out the second page (“Product View”) in the card’s User Manual.
CPU and Chipset
I read on many different sites that AMD’s current CPUs beat Intel’s CPUs in terms of performance per watt. We can better achieve goals 2 and 3 (low noise and low power usage) by using fewer watts, so we’ll pick an AMD CPU and mainboard for this build.
AMD’s current CPU generation is Zen 3, and current Zen 3 based CPUs can be divided into 65W TDP (Thermal Design Power) and 105W TDP models. Only one 65W model is available to customers right now: the Ryzen 5 5600X.
Mainboards are built for/with a certain so-called chipset. Zen 3 CPUs use the AM4 socket, for which 8 different chipsets exist. Our network cards need PCIe 3.0, so that disqualifies 5 chipsets right away: only the A520, B550 and X570 chipsets remain.

Mainboard: PCIe bandwidth
I originally tried using the ASUS PRIME X570-P mainboard, but I ran into two problems:
Too loud: X570 mainboards need an annoyingly loud chipset fan for their 15W TDP. Other chipsets such as the B550 don’t need a fan for their 5W TDP. With a loud chipset fan, goal 2 (low noise) cannot be achieved. Only the recently-released X570S variant comes without fans.
Not enough PCIe bandwidth/slots! This is how the ASUS tech specs describe the slots:
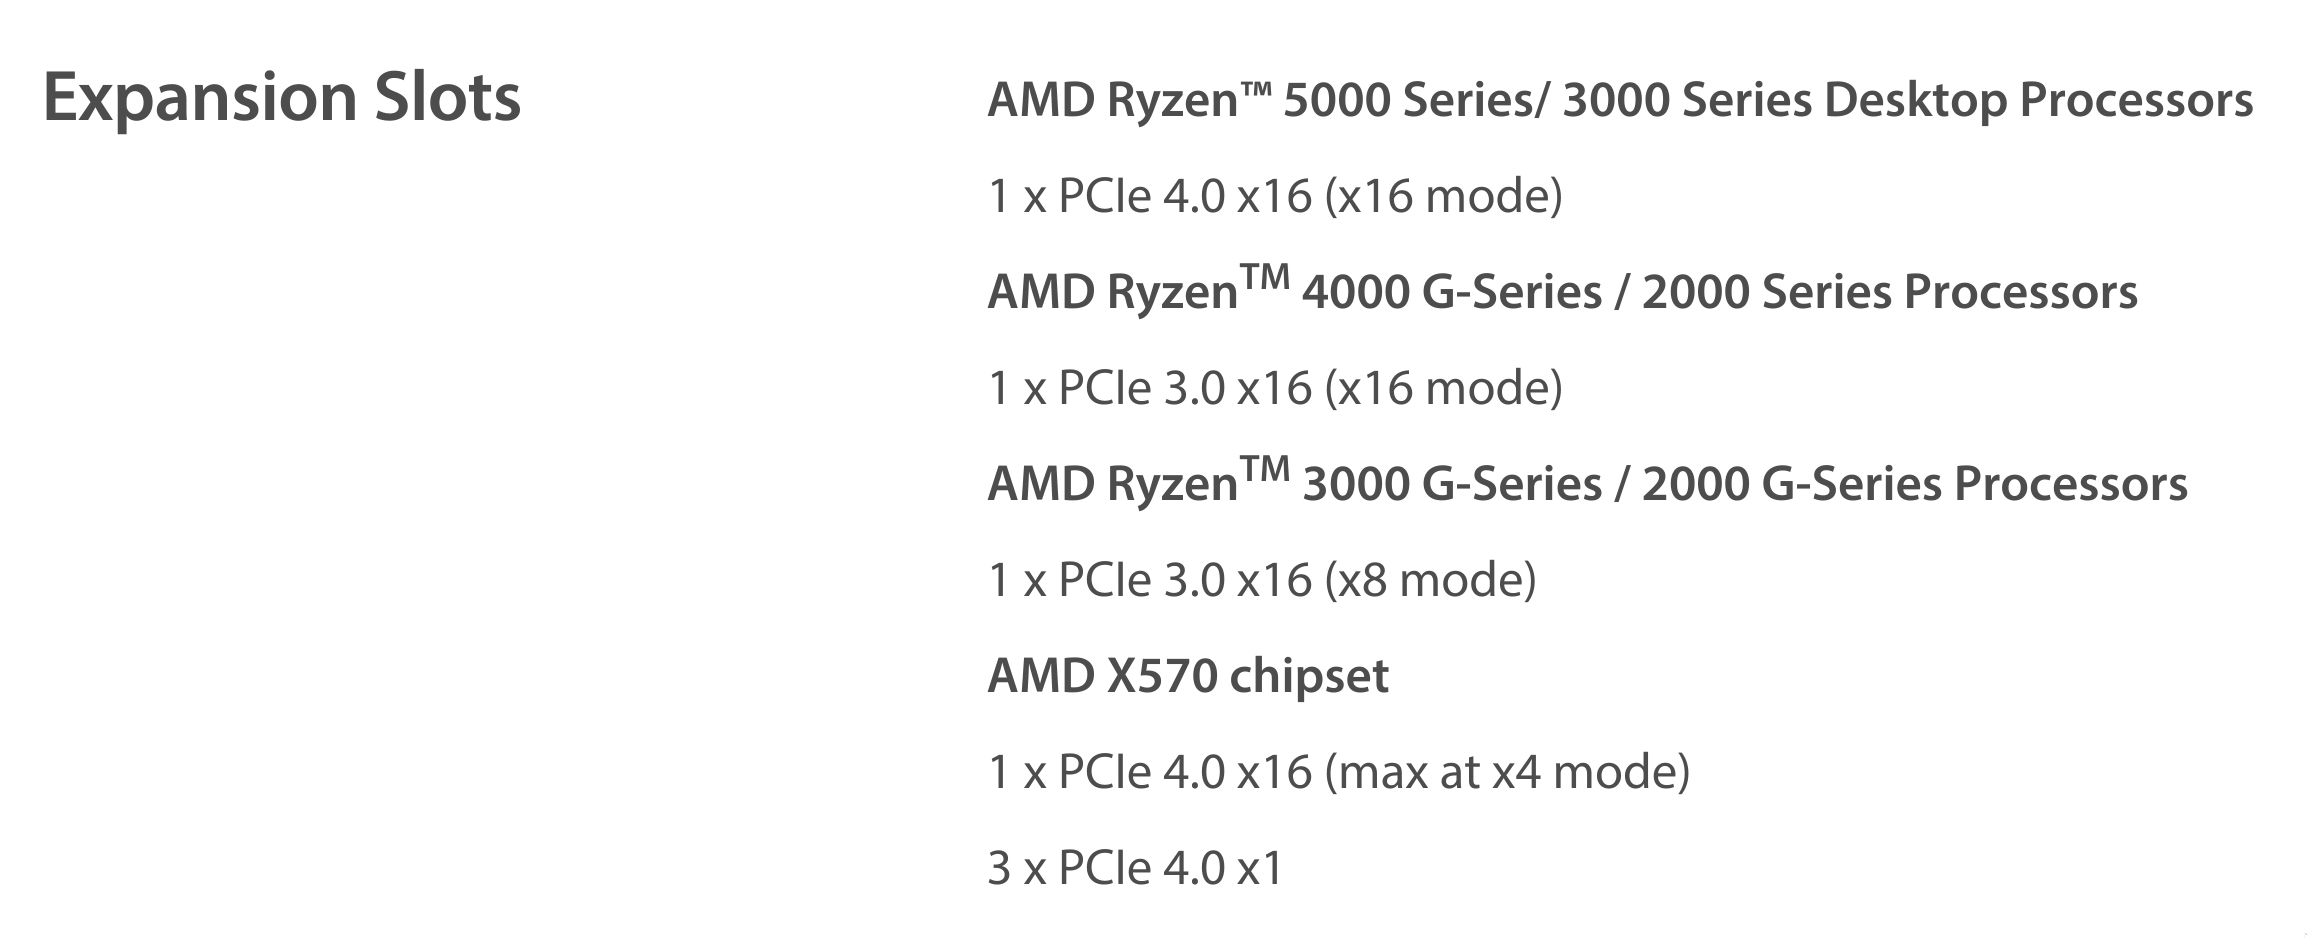
This means the board has 2 slots (1 CPU, 1 chipset) that are physically wide enough to hold a full-length x16 card, but only the first port can electronically be used as an x16 slot. The other port only has PCIe lanes electronically connected for x4, hence “x16 (max at x4 mode)”.
Unfortunately, our network cards need electrical connection of all their PCIe x8 lanes to run at full speed. Perhaps Intel/FS.COM will one day offer a new generation of network cards that use PCIe 4.0, because PCIe 4.0 x4 achieves the same 7.877 GB/s throughput as PCIe 3.0 x8. Until then, I needed to find a new mainboard.
Searching mainboards by PCIe capabilities is rather tedious, as mainboard block diagrams or PCIe tree diagrams are not consistently available from all mainboard vendors.
Instead, we can look explicitly for a feature called PCIe Bifurcation. In a nutshell, PCIe bifurcation lets us divide the PCIe bandwidth from the Ryzen CPU from 1 PCIe 4.0 x16 into 1 PCIe 4.0 x8 + 1 PCIe 4.0 x8, definitely satisfying our requirement for two x8 slots at full bandwidth.
I found a list of (only!) three B550 mainboards supporting PCIe Bifurcation in an Anandtech review. Two are made by Gigabyte, one by ASRock. I read the Gigabyte UEFI setup is rather odd, so I went with the ASRock B550 Taichi mainboard.
Case
For the case, I needed a midi case (large enough for the B550 mainboard’s ATX form factor) with plenty of options for large, low-spinning fans.
I stumbled upon the Corsair 4000D Airflow, which is available for 80 CHF and achieved positive reviews. I’m pleased with the 4000D: there are no sharp corners, installation is quick, easy and clean, and the front and top panels offer plenty of space for cooling behind large air intakes:
")
Inside, the case offers plenty of space and options for routing cables on the back side:
")
Which in turn makes for a clean front side:
")
Fans
I have been happy with Noctua fans for many years. In this build, I’m using only Noctua fans so that I can reach goal 2 (silent, no loud fan noise):

These fans are large (140mm), so they can spin on slow speeds and still be effective.
The specific fan configuration I ended up with:
- 1 Noctua NF-A14 PWM 140mm in the front, pulling air out of the case
- 1 Noctua NF-A14 PWM 140mm in the top, pulling air into the case
- 1 Noctua NF-A12x25 PWM 120mm in the back, pulling air into the case
- 1 Noctua NH-L12S CPU fan
Note that this is most likely overkill: I can well imagine that I could turn off one of these fans entirely without a noticeable effect on temperatures. But I wanted to be on the safe side and have a lot of cooling capacity, as I don’t know how hot the Intel network cards run in practice.
Fan Controller
The ASRock B550 Taichi comes with a Nuvoton NCT6683D-T fan controller.
Unfortunately, ASRock seems to have set the Customer ID register to 0 instead of
CUSTOMER_ID_ASROCK, so you need to load the nct6683 Linux driver with its
force option.
Once the module is loaded, lm-sensors lists accurate PWM fan speeds, but the
temperature values are mislabeled and don’t quite match the temperatures I see
in the UEFI H/W Monitor:
nct6683-isa-0a20
Adapter: ISA adapter
fan1:              471 RPM  (min =    0 RPM)
fan2:                0 RPM  (min =    0 RPM)
fan3:                0 RPM  (min =    0 RPM)
fan4:                0 RPM  (min =    0 RPM)
fan5:                0 RPM  (min =    0 RPM)
fan6:                0 RPM  (min =    0 RPM)
fan7:                0 RPM  (min =    0 RPM)
Thermistor 14:     +45.5 C  (low  =  +0.0 C)
                            (high =  +0.0 C, hyst =  +0.0 C)
                            (crit =  +0.0 C)  sensor = thermistor
AMD TSI Addr 98h:  +40.0 C  (low  =  +0.0 C)
                            (high =  +0.0 C, hyst =  +0.0 C)
                            (crit =  +0.0 C)  sensor = AMD AMDSI
intrusion0:       OK
beep_enable:      disabled
At least with the nct6683 Linux driver, there is no way to change the PWM fan
speed: the corresponding files in the hwmon interface are marked read-only.
At this point I accepted that I won’t be able to work with the fan controller from Linux, and tried just configuring static fan control settings in the UEFI setup.
But despite identical fan settings, one of my 140mm fans would end up turned off. I’m not sure why — is it an unclean PWM signal, or is there just a bug in the fan controller?
Controlling the fans to reliably spin at a low speed is vital to reach goal 2 (low noise), so I looked around for third-party fan controllers and found the Corsair Commander Pro, which a blog post explains is compatible with Linux.
Server Disk
This part of the build is not router-related, but I figured if I have a fast machine with a fast network connection, I could add a fast big disk to it and retire my other server PC.
Specifically, I chose the Samsung 970 EVO Plus M.2 SSD with 2 TB of capacity. This disk can deliver 3500 MB/s of sequential read throughput, which is more than the ≈3000 MB/s that a 25 Gbit/s link can handle.
Graphics Card
An important part of computer builds for me is making troubleshooting and maintenance as easy as possible. In my current tech landscape, that translates to connecting an HDMI monitor and a USB keyboard, for example to boot from a different device, to enter the UEFI setup, or to look at Linux console messages.
Unfortunately, the Ryzen 5 5600X does not have integrated graphics, so to get any graphics output, we need to install a graphics card. I chose the Zotac GeForce GT 710 Zone Edition, because it was the cheapest available card (60 CHF) that’s passively cooled.
An alternative to using a graphics card might be to use a PCIe IPMI card like the ASRock PAUL, however these seem to be harder to find, and more expensive.
Longer-term, I think the best option would be to use the Ryzen 5 5600G with integrated graphics, but that model only becomes available later this year.
Component List
I’m listing 2 different options here. Option A is what I built (router+server), but Option B is a lot cheaper if you only want a router. Both options use the same base components:
| Price | Type | Article |
|---|---|---|
| 347 CHF | Network card | FS.COM Intel XXV710, 2 × 25 Gbit/s (#75603) |
| 329 CHF | Network card | FS.COM Intel XL710, 4 × 10 Gbit/s (#75602) |
| 395 CHF | CPU | Ryzen 7 PRO 5750GE |
| 290 CHF | Mainboard | ASRock B550 Taichi |
| 92 CHF | Case | Corsair 4000D Airflow (Midi Tower) |
| 67 CHF | Fan control | Corsair Commander Pro |
| 65 CHF | Case fan | 2 × Noctua NF-A14 PWM (140mm) |
| 62 CHF | CPU fan | Noctua NH-L12S |
| 35 CHF | Case fan | 1 × Noctua NF-A12x25 PWM (120mm) |
| 60 CHF | GPU | Zotac GeForce GT 710 Zone Edition (1GB) |
Base total: 1671 CHF
Option A: Server extension. Because I had some parts lying around, and because I wanted to use my router for serving files (from large RAM cache/fast disk), I went with the following parts:
| Price | Type | Article |
|---|---|---|
| 309 CHF | Disk | Samsung 970 EVO Plus 2000GB, M.2 2280 |
| 439 CHF | RAM | 64GB HyperX Predator RAM (4x, 16GB, DDR4-3600, DIMM 288) |
| 127 CHF | Power supply | Corsair SF600 Platinum (600W) |
| 14 CHF | Power ext | Silverstone ATX 24-24Pin Extension (30cm) |
| 10 CHF | Power ext | Silverstone ATX Extension 8-8(4+4)Pin (30cm) |
The Corsair SF600 power supply is not server-related, I just had it lying around. I’d recommend going for the Corsair RM650x *2018* (which has longer cables) instead.
Server total: 2851 CHF
Option B: Non-server (router only) alternative. If you’re only interested in routing, you can opt for cheaper low-end disk and RAM, for example:
| Price | Type | Article |
|---|---|---|
| 112 CHF | Power supply | Corsair RM650x *2018* |
| 33 CHF | Disk | Kingston A400 120GB M.2 SSD |
| 29 CHF | RAM | Crucial CT4G4DFS8266 4GB DDR4-2666 RAM |
Non-server total: 1845 CHF
ASRock B550 Taichi Mainboard UEFI Setup
To enable PCIe Bifurcation for our two PCIe 3.0 x8 card setup:
- Set
Advanced > AMD PBS > PCIe/GFX Lanes Configuration
tox8x8.
To always turn on the PC after power is lost:
- Set
Advanced > Onboard Devices Configuration > Restore On AC Power Loss
toPower On.
To PXE boot (via UEFI) on the onboard ethernet port (management), but disable slow option roms for PXE boot on the FS.COM network cards:
- Set
Boot > Boot From Onboard LAN
toEnabled. - Set
Boot > CSM (Compatibility Support Module) > Launch PXE OpROM Policy
toUEFI only.
Fan Controller Setup
The Corsair Commander Pro fan controller is well-supported on Linux.
After enabling the Linux kernel option CONFIG_SENSORS_CORSAIR_CPRO, the device
shows up in the hwmon subsystem.
You can completely spin up (100% PWM) or turn off (0% PWM) a fan like so:
# echo 255 > /sys/class/hwmon/hwmon3/pwm1
# echo 0 > /sys/class/hwmon/hwmon3/pwm1
I run my fans at 13% PWM, which translates to about 226 rpm:
# echo 33 > /sys/class/hwmon/hwmon3/pwm1
# cat /sys/class/hwmon/hwmon3/fan1_input
226
Conveniently, the Corsair Commander Pro stores your settings even when power is lost. So you don’t even need to run a permanent fan control process, a one-off adjustment might be sufficient.
Power Usage
The PC consumes about 48W of power when idle (only management network connected) by default without further tuning. Each extra network link increases power usage by ≈1W:

Enabling all Ryzen-related options in my Linux kernel and switching to the powersave CPU frequency governor lowers power usage by ≈1W.
On some mainboards, you might need to force-enable Global C-States to save power. Not on the B550 Taichi, though.
I tried undervolting the CPU, but that didn’t even make ≈1W of difference in power usage. Potentially making my setup unreliable is not worth that little power saving to me.
I measured these values using a Homematic HM-ES-PMSw1-Pl-DN-R5 I had lying around.
Performance
Goal 1 is to saturate 25 Gbit/s, for example using two 10 Gbit/s downloads. I’m talking about large bulk transfers here, not many small transfers.
To get a feel for the performance/headroom of the router build, I ran 3 different tests.
Test A: 10 Gbit/s bridging throughput
For this test, I connected 2 PCs to the router’s XL710 network card and used iperf3(1)
to generate a 10 Gbit/s TCP stream between the
2 PCs. The router doesn’t need to modify the packets in this scenario, only
forward them, so this should be the lightest load scenario.

Test B: 10 Gbit/s NAT throughput
In this test, the 2 PCs were connected such that the router performs Network Address Translation (NAT), which is required for downloads from the internet via IPv4.
This scenario is slightly more involved, as the router needs to modify packets. But, as we can see below, a 10 Gbit/s NAT stream consumes barely more resources than 10 Gbit/s bridging:

Test C: 4 × 10 Gbit/s TCP streams
In this test, I wanted to max out the XL710 network card, so I connected 4 PCs
and started an iperf3(1)
benchmark between each PC
and the router itself, simultaneously.
This scenario consumes about 16% CPU, meaning we’ll most likely have plenty of headroom even when all ports are maxed out!

Tip: make sure to enable the CONFIG_IRQ_TIME_ACCOUNTING Linux kernel option to
include IRQ handlers in CPU usage
numbers for
accurate measurements.
Alternatives considered
The passively-cooled SuperServer E302-9D comes with 2 SFP+ ports (10 Gbit/s). It even comes with 2 PCIe 3.0 x8 capable slots. Unfortunately it seems impossible to currently buy this machine, at least in Switzerland.
You can find a few more suggestions in the replies of this Twitter thread. Most are either unavailable, require a lot more DIY work (e.g. a custom case), or don’t support 25 Gbit/s.
Router software: router7 porting
I wrote router7, my own small home internet router software in Go, back in 2018, and have been using it ever since.
I don’t have time to support any users, so I don’t recommend anyone else use router7, unless the project really excites you, and the lack of support doesn’t bother you! Instead, you might be better served with a more established and supported router software option. Popular options include OPNsense or OpenWrt. See also Wikipedia’s List of router and firewall distributions.
To make router7 work for this 25 Gbit/s router PC build, I had to make a few adjustments.
Because we are using UEFI network boot instead of BIOS network boot, I first had to make the PXE boot implementation in router7’s installer work with UEFI PXE boot.
I then enabled a few additional kernel options for network and storage drivers in router7’s kernel.
To router7’s control plane code, I added bridge network device configuration, which in my previous 2-port router setup was not needed.
During development, I compiled a few Linux programs statically or copied them
with their dependencies (→ gokrazy
prototyping) to run them on router7, such as
sensors(1)
, ethtool(8)
,
as well as iproute2’s ip(8)
and bridge(8)
implementation.
Next Steps
Based on my tests, the hardware I selected seems to deliver enough performance to use it for distributing a 25 Gbit/s upstream link across multiple 10 Gbit/s devices.
I won’t know for sure until the fiber7 Point Of Presence (POP, German Anschlusszentrale) close to my home is upgraded to support 25 Gbit/s “Fiber7-X2” connections. As I mentioned, unfortunately the upgrade plan is delayed due to the component shortage. I’ll keep you posted!
Other Builds
In case my build doesn’t exactly match your requirements, perhaps these others help inspire you:
Appendix A: DPDK test
Pim ran a DPDK based loadtester called T-Rex on this machine. Here’s his summary of the test:
For DPDK, this hardware does 4x10G at 64b frames. It does not do 6x10G as it tops out at 62Mpps using 4 cores (of 15.5Mpps per core).
I couldn’t test 25G symmetric [because we lacked a 25G DAC cable], but extrapolating from the numbers, 3 CPUs source and sink ~24.6Gbit per core, so we’d probably make it, leaving 1 core for OS and 2 cores for controlplane.
If the machine had a 12 core Ryzen, it would saturate all NICs with room to spare. So that’s what I’ll end up buying :)

Did you like this post? Subscribe to this blog’s RSS feed to not miss any new posts!
I run a blog since 2005, spreading knowledge and experience for over 20 years! :)
If you want to support my work, you can buy me a coffee.
Thank you for your support! ❤️