Table of contents
This post is the first article in a series of blog posts about the Nuki Opener on the SCS bus intercom, see the Series Overview.
I have long been looking for a way to make my intercom a little more pleasant.
Recently, a friend made me aware of the Nuki Opener, which promises to make existing intercom systems smart, and claims to be compatible with the specific intercom I have!
So I got one and tried setting it up, but could not get it to work.
This post documents how I have analyzed what goes over the intercom’s SCS bus. Perhaps the technique is interesting, or perhaps you want to learn more about SCS :)
Note that I have not yet used the Nuki Opener, so I can’t say anything about it yet. What I have seen so far makes a good impression, but it just does not seem to work at all with my intercom. I will update this article after working with the Nuki support to fix this.
Connecting the Nuki Opener to the bTicino 344212
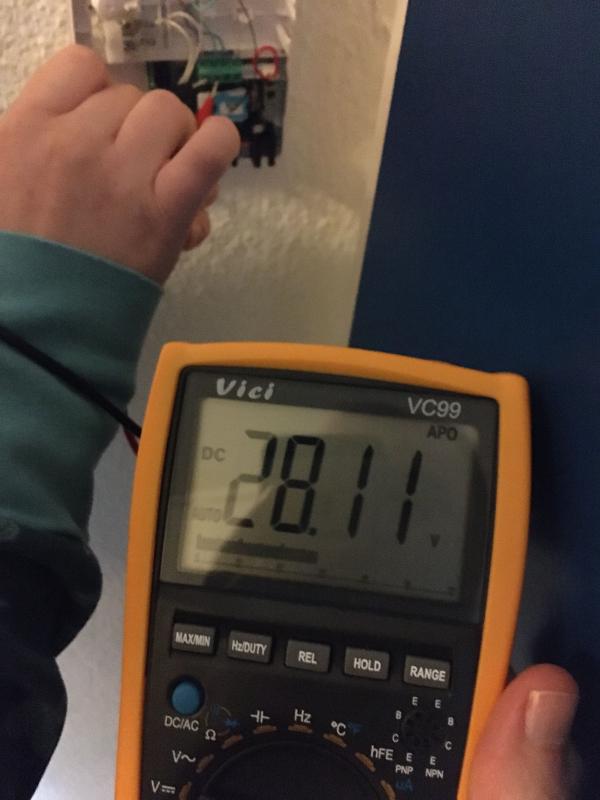
First, I identified which wires are used for the bus: between BUS- and BUS+, the internet tells me that I would expect to measure ≈27V, and indeed a multimeter shows:
I then connected the Nuki Opener as described in “Connect the Nuki Opener to an unknown intercom”, Page 8, Bus intercoms → Basic setup without doorbell suppression:
| Nuki wire | Intercom | Signal |
|---|---|---|
| black | BUS- | GND |
| red | BUS+ | SCS (+27V) |
| orange | BUS+ | SCS (+27V) |
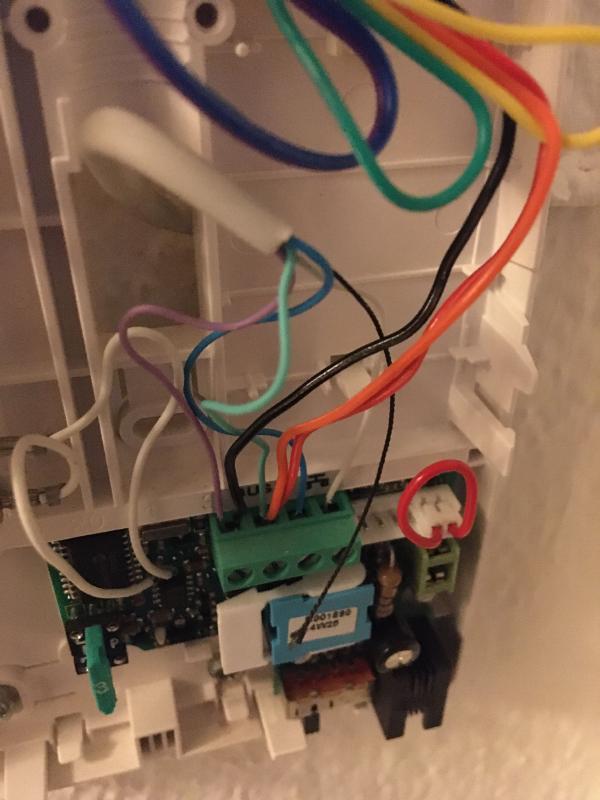
I had previously tried the enhanced setup with doorbell suppression, as the Nuki app recommends, but switched to the simplest setup possible when capturing the signal.
Configuring the Nuki Opener
With the Nuki app, I configured the Opener either as:
- bTicino → 344212
- Generic → Bus (SCS)
- Unknown intercom
Unfortunately, with all configurations:
- The app says it learned the door open signal successfully.
- The device/app does react to door rings.
- The device never successfully opens the door.
Capturing the SCS bus with sigrok
The logic analyzer that I have at home only works with signals under 5V. As the SCS bus is running at 27V, I’m capturing the signal with my Hantek 6022BE USB oscilloscope.
sigrok is a portable, cross-platform, free open source signal analysis software suite and supports the Hantek 6022BE out of the box, provided you have at least version 0.1.4 of the the sigrok fx2lafw package installed.
Check out sigrok’s “Getting started with a logic analyzer” if you’re new to sigrok!
The Nuki Opener has 3 different pin headers you can use, depending on where you want to attach it on your wall. These are connected straight through, so I used them to conveniently grab BUS+ and BUS- just like the Nuki sees it:
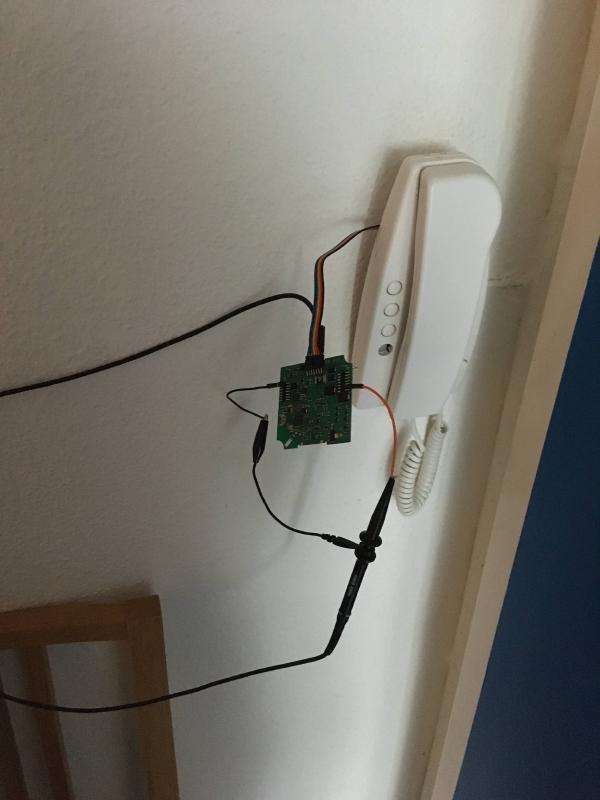
I set the oscilloscope probe head to its 10X divider setting, so that I had the full value range available, then started sampling 5M samples at 500 kHz:
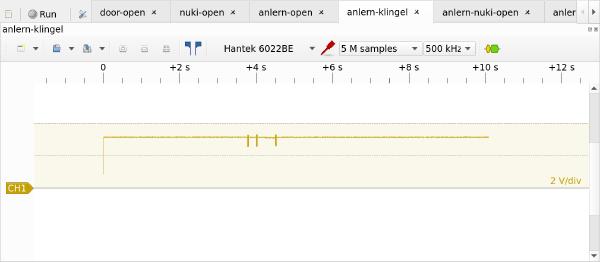
You can see 10s worth of signal. The three bursts are transmissions on the SCS bus.
The labeling didn’t quite match for me: it shows e.g. 3.2V instead of 27V, but as long as the signal comes in clearly, it doesn’t matter if it is offset or scaled.
SCS bus decoding with sigrok: voltage levels
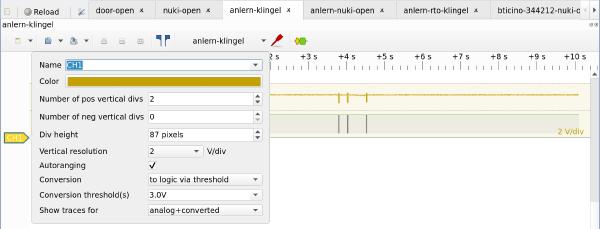
Let’s tell sigrok what voltage level corresponds to a low or high signal:
- left-click on channel
CH1 - set “conversion” to “to logic via threshold”
- set “conversion threshold” to 3.0V
Now you’ll see not only the captured signal, but also the logical signal below in green:
SCS bus decoding with sigrok: SCS decoder
Now that we have obtained a logical/digital signal (low/high), we can write a sigrok decoder for the SCS bus. See sigrok’s Protocol decoder HOWTO for an introduction.
In general, I strongly recommend investing into tooling, in particular when decoding protocols. Spending a few minutes to an hour at this stage will minimize mistakes and save lots of time later, and—when you contribute your tooling—enable others to do more interesting work!
I found it easy to write a sigrok decoder, having never used their API before. It was quick to get something onto the screen, mistakes were easy to correct, and the whole process was nicely iterative.
Until it is merged and released with a new version of libsigrokdecode, you can
find my SCS decoder on
GitHub.
The decoder looks at every layer of an SCS telegram: the start/stop bits, the data bits, the value and the value’s logical position/function in the SCS telegram.

Our SCS decoder displays the 3 bursts on the SCS bus when we ring the doorbell:


Only the middle burst sets a destination address of 0x3, the configured number
of my intercom system. I am not sure what the first and last burst indicate!
The SCS bus activity when opening the door seems more clear:


These 2 bursts are sent one second apart, and only differ in the request
parameter field: my guess is that 0xa4 means “start buzzing the door open” and
0xa0 means “stop buzzing the door open”.
I’m not sure why all these bursts repeat their SCS telegrams 3 times. My understanding was that SCS telegrams are repeated only when they are not acknowledged, and I indeed see no acknowledgement telegrams in my captures. Does that mean something is wrong with our intercom and it only works due to retransmissions?
SCS bus decoding with sigrok git: UART+SCS decoder
As Gerhard Sittig pointed out, in the git version of libsigrokdecode, one can use the existing UART decoder to decode SCS:
- Set
Baud rateto9600 - Set
Sample pointto20%
This seems a little more robust than my cobbled-together SCS decoder from above :)
In addition to the UART decoder, we can still use a custom SCS decoder to label individual bytes within an SCS telegram according to their function, and do CRC checks.
Captured SCS telegrams
You can find my most recent captures in 2020-09-27-rohdaten-klingel-rev2.zip:
2020-09-27-anlern-01-open-PUR-filtered.srzipis the door buzzer2020-09-27-anlern-02-klingel-PUR-filtered.srzipis the bell ringing
To extract the interesting parts from the sigrok files, I:
- Click the
Show Cursorsicon in PulseView’s toolbar. - Position the left and right cursor edges such that the signal of interest is selected.
- Click the drop-down next to the
Saveicon and selectSave Selected Range As.
Further reading
I used the following sources; please let me know of any others!
- https://it.wikipedia.org/wiki/Bus_SCS
- http://guidopic.altervista.org/alter/eibscsgt.html
- https://www.mikrocontroller.net/topic/493823
Next up
The second article in this series is Fixing the Nuki Opener smart intercom IOT device (on the BTicino SCS bus intercom system).
Did you like this post? Subscribe to this blog’s RSS feed to not miss any new posts!
I run a blog since 2005, spreading knowledge and experience for over 20 years! :)
If you want to support my work, you can buy me a coffee.
Thank you for your support! ❤️