Table of contents
I maintain two builds of the Linux kernel, a linux/arm64 build for gokrazy,
my Go appliance platform, which started out on the
Raspberry Pi, and then a linux/amd64 one for router7,
which runs on PCs.
The update process for both of these builds is entirely automated, meaning new Linux kernel releases are automatically tested and merged, but recently the continuous integration testing failed to automatically merge Linux 6․7 — this article is about tracking down the root cause of that failure.
Background info on the bootloader
gokrazy started out targeting only the Raspberry Pi, where you configure the bootloader with a plain text file on a FAT partition, so we did not need to include our own UEFI/MBR bootloader.
When I ported gokrazy to work on PCs in BIOS mode, I decided against complicated solutions like GRUB — I really wasn’t looking to maintain a GRUB package. Just keeping GRUB installations working on my machines is enough work. The fact that GRUB consists of many different files (modules) that can go out of sync really does not appeal to me.
Instead, I went with Sebastian Plotz’s Minimal Linux Bootloader because it fits entirely into the Master Boot Record (MBR) and does not require any files. In bootloader lingo, this is a stage1-only bootloader. You don’t even need a C compiler to compile its (Assembly) code. It seemed simple enough to integrate: just write the bootloader code into the first sector of the gokrazy disk image; done. The bootloader had its last release in 2012, so no need for updates or maintenance.
You can’t really implement booting a kernel and parsing text configuration
files in 446
bytes of 16-bit
8086 assembly instructions, so to tell the bootloader where on disk to load the
kernel code and kernel command line from, gokrazy writes the disk offset
(LBA) of vmlinuz and
cmdline.txt to the last bytes of the bootloader code. Because gokrazy
generates the FAT partition, we know there is never any fragmentation, so the
bootloader does not need to understand the FAT file system.
Symptom
The symptom was that the rtr7/kernel pull request
#434 for updating to Linux 6.7 failed.
My continuous integration tests run in two environments: a physical embedded PC from PC Engines (apu2c4) in my living room, and a virtual QEMU PC. Only the QEMU test failed.
On the physical PC Engines apu2c4, the pull request actually passed the boot test. It would be wrong to draw conclusions like “the issue only affects QEMU” from this, though, as later attempts to power on the apu2c4 showed the device boot-looping. I made a mental note that something is different about how the problem affects the two environments, but both are affected, and decided to address the failure in QEMU first, then think about the PC Engines failure some more.
In QEMU, the output I see is:
SeaBIOS (version Arch Linux 1.16.3-1-1)

iPXE (http://ipxe.org) 00:03.0 C900 PCI2.10 PnP PMM+06FD3360+06F33360 C900

Booting from Hard Disk...
Notably, the kernel doesn’t even seem to start — no “Decompressing linux” message is printed, the boot just hangs. I tried enabling debug output in SeaBIOS and eventually succeeded, but only with an older QEMU version:
Booting from Hard Disk...
Booting from 0000:7c00
In resume (status=0)
In 32bit resume
Attempting a hard reboot
This doesn’t tell me anything unfortunately.
Okay, so something about introducing Linux 6.7 into my setup breaks MBR boot.
I figured using Git Bisection should identify the problematic change within a few iterations, so I cloned the currently working Linux 6.6 source code, applied the router7 config and compiled it.
To my surprise, even my self-built Linux 6.6 kernel would not boot! 😲
Why does the router7 build work when built inside the Docker container, but not when built on my Linux installation? I decided to rebase the Docker container from Debian 10 (buster, from 2019) to Debian 12 (bookworm, from 2023) and that resulted in a non-booting kernel, too!
We have two triggers: building Linux 6.7 or building older Linux, but in newer environments.
Meta: Following Along
(Contains spoilers) Instructions for following along
First, check out the rtr7/kernel repository and undo the mitigation:
% mkdir -p go/src/github.com/rtr7/
% cd go/src/github.com/rtr7/
% git clone --depth=1 https://github.com/rtr7/kernel
% cd kernel
% sed -i 's,CONFIG_KERNEL_ZSTD,#CONFIG_KERNEL_ZSTD,g' cmd/rtr7-build-kernel/config.addendum.txt
% go run ./cmd/rtr7-rebuild-kernel
# takes a few minutes to compile Linux
% ls -l vmlinuz
-rw-r--r-- 1 michael michael 15885312 2024-01-28 16:18 vmlinuz
Now, you can either create a new gokrazy instance, replace the kernel and
configure the gokrazy instance to use rtr7/kernel:
% gok -i mbr new
% gok -i mbr add .
% gok -i mbr edit
# Adjust to contain:
    "KernelPackage": "github.com/rtr7/kernel",
    "FirmwarePackage": "github.com/rtr7/kernel",
    "EEPROMPackage": "",
…or you skip these steps and extract my already prepared
config to ~/gokrazy/mbr.
Then, build the gokrazy disk image and start it with QEMU:
% GOARCH=amd64 gok -i mbr overwrite \
  --full /tmp/gokr-boot.img \
  --target_storage_bytes=1258299392
% qemu-system-i386 \
  -nographic \
  -drive file=/tmp/gokr-boot.img,format=raw
Up/Downgrade Versions
Unlike application programs, the Linux kernel doesn’t depend on shared libraries at runtime, so the dependency footprint is a little smaller than usual. The most significant dependencies are the components of the build environment, like the C compiler or the linker.
So let’s look at the software versions of the known-working (Debian 10) environment and the smallest change we can make to that (upgrading to Debian 11):
- Debian 10 (buster) contains gcc-8 (8.3.0-6) and binutils 2.31.1-16.
- Debian 11 (bullseye) contains gcc-10 (10.2.1-6) and binutils 2.35.2-2.
To figure out if the problem is triggered by GCC, binutils, or something else entirely, I checked:
Debian 10 (buster) with its gcc-8, but with binutils 2.35 from bullseye
still works. (Checked by updating /etc/apt/sources.list, then upgrading only
the binutils package.)
Debian 10 (buster), but with gcc-10 and binutils 2.35 results in a
non-booting kernel.
So it seems like upgrading from GCC 8 to GCC 10 triggers the issue.
Instead of working with a Docker container and Debian’s packages, you could also
use Nix. The instructions
aren’t easy, but I used
nix-shell
to quickly try out GCC 8 (works), GCC 9 (works) and GCC 10 (kernel doesn’t boot)
on my machine.
New Hypothesis
To recap, we have two triggers: building Linux 6.7 or building older Linux, but with GCC 10.
Two theories seemed most plausible to me at this point: Either a change in GCC 10 (possibly enabled by another change in Linux 6.7) is the problem, or the size of the kernel is the problem.
To verify the file size hypothesis, I padded a known-working vmlinuz file to
the size of a known-broken vmlinuz:
% ls -l vmlinuz
% dd if=/dev/zero bs=108352 count=1 >> vmlinuz
But, even though it had the same file size as the known-broken kernel, the padded kernel booted!
So I ruled out kernel size as a problem and started researching significant changes in GCC 10.
I read that GCC 10 changed behavior with regards to stack protection.
Indeed, building the kernel with Debian 11 (bullseye), but with
CONFIG_STACKPROTECTOR=n makes it boot. So, I suspected that our bootloader
does not set up the stack correctly, or similar.
I sent an email to Sebastian Plotz, the author of the Minimal Linux Bootloader, to ask if he knew about any issues with his bootloader, or if stack protection seems like a likely issue with his bootloader to him.
To my surprise (it has been over 10 years since he published the bootloader!) he actually replied: He hadn’t received any problem reports regarding his bootloader, but didn’t really understand how stack protection would be related.
Debugging with QEMU
At this point, we have isolated at least one trigger for the problem, and exhausted the easy techniques of upgrading/downgrading surrounding software versions and asking upstream.
It’s time for a Tooling Level Up! Without a debugger you can only poke into the dark, which takes time and doesn’t result in thorough explanations. Particularly in this case, I think it is very likely that any source modifications could have introduced subtle issues. So let’s reach for a debugger!
Luckily, QEMU comes with built-in support for the GDB debugger. Just add the -s -S flags to your QEMU command to make QEMU stop execution (-s) and set up a
GDB stub (-S) listening on localhost:1234.
If you wanted to debug the Linux kernel, you could connect GDB to QEMU right away, but for debugging a boot loader we need an extra step, because the boot loader runs in Real Mode, but QEMU’s GDB integration rightfully defaults to the more modern Protected Mode.
When GDB is not configured correctly, it decodes addresses and registers with the wrong size, which throws off the entire disassembly — compare GDB’s output with our assembly source:
(gdb) b *0x7c00
(gdb) c
(gdb) x/20i $pc                         ; [expected (bootloader.asm)]
=> 0x7c00: cli                          ; => 0x7c00: cli
   0x7c01: xor    %eax,%eax             ;    0x7c01: xor %ax,%ax
   0x7c03: mov    %eax,%ds              ;    0x7c03: mov %ax,%ds
   0x7c05: mov    %eax,%ss              ;    0x7c05: mov %ax,%ss
   0x7c07: mov    $0xb87c00,%esp        ;    0x7c07: mov $0x7c00,%sp
   0x7c0c: adc    %cl,-0x47990440(%esi) ;    0x7c0a: mov $0x1000,%ax
   0x7c12: add    %eax,(%eax)           ;    0x7c0d: mov %ax,%es
   0x7c14: add    %al,(%eax)            ;    0x7c0f: sti
   0x7c16: xor    %ebx,%ebx
So we need to ensure we use qemu-system-i386 (qemu-system-x86_64 prints
Remote 'g' packet reply is too long) and configure the GDB target
architecture to 16-bit
8086:
(gdb) set architecture i8086
(gdb) target remote localhost:1234
Unfortunately, the above doesn’t actually work in QEMU 2.9 and newer: https://gitlab.com/qemu-project/qemu/-/issues/141.
On the web, people are working around this bug by using a modified target.xml
file. I
tried this, but must have made a mistake — I thought modifying target.xml
didn’t help, but when I wrote this article, I found that it does actually seem
to work. Maybe I didn’t use qemu-system-i386 but the x86_64 variant or
something like that.
Using an older QEMU
It is typically an exercise in frustration to get older software to compile in newer environments.
It’s much easier to use an older environment to run old software.
By querying packages.debian.org, we can see the QEMU versions included in
current and previous Debian
versions.
Unfortunately, the oldest listed version (QEMU 3.1 in Debian 10 (buster)) isn’t
old enough. By querying snapshot.debian.org, we can see that Debian 9
(stretch) contained QEMU
2.8.
So let’s run Debian 9 — the easiest way I know is to use Docker:
% docker run --net=host -v /tmp:/tmp -ti debian:stretch
Unfortunately, the debian:stretch Docker container does not work out of the
box anymore, because its /etc/apt/sources.list points to the deb.debian.org
CDN, which only serves current versions and no longer serves stretch.
So we need to update the sources.list file to point to
archive.debian.org. To correctly install QEMU you need both entries, the
debian line and the debian-security line, because the Docker container has
packages from debian-security installed and gets confused when these are
missing from the package list:
root@650a2157f663:/# cat > /etc/apt/sources.list <<'EOT'
deb http://archive.debian.org/debian/ stretch contrib main non-free
deb http://archive.debian.org/debian-security/ stretch/updates main
EOT
root@650a2157f663:/# apt update
Now we can just install QEMU as usual and start it to debug our boot process:
root@650a2157f663:/# apt install qemu-system-x86
root@650a2157f663:/# qemu-system-i386 \
  -nographic \
  -drive file=/tmp/gokr-boot.img,format=raw \
  -s -S
Now let’s start GDB and set a breakpoint on address 0x7c00, which is the
address to which the BIOS loades the MBR
code and starts execution:
% gdb
(gdb) set architecture i8086
The target architecture is set to "i8086".
(gdb) target remote localhost:1234
Remote debugging using localhost:1234
0x0000fff0 in ?? ()
(gdb) break *0x7c00
Breakpoint 1 at 0x7c00
(gdb) continue
Continuing.

Breakpoint 1, 0x00007c00 in ?? ()
(gdb)
Debug symbols
Okay, so we have GDB attached to QEMU and can step through assembly instructions. Let’s start debugging!?
Not so fast. There is another Tooling Level Up we need first: debug symbols. Yes, even for a Minimal Linux Bootloader, which doesn’t use any libraries or local variables. Having proper names for functions, as well as line numbers, will be hugely helpful in just a second.
Before debug symbols, I would directly build the bootloader using nasm bootloader.asm, but to end up with a symbol file for GDB, we need to instruct
nasm to generate an ELF file with debug symbols, then use ld to link it and
finally use objcopy to copy the code out of the ELF file again.
After commit
d29c615
in gokrazy/internal/mbr, I have bootloader.elf.
Back in GDB, we can load the symbols using the symbol-file command:
(gdb) set architecture i8086
The target architecture is set to "i8086".
(gdb) target remote localhost:1234
Remote debugging using localhost:1234
0x0000fff0 in ?? ()
(gdb) symbol-file bootloader.elf
Reading symbols from bootloader.elf...
(gdb) break *0x7c00
Breakpoint 1 at 0x7c00: file bootloader.asm, line 48.
(gdb) continue
Continuing.

Breakpoint 1, ?? () at bootloader.asm:48
48		cli
(gdb)
Automation with .gdbinit
At this point, we need 4 commands each time we start GDB. We can automate these
by writing them to a .gdbinit file:
% cat > .gdbinit <<'EOT'
set architecture i8086
target remote localhost:1234
symbol-file bootloader.elf
break *0x7c00
EOT

% gdb
The target architecture is set to "i8086".
0x0000fff0 in ?? ()
Breakpoint 1 at 0x7c00: file bootloader.asm, line 48.
(gdb)
Understanding program flow
The easiest way to understand program flow seems to be to step through the program.
But Minimal Linux Bootloader (MLB) contains loops that run through thousands of
iterations. You can’t use gdb’s stepi command with that.
Because MLB only contains a few functions, I eventually realized that placing a breakpoint on each function would be the quickest way to understand the high-level program flow:
(gdb) b read_kernel_setup
Breakpoint 2 at 0x7c38: file bootloader.asm, line 75.
(gdb) b check_version
Breakpoint 3 at 0x7c56: file bootloader.asm, line 88.
(gdb) b read_protected_mode_kernel
Breakpoint 4 at 0x7c8f: file bootloader.asm, line 105.
(gdb) b read_protected_mode_kernel_2
Breakpoint 5 at 0x7cd6: file bootloader.asm, line 126.
(gdb) b run_kernel
Breakpoint 6 at 0x7cff: file bootloader.asm, line 142.
(gdb) b error
Breakpoint 7 at 0x7d51: file bootloader.asm, line 190.
(gdb) b reboot
Breakpoint 8 at 0x7d62: file bootloader.asm, line 204.
With the working kernel, we get the following transcript:
(gdb)
Continuing.

Breakpoint 2, read_kernel_setup () at bootloader.asm:75
75		xor	eax, eax
(gdb)
Continuing.

Breakpoint 3, check_version () at bootloader.asm:88
88		cmp	word [es:0x206], 0x204		; we need protocol version >= 2.04
(gdb)
Continuing.

Breakpoint 4, read_protected_mode_kernel () at bootloader.asm:105
105		mov	edx, [es:0x1f4]			; edx stores the number of bytes to load
(gdb)
Continuing.

Breakpoint 5, read_protected_mode_kernel_2 () at bootloader.asm:126
126		mov	eax, edx
(gdb)
Continuing.

Breakpoint 6, run_kernel () at bootloader.asm:142
142		cli
(gdb)
With the non-booting kernel, we get:
(gdb) c
Continuing.

Breakpoint 1, ?? () at bootloader.asm:48
48		cli
(gdb)
Continuing.

Breakpoint 2, read_kernel_setup () at bootloader.asm:75
75		xor	eax, eax
(gdb)
Continuing.

Breakpoint 3, check_version () at bootloader.asm:88
88		cmp	word [es:0x206], 0x204		; we need protocol version >= 2.04
(gdb)
Continuing.

Breakpoint 4, read_protected_mode_kernel () at bootloader.asm:105
105		mov	edx, [es:0x1f4]			; edx stores the number of bytes to load
(gdb)
Continuing.

Breakpoint 1, ?? () at bootloader.asm:48
48		cli
(gdb)
Okay! Now we see that the bootloader starts loading the kernel from disk into
RAM, but doesn’t actually get far enough to call run_kernel, meaning the
problem isn’t with stack protection, with loading a working command line or with
anything inside the Linux kernel.
This lets us rule out a large part of the problem space. We now know that we can focus entirely on the bootloader and why it cannot load the Linux kernel into memory.
Let’s take a closer look…
Wait, this isn’t GDB!
In the example above, using breakpoints was sufficient to narrow down the problem.
You might think we used GDB, and it looked like this:

But that’s not GDB! It’s an easy mistake to make. After all, GDB starts up with just a text prompt, and as you can see from the example above, we can just enter text and achieve a good result.
To see the real GDB, you need to start it up fully, meaning including its user interface.
You can either use GDB’s text user interface (TUI), or a graphical user interface for gdb, such as the one available in Emacs.
The GDB text-mode user interface (TUI)
You’re already familiar with the architecture, target and breakpoint
commands from above. To also set up the text-mode user interface, we run a few
layout commands:
(gdb) set architecture i8086
(gdb) target remote localhost:1234
(gdb) symbol-file bootloader.elf
(gdb) layout split
(gdb) layout src
(gdb) layout regs
(gdb) break *0x7c00
(gdb) continue
The layout split command loads the text-mode user interface and splits the
screen into a register window, disassembly window and command window.
With layout src we disregard the disassembly window in favor of a source
listing window. Both are in assembly language in our case, but the source
listing contains comments as well.
The layout src command also got rid of the register window, which we’ll get
back using layout regs. I’m not sure if there’s an easier way.
The result looks like this:
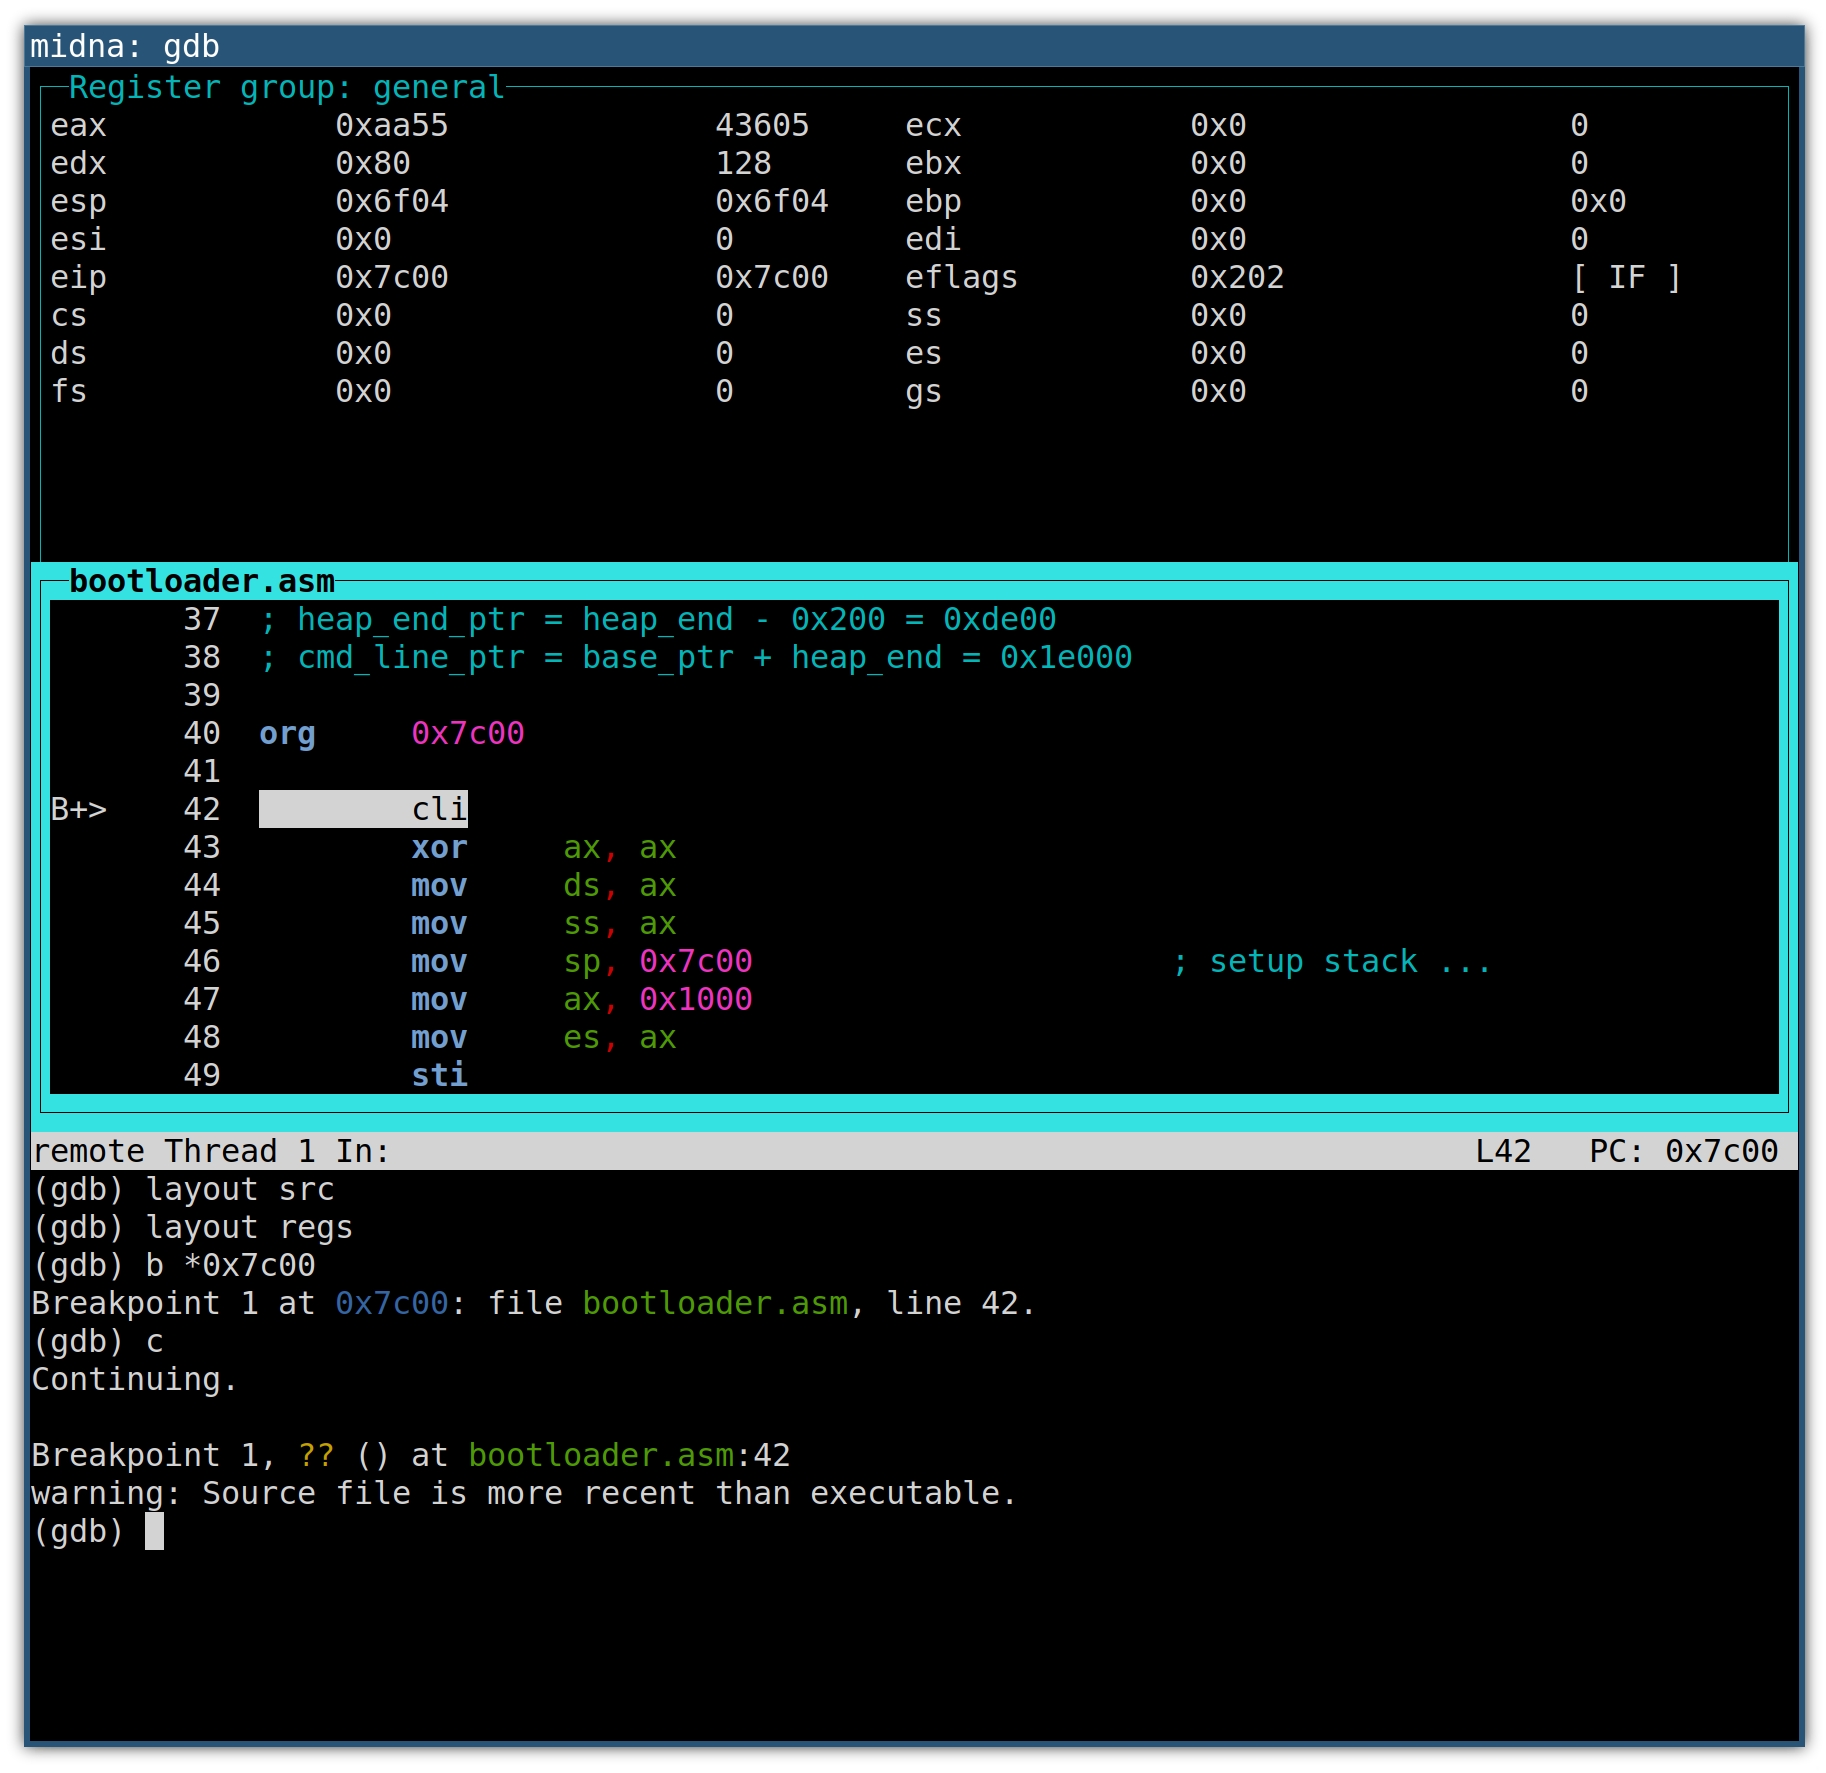
The source window will highlight the next line of code that will be executed. On
the left, the B+ marker indicates an enabled breakpoint, which will become
helpful with multiple breakpoints. Whenever a register value changes, the
register and its new value will be highlighted.
The up and down arrow keys scroll the source window.
Use C-x o to switch between the windows.
If you’re familiar with Emacs, you’ll recognize the keyboard shortcut. But as an Emacs user, you might prefer the GDB Emacs user interface:
The GDB Emacs user interface (M-x gdb)
This is M-x gdb with gdb-many-windows
enabled:

Debugging the failing loop
Let’s take a look at the loop that we know the bootloader is entering, but not
leaving (neither read_protected_mode_kernel_2 nor run_kernel are ever called):
read_protected_mode_kernel:
    mov  edx, [es:0x1f4]              ; edx stores the number of bytes to load
    shl  edx, 4

.loop:
    cmp  edx, 0
    je   run_kernel

    cmp  edx, 0xfe00                  ; less than 127*512 bytes remaining?
    jb   read_protected_mode_kernel_2

    mov  eax, 0x7f                    ; load 127 sectors (maximum)
    xor  bx, bx                       ; no offset
    mov  cx, 0x2000                   ; load temporary to 0x20000
    mov  esi, current_lba
    call read_from_hdd

    mov  cx, 0x7f00                   ; move 65024 bytes (127*512 byte)
    call do_move

    sub  edx, 0xfe00                  ; update the number of bytes to load
    add  word [gdt.dest], 0xfe00
    adc  byte [gdt.dest+2], 0
    jmp  short read_protected_mode_kernel.loop
The comments explain that the code loads chunks of FE00h == 65024 (127*512) bytes at a time.
Loading means calling read_from_hdd, then do_move. Let’s take a look at do_move:
do_move:
    push edx
    push es
    xor  ax, ax
    mov  es, ax
    mov  ah, 0x87
    mov  si, gdt
    int  0x15     ; line 182
    jc   error
    pop  es
    pop  edx
    ret
int 0x15 is a call to the BIOS Service Interrupt, which will dispatch the call
based on AH == 87H to the Move Memory Block
(techhelpmanual.com)
function.
This function moves the specified amount of memory (65024 bytes in our case) from source/destination addresses specified in a Global Descriptor Table (GDT) record.
We can use GDB to show the addresses of each of do_move’s memory move calls by
telling it to stop at line 182 (the int 0x15 instruction) and print the GDT
record’s destination descriptor:
(gdb) break 182
Breakpoint 2 at 0x7d49: file bootloader.asm, line 176.

(gdb) command 2
Type commands for breakpoint(s) 2, one per line.
End with a line saying just "end".
>x/8bx gdt+24
>end

(gdb) continue
Continuing.

Breakpoint 1, ?? () at bootloader.asm:48
42		cli

(gdb)
Continuing.

Breakpoint 2, do_move () at bootloader.asm:182
182		int	0x15
0x7d85:	0xff	0xff	0x00	0x00	0x10	0x93	0x00	0x00

(gdb)
Continuing.

Breakpoint 2, do_move () at bootloader.asm:182
182		int	0x15
0x7d85:	0xff	0xff	0x00	0xfe	0x10	0x93	0x00	0x00

(gdb)
The destination address is stored in byte 2..4. Remember to read these little
endian entries “back to front”.
-
Address #1 is
0x100000. -
Address #2 is
0x10fe00.
If we press Return long enough, we eventually end up here:
Breakpoint 2, do_move () at bootloader.asm:182
182		int	0x15
0x7d85:	0xff	0xff	0x00	0x1e	0xff	0x93	0x00	0x00
(gdb)
Continuing.

Breakpoint 2, do_move () at bootloader.asm:182
182		int	0x15
0x7d85:	0xff	0xff	0x00	0x1c	0x00	0x93	0x00	0x00

(gdb)
Continuing.

Breakpoint 1, ?? () at bootloader.asm:48
42		cli
(gdb)

Program received signal SIGTRAP, Trace/breakpoint trap.
0x000079b0 in ?? ()
(gdb)
Now that execution left the bootloader, let’s take a look at the last do_move
call parameters: We notice that the destination address overflowed its 24 byte
data type:
- Address #y is
0xff1e00 - Address #z is
0x001c00
Root cause
At this point I reached out to Sebastian again to ask him if there was an (undocumented) fundamental architectural limit to his Minimal Linux Bootloader — with 24 bit addresses, you can address at most 16 MB of memory.
He replied explaining that he didn’t know of this limit either! He then linked to Move Memory Block (techhelpmanual.com) as proof for the 24 bit limit.
Speculation
So, is it impossible to load larger kernels into memory from Real Mode? I’m not sure.
The current bootloader code prepares a GDT in which addresses are 24 bits long at most. But note that the techhelpmanual.com documentation that Sebastian referenced is apparently for the Intel 286 (a 16 bit CPU), and some of the GDT bytes are declared reserved.
Today’s CPUs are Intel 386-compatible (a
32 bit CPU), which seems to use one of the formerly reserved bytes to represent
bit 24..31 of the address, meaning we might be able to pass 32 bit addresses
to BIOS functions in a GDT after all!
I wasn’t able to find clear authoritative documentation on the Move Memory Block API on 386+, or whether BIOS functions in general are just expected to work with 32 bit addresses.
But Microsoft’s 1989 HIMEM.SYS source contains a struct that documents this 32-bit descriptor usage. A more modern reference is this Operating Systems Class from FAU 2023 (page 71/72).
Hence I’m thinking that most BIOS implementations should actually support 32 bit addresses for their Move Memory Block implementation — provided you fill the descriptor accordingly.
If that doesn’t work out, there’s also “Unreal Mode”, which allows using up to 4 GB in Real Mode, but is a change that is a lot more complicated. See also Julio Merino’s “Beyond the 1 MB barrier in DOS” post to get an idea of the amount of code needed.
Update: a fix!
Lobsters reader abbeyj pointed out that the following code change should fix the truncation and result in a GDT with all address bits in the right place:
--- i/mbr/bootloader.asm
+++ w/mbr/bootloader.asm
@@ -119,6 +119,7 @@ read_protected_mode_kernel:
 	sub	edx, 0xfe00			; update the number of bytes to load
 	add	word [gdt.dest], 0xfe00
 	adc	byte [gdt.dest+2], 0
+	adc	byte [gdt.dest+5], 0
 	jmp	short read_protected_mode_kernel.loop

 read_protected_mode_kernel_2:
…and indeed, in my first test this seems to fix the problem! It’ll take me a little while to clean this up and submit it. You can follow gokrazy issue #248 if you’re interested.
Bonus: reading BIOS source
There are actually a couple of BIOS implementations that we can look into to get a better understanding of how Move Memory Block works.
We can look at DOSBox, an open source DOS emulator. Its Move Memory Block implementation does seem to support 32 bit addresses:
PhysPt dest	= (mem_readd(data+0x1A) & 0x00FFFFFF) +
              (mem_readb(data+0x1E)<<24);
Another implementation is SeaBIOS. Contrary to DOSBox, SeaBIOS is not just used in emulation: The PC Engines apu uses coreboot with SeaBIOS. QEMU also uses SeaBIOS.
The SeaBIOS handle_1587 source
code
is a little harder to follow, because it requires knowledge of Real Mode
assembly. The way I read it, SeaBIOS doesn’t truncate or otherwise modify the
descriptors and just passes them to the CPU. On 386 or newer, 32 bit addresses
should work.
Mitigation
While it’s great to understand the limitation we’re running into, I wanted to unblock the pull request as quickly as possible, so I needed a quick mitigation instead of investigating if my speculation can be developed into a proper fix.
When I started router7, we didn’t support loadable kernel modules, so everything had to be compiled into the kernel. We now do support loadable kernel modules, so I could have moved functionality into modules.
Instead, I found an even easier quick fix: switching from gzip to zstd compression. This saved about 1.8 MB and will buy us some time to implement a proper fix while unblocking automated new Linux kernel version merges.
Conclusion
I wanted to share this debugging story because it shows a couple of interesting lessons:
-
Being able to run older versions of various parts of your software stack is a very valuable debugging tool. It helped us isolate a trigger for the bug (using an older GCC) and it helped us set up a debugging environment (using an older QEMU).
-
Setting up a debugger can be annoying (symbol files, learning the UI) but it’s so worth it.
-
Be on the lookout for wrong turns during debugging. Write down every conclusion and challenge it.
-
The BIOS can seem mysterious and “too low level” but there are many blog posts, lectures and tutorials. You can also just read open-source BIOS code to understand it much better.
Enjoy poking at your BIOS!
Appendix: Resources
I found the following resources helpful:
- linux-insides: From bootloader to kernel
- The MS-DOS Encyclopedia
- Ben Eater: A simple BIOS for my breadboard computer (22 minutes)
Did you like this post? Subscribe to this blog’s RSS feed to not miss any new posts!
I run a blog since 2005, spreading knowledge and experience for over 20 years! :)
All of my content is human-authored. I do use LLMs for research and knowledge work, and even to review my posts, but all writing is my own, every word is my own voice.