Michael Stapelbergs Website: posts tagged fiberhttps://michael.stapelberg.ch/posts/tags/fiber/Hugo -- gohugo.io<![CDATA[25 Gbit/s HTTP and HTTPS download speeds]]>https://michael.stapelberg.ch/posts/2022-05-14-http-and-https-download-25gbit/2022-05-14T16:18:00+02:00Now that I recently upgraded my internet connection to 25
Gbit/s, I was curious how hard or
easy it is to download files via HTTP and HTTPS over a 25 Gbit/s link. I don’t
have another 25 Gbit/s connected machine other than my router, so I decided to
build a little lab for tests like these 🧑🔬
Hardware and Software setup
I found a Mellanox ConnectX-4 Lx for the comparatively low price of 204 CHF on
digitec:
To connect it to my router, I ordered a MikroTik XS+DA0003 SFP28/SFP+ Direct
Attach Cable (DAC) with it. I installed the network card into my old workstation
(on the right) and connected it with the 25 Gbit/s DAC to router7 (on the left):
Before taking any measurements, I do one full download so that the file contents
are entirely in the Linux page cache, and the measurements therefore no longer
contain the speed of the disk.
big.img in the tests below refers to the 35 GB test file I’m downloading,
which consists of distri-disk.img repeated 5 times.
T1: HTTP download speed (unencrypted)
T1.1: Single TCP connection
The simplest test is using just a single TCP connection, for example:
In terms of download speeds, there is no difference with or without KTLS. But,
enabling KTLS noticeably reduces CPU usage, from ≈10% to a steady 2%.
For even newer network cards such as the Mellanox ConnectX-6, the kernel can
even offload TLS onto the network card!
T3.1: Single TCP connection
Client
Server
Gbit/s
curl
nginx
8
Go
nginx
12
T3.2: Multiple TCP connections
Client
Server
Gbit/s
curl
nginx
23.4
Go
nginx
23.4
Conclusions
When downloading from nginx with 1 TCP connection, with TLS encryption enabled
(HTTPS), the Go net/http client is faster than curl!
Caddy is slightly slower than nginx, which manifests itself in slower speeds
with curl and even slower speeds with Go’s net/http.
To max out 25 Gbit/s, even when using TLS encryption, just use 3 or more
connections in parallel. This helps with HTTP and HTTPS, with any combination of
client and server.
]]><![CDATA[My upgrade to 25 Gbit/s Fiber To The Home]]>https://michael.stapelberg.ch/posts/2022-04-23-fiber7-25gbit-upgrade/2022-04-23T16:00:00+02:00My favorite internet service provider, init7, is rolling out faster speeds with their infrastructure upgrade. Last week, the point of presence (POP) that my apartment’s fiber connection terminates in was upgraded, so now I am enjoying a 25 Gbit/s fiber internet connection!
My first internet connections
(Feel free to skip right to the 25 Gbit/s announcement section, but I figured this would be a good point to reflect on the last 20 years of internet connections for me!)
The first internet connection that I consciously used was a symmetric DSL connection that my dad († 2020) shared between his home office and the rest of the house, which was around the year 2000. My dad was an early adopter and was connected to the internet well before then using dial up connections, but the SDSL connection in our second house was the first connection I remember using myself. It wasn’t particularly fast in terms of download speed — I think it delivered 256 kbit/s or something along those lines.
I encountered two surprises with this internet connection. The first surprise was that the upload speed (also 256 kbit/s — it was a symmetric connection) was faster than other people’s. At the time, even DSL connections with much higher download speeds were asymmetric (ADSL) and came with only 128 kbit/s upload. I learnt this while making first contact with file sharing: people kept asking me to stay online so that their transfers would complete more quickly.
The second surprise was the concept of a metered connection, specifically one where you pay more the more data you transfer. During the aforementioned file sharing experiments, it never crossed my mind that down- or uploading files could result in extra charges.
These two facts combined resulted in a 3000 € surprise bill for my dad!
Luckily, his approach to solve this problem wasn’t to restrict my internet usage, but rather to buy a cheap, separate ADSL flatrate line for the family (from Telekom, which he hated), while he kept the good SDSL metered line for his business.
I still vividly remember the first time that ADSL connection synchronized. It was a massive upgrade in download speed (768 kbit/s!), but a downgrade in upload speed (128 kbit/s). But, because it was a flatrate, it made possible new use cases for my dad, who would jump on this opportunity to download a number of CD images to upgrade the software of his SGI machines.
The different connection speeds and characteristics have always interested me, and I used several other connections over the years, all of which felt limiting. The ADSL connection at my parent’s place started at 1 Mbit/s, was upgraded first to 3 Mbit/s, then 6 Mbit/s, and eventually reached its limit at 16 Mbit/s. When I spent one semester in Ireland, I had a 9 Mbit/s ADSL connection, and then later in Zürich I started out with a 15 Mbit/s ADSL connection.
All of these connections have always felt limiting, like peeking through the keyhole to see a rich world behind, but not being able to open the door. We’ve had to set up (and tune) traffic shaping, and coordinate when large downloads were okay.
My first fiber connection
The dream was always to leave ADSL behind and get a fiber connection. The
advantages are numerous: lower latency (ADSL came with 40 ms at the time), much
higher bandwidth (possibly Gigabit/s?) and typically the connection was
established via ethernet (instead of PPPoE). Most importantly, once the fiber is
there, you can upgrade both ends to achieve higher speeds.
In Zürich, I managed to get a fiber connection set up in my apartment after fighting bureaucracy for many months. The issue was that there was no permission slip on file at Swisscom. Either the owner of my apartment never signed it to begin with, or it got lost. This is not a state that the online fiber availability checker can represent, but once you know it, the fix is easy: just have Swisscom send out the form again, have the owner sign it, and a few weeks later, you can order!
One wrinkle was that availability was only fixed in the Swisscom checker, and it was unclear when EWZ or other providers would get an updated data dump. Hence, I ordered Swisscom fiber to get things moving as quick as possible, and figured I could switch to a different provider later.
Here’s a picture of when the electrician pulled the fiber from the building entry endpoint (BEP) in the basement into my flat, from March 2014:
Switching to fiber7
Only two months after I first got my fiber connection, init7 launched their fiber7 offering, and I switched from Swisscom to fiber7 as quickly as I could.
The switch was worth it in every single dimension:
Swisscom charged over 200 CHF per month for a 1 Gbit/s download, 100 Mbit/s upload fiber connection. fiber7 costs only 65 CHF per month and comes with a symmetric 1 Gbit/s connection. (Other providers had to follow, so now symmetric is standard.)
init7’s network performs much better than Swisscom’s: ping times dropped when I switched, and downloads are generally much faster. Note that this is with the same physical fiber line, so the difference is thanks to the numerous peerings that init7 maintains.
init7 gives you a static IPv6 prefix (if you want) for free, and even delegates reverse DNS to your servers of choice.
I enjoy init7’s unparalleled transparency. For example, check out the blog post about cost calculation if you’re ever curious if there could be a fiber7 POP in your area.
I have been very happy with my fiber7 connection ever since. What I wrote in 2014 regarding its performance remained true over the years — downloads were always fast for me, latencies were low, outages were rare (and came with good explanations).
I switched hardware multiple times over the years:
First, I started with the Ubiquiti EdgeRouter Lite which could handle the full Gigabit line rate (the MikroTik router I originally ordered maxed out at about 500 Mbit/s!).
In 2017, I switched to the Turris Omnia, an open hardware, open source software router that comes with automated updates.
In July 2018, after my connectivity was broken due to an incompatibility between the DHCPv6 client on the Turris Omnia and fiber7, I started developing my own router7 in Go, my favorite programming language, mostly for fun, but also as a proof of concept for some cool features I think routers should have. For example, you can retro-actively start up Wireshark and open up a live ring buffer of the last few hours of network configuration traffic.
Notably, init7 encourages people to use their preferred router (Router
Freedom).
The 25 Gbit/s announcement
Over the years, other Swiss internet providers such as Swisscom and Salt introduced 10 Gbit/s offerings, so an obvious question was when init7 would follow suit.
What nobody expected before init7 announced it on their seventh birthday, however, was that init7 started offering not only 10 Gbit/s (Fiber7-X), but also 25 Gbit/s connections (Fiber7-X2)! 🤯
Sieben Jahre nach dem Launch von #Fiber7 zünden wir die nächste Stufe 🚀 - Fiber7-X (10Gbps) und Fiber7-X2 (25Gbps) - zum selben Preis: CHF 777 pro Jahr.
With this move, init7 has done it again: they introduced an offer that is better than anything else in the Swiss internet market, perhaps even world-wide!
One interesting aspect is init7’s so-called «MaxFix principle»: maximum speed for a fixed price. No matter if you’re using 1 Gbit/s or 25 Gbit/s, you pay the same monthly fee. init7’s approach is to make the maximum bandwidth available to you, limited only by your physical connection. This is such a breath of fresh air compared to other ISPs that think rate-limiting customers to ridiculously low speeds is somehow acceptable on an FTTH offering 🙄 (recent example).
A common first reaction to fast network connections is the question: “For what do you need so much bandwidth?”
Interestingly enough, I heard this question as recently as last year, in the context of a Gigabit internet connection! Some people can’t imagine using more than 100 Mbit/s. And sure, from a certain perspective, I get it — that 100 Mbit/s connection will not be overloaded any time soon.
But, looking at when a line is overloaded is only one aspect to take into account when deciding how fast of a connection you want.
There is a lower limit where you notice your connection is slow. Back in 2014, a 2 Mbit/s connection was noticeably slow for regular web browsing. These days, even a 10 Mbit/s connection is noticeably slow when re-opening my browser and loading a few tabs in parallel.
So what should you get? A 100 Mbit/s line? 500 Mbit/s? 1000 Mbit/s? Personally, I like to not worry about it and just get the fastest line I can, to reduce any and all wait times as much as possible, whenever possible. It’s a freeing feeling! Here are a few specific examples:
If I have to wait only 17 minutes to download a PS5 game, that can make the difference between an evening waiting in frustration, or playing the title I’ve been waiting for.
If I can run a daily backup (over the internet) of all servers I care about without worrying that the transfers interfere with my work video calls, that gives me peace of mind.
If I can transfer a Debian Code Search index to my computer for debugging when needed, that might make the difference between being able to use the limited spare time I have to debug or improve Debian Code Search, or having to postpone that improvement until I find more time.
Aside from my distaste for waiting, a fast and reliable fiber connection enables self-hosting. In particular for my distri Linux project where I explore fast package installation, it’s very appealing to connect it to the internet on as fast a line as possible. I want to optimize all the parts: software architecture and implementation, hardware, and network connectivity. But, for my hobby project budget, getting even a 10 Gbit/s line at a server hoster is too expensive, let alone a 25 Gbit/s line!
Lastly, even if there isn’t really a need to have such a fast connection, I hope you can understand that after spending so many years of my life limited by slow connections, that I’ll happily take the opportunity of a faster connection whenever I can. Especially at no additional monthly cost!
Getting ready
Right after the announcement dropped, I wanted to prepare my side of the connection and therefore ordered a MikroTik CCR2004, the only router that init7 lists as compatible. I returned the MikroTik CCR2004 shortly afterwards, mostly because of its annoying fan regulation (spins up to top speed for about 1 minute every hour or so), and also because MikroTik seems to have made no progress at all since I last used their products almost 10 years ago. Table-stakes features such as DNS resolution for hostnames within the local network are still not included!
I expect that more and more embedded devices with SFP28 slots (like the MikroTik CCR2004) will become available over the next few years (hopefully with better fan control!), but at the moment, the selection seems to be rather small.
For my router, I instead went with a custom PC build. Having more space available means I can run larger, slow-spinning fans that are not as loud. Plugging in high-end Intel network cards (2 × 25 Gbit/s, and 4 × 10 Gbit/s on the other one) turns a PC into a 25 Gbit/s capable router.
With my equipment sorted out, I figured it was time to actually place the order. I wasn’t in a hurry to order, because it was clear that it would be months before my POP could be upgraded. But, it can’t hurt to register my interest (just in case it influences the POP upgrade plan). Shortly after, I got back this email from init7 where they promised to send me the SFP module via post:
And sure enough, a few days later, I received the SFP28 module in the mail:
With my router build, and the SFP28 module, I had everything I needed for my side of the connection.
Being able to plug in the SFP module into the new POP infrastructure yourself (like Pim did) sounded super cool to me, so I decided to reach out, and init7 actually agreed to let me stop by to plug in “my” fiber and SFP module!
Giddy with excitement, I left my place at just before 23:00 for a short walk to the POP building, which I had seen many times before, but never from the inside.
Patrick, the init7 engineer met me in front of the building and explained “Hey! You wrote my window manager!” — what a coincidence :-). Luckily I had packed some i3 stickers that I could hand him as a small thank you.
Inside, I met the other init7 employee working on this upgrade. Pascal, init7’s CTO, was coordinating everything remotely.
Standing in front of init7’s rack, I spotted the old Cisco switch (at the bottom), and the new Cisco C9500-48Y4C switches that were already prepared (at the top). The SFP modules are for customers who decided to upgrade to 10 or 25 Gbit/s, whereas for the others, the old SFP modules would be re-used:
We then spent the next hour pulling out fiber cables and SFP modules out of the old Cisco switch, and plugging them back into the new Cisco switch.
Just like the init7 engineer working with me (who is usually a software guy, too, he explained), I enjoy doing physical labor from time to time for variety. Especially with nice hardware like this, and when it’s for a good cause (faster internet)! It’s almost meditative, in a way, and I enjoyed the nice conversation we had while we were both moving the connections.
After completing about half of the upgrade (the top half of the old Cisco switch), I walked back to my place — still blissfully smiling all the way — to turn up my end of the connection while the others were still on site and could fix any mistakes.
After switching my uplink0 network interface to the faster network card, it also took a full reboot of my router for some reason, but then it recognized the SFP28 module without trouble and successfully established a 25 Gbit/s link! 🎉 🥳
I did a quick speed test to confirm and called it a night.
Speed tests / benchmarks
Just like in the early days of Gigabit connections, my internet connection is
now faster than the connection of many servers. It’s a luxury problem to be
sure, but in case you’re curious how far a 25 Gbit/s connection gets you in the
internet, in this section I collected some speed test results.
Ookla speedtest.net
speedtest.net (run by Ookla) is the best way to measure fast connections that I’m aware of.
I also ran speedtests to all other servers that were listed for the broader
Zürich area at the time, using the
tamasboros/ookla-speedtest
Docker image. As you can see, most speedtest servers are connected with a 10
Gbit/s port, and some (GGA Maur) even only with a 1 Gbit/s port:
Speedtest server
latency
download (mbps)
upload (mbps)
Init7 AG - Winterthur
1.45
23530.27
23031.24
fdcservers.net
18.15
9386.29
1262.92
GIB-Solutions AG - Schlieren
6.64
9154.12
2207.68
Monzoon Networks AG
0.74
8874.85
6427.66
Glattwerk AG
0.92
8719.04
4008.28
AltusHost B.V.
0.80
8373.34
8518.90
iWay AG - Zurich
2.13
8337.56
8194.89
Sunrise Communication AG
9.04
8279.60
3109.34
31173 Services AB
18.69
8279.75
1503.92
Wingo
4.25
6179.57
5248.36
Netrics Zürich AG
0.74
7910.78
8770.19
Cloudflare - Zurich
1.14
7410.97
2218.88
Netprotect - Zurich
0.87
7034.62
8948.01
C41.ch - Zurich
9.90
6792.60
690.33
Goldenphone GmbH
18.91
3116.32
659.23
GGA Maur
0.99
940.24
941.24
Linux mirrors
For a few popular Linux distributions, I went through the mirror list and tried
all servers in Switzerland and Germany. Only one or two would be able to deliver
files at more than 1 Gigabit/s. Other miror servers were either capped at 1
Gigabit/s, or wouldn’t even reach that (slow disks?).
Here are the fast ones:
Debian:mirror1.infomaniak.com and mirror2.infomaniak.com
Arch Linux:mirror.puzzle.ch
Fedora Linux:mirrors.xtom.de
Ubuntu Linux:mirror.netcologne.de and ubuntu.ch.altushost.com
iperf3
Using iperf3 -P 2 -c speedtest.init7.net, iperf3 shows 23 Gbit/s:
It’s hard to find public iperf3 servers that are connected with a fast-enough
port. I could only find one that claims to be connected via a 40 Gbit/s port,
but it was unavailable when I wanted to test.
Interested in a speed test?
Do you have a ≥ 10 Gbit/s line in Europe, too? Are you interested in a speed
test? Reach out to me and we can set something up.
Conclusion
What an exciting time to be an init7 customer! I still can’t quite believe that
I now have a 25 Gbit/s connection in 2022, and it feels like I’m living 10 years
in the future.
Thank you to Fredy,
Pascal, Patrick,
and all the other former and current init7 employees for showing how to run an
amazing Internet Service Provider. Thank you for letting me peek behind the
curtains, and keep up the good work! 💪
If you want to learn more, check out Pascal’s talk at DENOG:
]]><![CDATA[25 Gigabit Linux internet router PC build]]>https://michael.stapelberg.ch/posts/2021-07-10-linux-25gbit-internet-router-pc-build/2021-07-10T13:43:00+02:00init7 recently announced that with their FTTH fiber offering
Fiber7, they will now sell and
connect you with 25 Gbit/s (Fiber7-X2) or 10 Gbit/s (Fiber7-X) fiber optics, if
you want more than 1 Gbit/s.
After my previous
disappointment
with the MikroTik CCR2004, I decided to try a custom PC build.
An alternative to many specialized devices, including routers, is to use a PC
with an expansion card. An internet router’s job is to configure a network
connection and forward network packets. So, in our case, we’ll build a PC and
install some network expansion cards!
Goals
For this PC internet router build, I had the following goals, highest priority
to lowest priority:
Enough performance to saturate 25 Gbit/s, e.g. with two 10 Gbit/s downloads.
Silent: no loud fan noise.
Power-efficient: low power usage, as little heat as possible.
Low cost (well, for a high-end networking build…).
Network Port Plan
The simplest internet router has 2 network connections: one uplink to the
internet, and the local network. You can build a router without extra cards by
using a mainboard with 2 network ports.
Because there are no mainboards with SFP28 slots (for 25 Gbit/s SFP28 fiber
modules), we need at least 1 network card for our build. You might be able to
get by with a dual-port SFP28 network card if you have an SFP28-compatible
network switch already, or need just one fast connection.
I want to connect a few fast devices (directly and via fiber) to my router, so
I’m using 2 network cards: an SFP28 network card for the uplink, and a quad-port
10G SFP+ network card for the local network (LAN). This leaves us with the
following network ports and connections:
Network Card
max speed
cable
effective
Connection
Intel XXV710
25 Gbit/s
fiber
25 Gbit/s
Fiber7-X2 uplink
Intel XXV710
25 Gbit/s
DAC
10 Gbit/s
workstation
Intel XL710
10 Gbit/s
RJ45
1 Gbit/s
rest (RJ45 Gigabit)
Intel XL710
10 Gbit/s
fiber
10 Gbit/s
MikroTik 1
Intel XL710
10 Gbit/s
fiber
10 Gbit/s
MikroTik 2
Intel XL710
10 Gbit/s
/
10 Gbit/s
(unused)
onboard
2.5 Gbit/s
RJ45
1 Gbit/s
(management)
Hardware selection
Now that we have defined the goals and network needs, let’s select the actual
hardware!
Network Cards
My favorite store for 10 Gbit/s+ network equipment is
FS.COM. They offer Intel-based cards:
For a good overview over the different available Intel cards, check out the
second page (“Product View”) in the card’s User
Manual.
CPU and Chipset
I read on many different sites that AMD’s current CPUs beat Intel’s CPUs in
terms of performance per watt. We can better achieve goals 2 and 3 (low noise
and low power usage) by using fewer watts, so we’ll pick an AMD CPU and
mainboard for this build.
AMD’s current CPU generation is Zen 3, and current Zen 3 based
CPUs
can be divided into 65W TDP (Thermal Design
Power) and 105W TDP
models. Only one 65W model is available to customers right now: the Ryzen 5
5600X.
Mainboards are built for/with a certain so-called chipset. Zen 3 CPUs use the
AM4 socket, for which 8 different
chipsets exist. Our network
cards need PCIe 3.0, so that disqualifies 5 chipsets right away: only the A520,
B550 and X570 chipsets remain.
Mainboard: PCIe bandwidth
I originally tried using the ASUS PRIME X570-P mainboard, but I ran into two
problems:
Too loud: X570 mainboards need an annoyingly loud chipset fan for their 15W
TDP. Other chipsets such as the B550 don’t need a fan for their 5W TDP. With a
loud chipset fan, goal 2 (low noise) cannot be achieved. Only the
recently-released X570S
variant
comes without fans.
Not enough PCIe bandwidth/slots! This is how the ASUS tech specs describe the slots:
This means the board has 2 slots (1 CPU, 1 chipset) that are physically wide
enough to hold a full-length x16 card, but only the first port can
electronically be used as an x16 slot. The other port only has PCIe lanes
electronically connected for x4, hence “x16 (max at x4 mode)”.
Unfortunately, our network cards need electrical connection of all their PCIe x8
lanes to run at full speed. Perhaps Intel/FS.COM will one day offer a new
generation of network cards that use PCIe 4.0, because PCIe 4.0 x4 achieves
the same 7.877 GB/s throughput as PCIe 3.0 x8. Until then, I needed to find
a new mainboard.
Searching mainboards by PCIe capabilities is rather tedious, as mainboard block
diagrams or PCIe tree diagrams are not consistently available from all mainboard
vendors.
Instead, we can look explicitly for a feature called PCIe Bifurcation. In a
nutshell, PCIe bifurcation lets us divide the PCIe bandwidth from the Ryzen CPU
from 1 PCIe 4.0 x16 into 1 PCIe 4.0 x8 + 1 PCIe 4.0 x8, definitely satisfying
our requirement for two x8 slots at full bandwidth.
I found a list of (only!) three B550 mainboards supporting PCIe Bifurcation in an
Anandtech
review. Two
are made by Gigabyte, one by ASRock. I read the Gigabyte UEFI setup is rather
odd, so I went with the ASRock B550 Taichi mainboard.
Case
For the case, I needed a midi case (large enough for the B550 mainboard’s ATX
form factor) with plenty of options for large, low-spinning fans.
I stumbled upon the Corsair 4000D
Airflow,
which is available for 80 CHF and achieved positive
reviews. I’m
pleased with the 4000D: there are no sharp corners, installation is quick, easy
and clean, and the front and top panels offer plenty of space for cooling behind
large air intakes:
Inside, the case offers plenty of space and options for routing cables on the back side:
Which in turn makes for a clean front side:
Fans
I have been happy with Noctua fans for many years. In this
build, I’m using only Noctua fans so that I can reach goal 2 (silent, no loud
fan noise):
These fans are large (140mm), so they can spin on slow speeds and still be
effective.
The specific fan configuration I ended up with:
1 Noctua NF-A14 PWM 140mm in the front, pulling air out of the case
1 Noctua NF-A14 PWM 140mm in the top, pulling air into the case
1 Noctua NF-A12x25 PWM 120mm in the back, pulling air into the case
1 Noctua NH-L12S CPU fan
Note that this is most likely overkill: I can well imagine that I could turn off
one of these fans entirely without a noticeable effect on temperatures. But I
wanted to be on the safe side and have a lot of cooling capacity, as I don’t
know how hot the Intel network cards run in practice.
Unfortunately, ASRock seems to have set the Customer ID register to 0 instead of
CUSTOMER_ID_ASROCK, so you need to load the nct6683 Linux driver with its
force option.
Once the module is loaded, lm-sensors lists accurate PWM fan speeds, but the
temperature values are mislabeled and don’t quite match the temperatures I see
in the UEFI H/W Monitor:
nct6683-isa-0a20
Adapter: ISA adapter
fan1:              471 RPM  (min =    0 RPM)
fan2:                0 RPM  (min =    0 RPM)
fan3:                0 RPM  (min =    0 RPM)
fan4:                0 RPM  (min =    0 RPM)
fan5:                0 RPM  (min =    0 RPM)
fan6:                0 RPM  (min =    0 RPM)
fan7:                0 RPM  (min =    0 RPM)
Thermistor 14:     +45.5 C  (low  =  +0.0 C)
                            (high =  +0.0 C, hyst =  +0.0 C)
                            (crit =  +0.0 C)  sensor = thermistor
AMD TSI Addr 98h:  +40.0 C  (low  =  +0.0 C)
                            (high =  +0.0 C, hyst =  +0.0 C)
                            (crit =  +0.0 C)  sensor = AMD AMDSI
intrusion0:       OK
beep_enable:      disabled
At least with the nct6683 Linux driver, there is no way to change the PWM fan
speed: the corresponding files in the hwmon interface are marked read-only.
At this point I accepted that I won’t be able to work with the fan controller
from Linux, and tried just configuring static fan control settings in the UEFI
setup.
But despite identical fan settings, one of my 140mm fans would end up turned
off. I’m not sure why — is it an unclean PWM signal, or is there just a bug in
the fan controller?
This part of the build is not router-related, but I figured if I have a fast
machine with a fast network connection, I could add a fast big disk to it and
retire my other server PC.
Specifically, I chose the Samsung 970 EVO Plus M.2 SSD with 2 TB of
capacity. This disk can deliver 3500 MB/s of sequential read
throughput,
which is more than the ≈3000 MB/s that a 25 Gbit/s link can handle.
Graphics Card
An important part of computer builds for me is making troubleshooting and
maintenance as easy as possible. In my current tech landscape, that translates
to connecting an HDMI monitor and a USB keyboard, for example to boot from a
different device, to enter the UEFI setup, or to look at Linux console messages.
Unfortunately, the Ryzen 5 5600X does not have integrated graphics, so to get
any graphics output, we need to install a graphics card. I chose the Zotac
GeForce GT 710 Zone Edition, because it was the cheapest available card (60 CHF)
that’s passively cooled.
An alternative to using a graphics card might be to use a PCIe IPMI card like
the ASRock
PAUL,
however these seem to be harder to find, and more expensive.
Longer-term, I think the best option would be to use the Ryzen 5 5600G with
integrated graphics, but that model only becomes available later this
year.
Component List
I’m listing 2 different options here. Option A is what I built (router+server),
but Option B is a lot cheaper if you only want a router. Both options use the
same base components:
Option A: Server extension. Because I had some parts lying around, and because I
wanted to use my router for serving files (from large RAM cache/fast disk), I
went with the following parts:
The Corsair SF600 power supply is not server-related, I just had it lying around. I’d
recommend going for the Corsair RM650x *2018* (which has longer cables) instead.
Server total: 2851 CHF
Option B: Non-server (router only) alternative. If you’re only interested
in routing, you can opt for cheaper low-end disk and RAM, for example:
Conveniently, the Corsair Commander Pro stores your settings even when power is
lost. So you don’t even need to run a permanent fan control process, a one-off
adjustment might be sufficient.
Power Usage
The PC consumes about 48W of power when idle (only management network connected)
by default without further tuning. Each extra network link increases power usage
by ≈1W:
Enabling all Ryzen-related options
in my Linux kernel and switching to the powersave CPU frequency governor lowers
power usage by ≈1W.
On some mainboards, you might need to force-enable Global
C-States to save
power. Not on the B550 Taichi, though.
I tried undervolting the CPU, but that didn’t even make ≈1W of difference in
power usage. Potentially making my setup unreliable is not worth that little
power saving to me.
Goal 1 is to saturate 25 Gbit/s, for example using two 10 Gbit/s downloads. I’m
talking about large bulk transfers here, not many small transfers.
To get a feel for the performance/headroom of the router build, I ran 3 different tests.
Test A: 10 Gbit/s bridging throughput
For this test, I connected 2 PCs to the router’s XL710 network card and used iperf3(1)
to generate a 10 Gbit/s TCP stream between the
2 PCs. The router doesn’t need to modify the packets in this scenario, only
forward them, so this should be the lightest load scenario.
Test B: 10 Gbit/s NAT throughput
In this test, the 2 PCs were connected such that the router performs Network
Address Translation
(NAT), which is
required for downloads from the internet via IPv4.
This scenario is slightly more involved, as the router needs to modify
packets. But, as we can see below, a 10 Gbit/s NAT stream consumes barely more
resources than 10 Gbit/s bridging:
Test C: 4 × 10 Gbit/s TCP streams
In this test, I wanted to max out the XL710 network card, so I connected 4 PCs
and started an iperf3(1)
benchmark between each PC
and the router itself, simultaneously.
This scenario consumes about 16% CPU, meaning we’ll most likely have plenty of
headroom even when all ports are maxed out!
The passively-cooled SuperServer E302-9D comes with 2 SFP+ ports (10 Gbit/s). It
even comes with 2 PCIe 3.0 x8 capable slots. Unfortunately it seems impossible
to currently buy this machine, at least in Switzerland.
You can find a few more suggestions in the replies of this Twitter
thread. Most are either
unavailable, require a lot more DIY work (e.g. a custom case), or don’t support
25 Gbit/s.
Router software: router7 porting
I wrote router7, my own small home internet router
software in Go, back in 2018, and have been using it ever since.
I don’t have time to support any users, so I don’t recommend anyone else use
router7, unless the project really excites you, and the lack of support doesn’t
bother you! Instead, you might be better served with a more established and
supported router software option. Popular options include
OPNsense or
OpenWrt. See also Wikipedia’s List of
router and firewall
distributions.
To make router7 work for this 25 Gbit/s router PC build, I had to make a few
adjustments.
Because we are using UEFI network boot instead of BIOS network boot, I first had
to make the PXE boot implementation in router7’s installer work with UEFI PXE
boot.
During development, I compiled a few Linux programs statically or copied them
with their dependencies (→ gokrazy
prototyping) to run them on router7, such as
sensors(1)
, ethtool(8)
,
as well as iproute2’s ip(8)
and bridge(8)
implementation.
Next Steps
Based on my tests, the hardware I selected seems to deliver enough performance
to use it for distributing a 25 Gbit/s upstream link across multiple 10 Gbit/s
devices.
I won’t know for sure until the fiber7 Point Of
Presence (POP, German Anschlusszentrale) close to my home is upgraded to support
25 Gbit/s “Fiber7-X2” connections. As I mentioned, unfortunately the upgrade
plan is delayed due to
the component shortage. I’ll keep you posted!
Other Builds
In case my build doesn’t exactly match your requirements, perhaps these others
help inspire you:
Pim ran a DPDK
based loadtester called T-Rex on this
machine. Here’s his summary of the test:
For DPDK, this hardware does 4x10G at 64b frames. It does not do 6x10G as it
tops out at 62Mpps using 4 cores (of 15.5Mpps per core).
I couldn’t test 25G symmetric [because we lacked a 25G DAC cable], but
extrapolating from the numbers, 3 CPUs source and sink ~24.6Gbit per core, so
we’d probably make it, leaving 1 core for OS and 2 cores for controlplane.
If the machine had a 12 core Ryzen, it would saturate all NICs with room to
spare. So that’s what I’ll end up buying :)
]]><![CDATA[How I configured and then promptly returned a MikroTik CCR2004 router for Fiber7]]>https://michael.stapelberg.ch/posts/2021-05-28-configured-and-returned-mikrotik-ccr2004-for-fiber7/2021-05-28T14:57:00+02:00init7 recently announced that with their FTTH fiber offering
Fiber7, they will now sell and
connect you with 25 Gbit/s (Fiber7-X2) or 10 Gbit/s (Fiber7-X) fiber optics, if
you want more than 1 Gbit/s.
This is possible thanks to the upgrade of their network infrastructure as part
of their “lifecycle management”, meaning the old networking gear was declared as
end-of-life. The new networking gear supports not only SFP+ modules (10 Gbit/s),
but also SFP28 modules (25 Gbit/s).
The rest of this article walks through what I needed to configure (a lot,
compared to Ubiquiti or OpenWRT) in the hope that it helps other MikroTik users,
and then ends in Why I returned it.
Configuration
Connect an Ethernet cable to the management port on the MikroTik and:
log into the system using ssh admin@192.168.88.1
point a web browser to “Webfig” at http://192.168.88.1/ (no login required)
Update firmware
Update the CCR2004 to the latest firmware version. At the time of writing, the
Long-term RouterOS track is at version 6.47.9
for the CCR2004 (ARM64):
Use /system package print to display the current version.
Upload routeros-arm64-6.47.9.npk using Webfig.
/system reboot and verify that /system package print shows 6.47.9 now.
/system routerboard upgrade to upgrade the firmware of the underlying chipsets, etc. Enter y at the prompt, wait for a response of “echo: system,info,critical Firmware upgraded successfully, please reboot for changes to take effect”
/system reboot again and verify that /system routerboard print has the line current-firmware:6.47.9 now.
Set up auth
Set a password to prevent others from logging into the router:
/user set admin password=secret
Additionally, you can enable passwordless SSH key login, if you
want.
/tool mac-server set allowed-interface-list=none
/tool mac-server mac-winbox set allowed-interface-list=none
/tool mac-server ping set enabled=no
/tool bandwidth-server set enabled=no
/ip ssh set strong-crypto=yes
/ip neighbor discovery-settings set discover-interface-list=none
Enable DHCPv6 Client
For some reason, you need to explicitly enable IPv6 in 2021:
/system package enable ipv6
/system reboot
MikroTik says this is a precaution so that users don’t end up with default-open
firewall settings for IPv6. But then why don’t they just add some default
firewall rules?!
Anyway, to configure and immediately enable the DHCPv6 client, use:
Unfortunately, MikroTik does not offer any user interface to set the IPv6 DUID,
which I need to configure to obtain my static IPv6 network prefix from my
provider’s DHCPv6 server.
Luckily, the DUID is included in backup files, so we can edit it and restore
from backup:
Run /system backup save
Download the backup file in Webfig by navigating to Files → Backup → Download.
Convert the backup file to hex in textual form, edit the DUID and convert it back to binary:
% xxd MikroTik-19700102-0111.backup MikroTik-19700102-0111.backup.hex

% emacs MikroTik-19700102-0111.backup.hex
# Search for “dhcp/duid” in the file and edit accordingly:
# got:  00030001085531dfa69e

% xxd -r MikroTik-19700102-0111.backup.hex MikroTik-19700102-0111-patched.backup
Upload the file in Webfig, then restore the backup:
To configure and immediately enable the DHCPv4
client on the upstream
port, use:
/ip dhcp-client add interface=sfp28-1 disabled=no
I also changed the MAC address to match my old router’s address, just to take
maximum precaution to avoid any Port Security related issues with my provider’s
DHCP server:
/interface ethernet set sfp28-1 mac-address=00:0d:fa:4c:0c:31
Enable DNS Server
By default, the Mikrotik Router will not respond to DNS Queries, when enabling remote requests make sure to firewall the DNS server from responding to DNS Queries from the greater internet. Otherwise you will find yourself participating in DNS DDOS attacks.
First, let’s bundle all SFP+ ports into a single bridge interface:
/interface bridge add name=bridge1
/interface bridge port add bridge=bridge1 interface=sfp-sfpplus1 hw=yes
/interface bridge port add bridge=bridge1 interface=sfp-sfpplus2 hw=yes
/interface bridge port add bridge=bridge1 interface=sfp-sfpplus3 hw=yes
/interface bridge port add bridge=bridge1 interface=sfp-sfpplus4 hw=yes
/interface bridge port add bridge=bridge1 interface=sfp-sfpplus5 hw=yes
/interface bridge port add bridge=bridge1 interface=sfp-sfpplus6 hw=yes
/interface bridge port add bridge=bridge1 interface=sfp-sfpplus7 hw=yes
/interface bridge port add bridge=bridge1 interface=sfp-sfpplus8 hw=yes
/interface bridge port add bridge=bridge1 interface=sfp-sfpplus9 hw=yes
/interface bridge port add bridge=bridge1 interface=sfp-sfpplus10 hw=yes
/interface bridge port add bridge=bridge1 interface=sfp-sfpplus11 hw=yes
/interface bridge port add bridge=bridge1 interface=sfp-sfpplus12 hw=yes
This means we’ll use the device like a big switch with routing between the
switch and the uplink port sfp28-1.
To configure the DHCPv4 Server, configure an IP address, then start the setup
wizard:
/ip address add address=10.0.0.1/24 interface=bridge1
/ip dhcp-server setup
Select interface to run DHCP server on

dhcp server interface: bridge1
Select network for DHCP addresses

dhcp address space: 10.0.0.0/24
Select gateway for given network

gateway for dhcp network: 10.0.0.1
Select pool of ip addresses given out by DHCP server

addresses to give out: 10.0.0.2-10.0.0.240
Select DNS servers

dns servers: 10.0.0.1,8.8.8.8
Select lease time

lease time: 20m
Enable IPv4 NAT
We need NAT to route all IPv4 traffic over our single public IP address:
Initially, I thought the device’s fan spins up only at boot, and then the large
heatsink takes care of all cooling needs. Unfortunately, after an hour or so
into my experiment, I noticed that the MikroTik would spin up the fan for a
whole minute or so occasionally! Very annoying.
I also ran into weird DNS slow-downs, which I didn’t fully diagnose. In
Wireshark, it looked like my machine sent 2 DNS queries but received only 1 DNS
result, and then waited for a timeout.
I also noticed that I have a few more unexpected dependencies such as my home
automation using DHCP lease state by subscribing to an MQTT topic. Addressing
this issue and other similar little problems would have taken a bunch more time
and would have resulted in a less reliable system than I have today.
Since I last used MikroTik in 2014 the software seems to have barely changed. I
wish they finally implemented some table-stakes features like DNS resolution for
DHCP hostnames.
Given all the above, I no longer felt like getting enough value for the money
from the MikroTik, and found it easier to just switch back to my own
router7 and return the MikroTik.
I will probably stick with the router7 software, but exchange the PC Engines APU
with the smallest PC that has enough PCI-E bandwidth for a multi-port SFP28
network card.
Appendix A: Full configuration
# may/28/2021 11:40:15 by RouterOS 6.47.9
# software id = 6YZE-HKM8
#
# model = CCR2004-1G-12S+2XS
/interface bridge
add name=bridge1
/interface ethernet
set [ find default-name=sfp28-1 ] auto-negotiation=no mac-address=00:0d:fa:4c:0c:31
/interface wireless security-profiles
set [ find default=yes ] supplicant-identity=MikroTik
/ip pool
add name=dhcp_pool0 ranges=10.0.0.2-10.0.0.240
/ip dhcp-server
add address-pool=dhcp_pool0 disabled=no interface=bridge1 lease-time=20m name=dhcp1
/interface bridge port
add bridge=bridge1 interface=sfp-sfpplus1
add bridge=bridge1 interface=sfp-sfpplus2
add bridge=bridge1 interface=sfp-sfpplus3
add bridge=bridge1 interface=sfp-sfpplus4
add bridge=bridge1 interface=sfp-sfpplus5
add bridge=bridge1 interface=sfp-sfpplus6
add bridge=bridge1 interface=sfp-sfpplus7
add bridge=bridge1 interface=sfp-sfpplus8
add bridge=bridge1 interface=sfp-sfpplus9
add bridge=bridge1 interface=sfp-sfpplus10
add bridge=bridge1 interface=sfp-sfpplus11
add bridge=bridge1 interface=sfp-sfpplus12
/ip neighbor discovery-settings
set discover-interface-list=none
/ip address
add address=192.168.88.1/24 comment=defconf interface=ether1 network=192.168.88.0
add address=10.0.0.1/24 interface=bridge1 network=10.0.0.0
/ip dhcp-client
add disabled=no interface=sfp28-1 use-peer-dns=no
/ip dhcp-server lease
add address=10.0.0.54 mac-address=DC:A6:32:02:AA:10
/ip dhcp-server network
add address=10.0.0.0/24 dns-server=10.0.0.1 domain=lan gateway=10.0.0.1
/ip dns
set allow-remote-requests=yes servers=8.8.8.8,8.8.4.4,2001:4860:4860::8888,2001:4860:4860::8844
/ip firewall nat
add action=masquerade chain=srcnat out-interface=sfp28-1 to-addresses=0.0.0.0
/ip firewall service-port
set ftp disabled=yes
set tftp disabled=yes
set irc disabled=yes
set h323 disabled=yes
set sip disabled=yes
set pptp disabled=yes
set udplite disabled=yes
set dccp disabled=yes
set sctp disabled=yes
/ip service
set telnet disabled=yes
set ftp disabled=yes
set www disabled=yes
set www-ssl certificate=webfig disabled=no
set api disabled=yes
set winbox disabled=yes
set api-ssl disabled=yes
/ip ssh
set strong-crypto=yes
/ipv6 address
add address=::1 from-pool=fiber7 interface=bridge1
/ipv6 dhcp-client
add add-default-route=yes interface=sfp28-1 pool-name=fiber7 request=address,prefix use-peer-dns=no
/ipv6 nd
add interface=bridge1 managed-address-configuration=yes other-configuration=yes
/system clock
set time-zone-name=Europe/Zurich
/system logging
add topics=dhcp
/tool bandwidth-server
set enabled=no
/tool mac-server
set allowed-interface-list=none
/tool mac-server mac-winbox
set allowed-interface-list=none
/tool mac-server ping
set enabled=no
]]><![CDATA[Home network 10 Gbit/s upgrade]]>https://michael.stapelberg.ch/posts/2021-05-16-home-network-fiber-10-gbits-upgrade/2021-05-16T17:33:16+02:00After adding a fiber link to my home
network, I am upgrading that link
from 1 Gbit/s to 10 Gbit/s.
As a reminder, conceptually the fiber link is built using two media converters
from/to ethernet:
Schematically, this is what’s connected to both ends:
All links are 1 Gbit/s, so it’s easy to see that, for example, transfers between
chuchi↔router7 and storage2↔midna cannot both use 1 Gbit/s at the same time.
This upgrade serves 2 purposes:
Raise the floor to 1 Gbit/s end-to-end: Ensure that serving large files
(e.g. distri Linux images and packages) does no longer impact, and is no
longer impacted by, other bandwidth flows that also use this transfer link in
my home network, e.g. daily backups.
Raise the ceiling to 10 Gbit/s: Make it possible to selectively upgrade
Linux PCs on either end of the link to 10 Gbit/s peak bandwidth.
Note that the internet uplink remains untouched at 1 Gbit/s — only transfers
within the home network can happen at 10 Gbit/s.
Replacing the media converters with Mikrotik switches
1 × RJ45 Ethernet port for management, can be used as a regular 1 Gbit/s port.
4 × SFP+ ports
Each SFP+ port can be used with either an RJ-45 Ethernet or a fiber SFP+ module,
but beware! As Nexus2kSwiss points out on
twitter, the
Mikrotik supports at most 2 RJ-45 SFPs at a time!
Fiber module upgrade
I’m using 10 Gbit/s fiber SFP+ modules for the fiber link between my kitchen and
living room.
To make use of the 10 Gbit/s link between the switches, all devices that should
get their guaranteed 1 Gbit/s end-to-end connection need to be connected
directly to a Mikrotik switch.
I’m connecting the PCs to the switch using Direct Attach Cables (DAC) where
possible. The advantage of DAC cables over RJ45 SFP+ modules is their lower
power usage and heat.
The resulting list of SFP modules used in the two Mikrotik switches looks like
so:
Mikrotik 1 SFP
speed
speed
Mikrotik 2 SFP
chuchi
10 Gbit/s DAC
10 Gbit/s DAC
midna
storage2
1 Gbit/s RJ45
1 Gbit/s RJ45
router7
10 Gbit/s BiDi
⬅ BiDi fiber link ➡
10 Gbit/s BiDi
Hardware sourcing
The total cost of this upgrade is 676 CHF, with the biggest chunk spent on the
Mellanox ConnectX-3 network cards and MikroTik switches.
FS (Fiber Store) order
FS.COM was my go-to source for anything
fiber-related. Everything they have is very affordable, and products in stock at
their German warehouse arrive in Switzerland (and presumably other European
countries, too) within the same week.
There are a few items that FS.COM doesn’t stock. These I
bought at digitec, a big and popular electronics
store in Switzerland. My thinking is that if products are available at digitec,
they most likely are available at your preferred big electronics store, too.
I want to use my switches only as switches, not for any routing or other layer 3
features that might reduce bandwidth, so I first reboot the MikroTik
CRS305-1G-4S+ into SwOS:
In the web interface menu, navigate to System → Routerboard →
Settings, open the Boot OS drop-down and select option
SwOS.
In the web interface menu, navigate to System → Reboot.
After the device rebooted, change the hostname which was reset to MikroTik.
Next, upgrade the firmware to 2.12 to fix a weird issue with certain
combinations of SFP modules (SFP-10G-BX in SFP1, SFP-10G-T in SFP2):
In the SwOS web interface, select the Upgrade tab, then click
Download & Upgrade.
Network card setup (Linux)
After booting with the Mellanox ConnectX3 in a PCIe slot, the card should show
up in dmesg(8)
:
mlx4_core: Mellanox ConnectX core driver v4.0-0
mlx4_core: Initializing 0000:03:00.0
mlx4_core 0000:03:00.0: DMFS high rate steer mode is: disabled performance optimized steering
mlx4_core 0000:03:00.0: 31.504 Gb/s available PCIe bandwidth (8.0 GT/s PCIe x4 link)
mlx4_en: Mellanox ConnectX HCA Ethernet driver v4.0-0
mlx4_en 0000:03:00.0: Activating port:1
mlx4_en: 0000:03:00.0: Port 1: Using 16 TX rings
mlx4_en: 0000:03:00.0: Port 1: Using 16 RX rings
mlx4_en: 0000:03:00.0: Port 1: Initializing port
mlx4_en 0000:03:00.0: registered PHC clock
mlx4_core 0000:03:00.0 enp3s0: renamed from eth0
<mlx4_ib> mlx4_ib_add: mlx4_ib: Mellanox ConnectX InfiniBand driver v4.0-0
<mlx4_ib> mlx4_ib_add: counter index 1 for port 1 allocated 1
mlx4_en: enp3s0: Steering Mode 1
mlx4_en: enp3s0: Link Up
Another way to verify the device is running at maximum speed on the computer’s
PCIe bus, is to ensure LnkSta matches LnkCap in the lspci(8)
output:
Downloading a file from an nginx(1)
web server using curl(1)
is fast, too:
% curl -o /dev/null http://chuchi.lan/distri/supersilverhaze/img/distri-disk.img.zst
  % Total    % Received % Xferd  Average Speed   Time    Time     Time  Current
                                 Dload  Upload   Total   Spent    Left  Speed
100  934M  100  934M    0     0  1118M      0 --:--:-- --:--:-- --:--:-- 1117M
Note that this download was served from RAM (Linux page cache). The next upgrade
I need to do in this machine is replace the SATA SSD with an NVMe SSD, because
the disk is now the bottleneck.
Conclusion
This was a pleasantly simple upgrade: plug in a bunch of new hardware and batch
transfers become faster.
The Mikrotik switch provides great value for money, and the Mellanox ConnectX-3
cards work well, provided you can find them.
Appendix A: Switching from RJ45 SFP+ modules to Direct Attach Cables
Originally, I connected all PCs to the MikroTik switches with RJ45 SFP+ modules
for two reasons:
I bought Intel
X550-T2
PCIe 10 Gbit/s network cards that RJ45 as my first choice.
The SFP+ modules are backwards-compatible and can be used with 1 Gbit/s RJ45
devices, too, which makes for a nice incremental upgrade path.
However, I later was made aware that the RJ45 SFP+ modules use significantly
more power and run significantly hotter than Direct Attach Cables (DAC).
I measured it: each RJ45 SFP+ module was causing my BiDi SFP+ module to run 5℃
hotter!
Around 06/02 I replaced one RJ45 SFP+ module with a Direct Attach Cable.
Around 06/06 I replaced the remaining RJ45 SFP+ module with another Direct
Attach Cable.
As you can see, this caused a 10℃ drop in temperature of the BiDi SFP+ module.
The MikroTik is still uncomfortably hot, making it hard to work with when it’s
powered on.
Appendix B: Network card setup (Linux) with Intel X550-T2
For reference, here is the Network card setup (Linux) section, but with the
Intel X550-T2 that I previously used.
After booting with the Intel X550-T2 in a PCIe slot, the card should show up in
dmesg(8)
:
I think if you only use 1 of the card’s 2 network ports, you might not hit any
bottlenecks even when running the card only at PCIe 3.0 ×2 link
speed, but I
haven’t verified this!
Another way to verify the device is running at maximum speed on the computer’s
PCIe bus, is to ensure LnkSta matches LnkCap in the lspci(8)
output:
You can verify your network link is running at 10 Gbit/s using ethtool(8)
:
% sudo ethtool enp3s0f1
Settings for enp3s0f1:
	Supported ports: [ TP ]
	Supported link modes:   100baseT/Full
	                        1000baseT/Full
	                        10000baseT/Full
	                        2500baseT/Full
	                        5000baseT/Full
	Supported pause frame use: Symmetric
	Supports auto-negotiation: Yes
	Supported FEC modes: Not reported
	Advertised link modes:  100baseT/Full
	                        1000baseT/Full
	                        10000baseT/Full
	Advertised pause frame use: Symmetric
	Advertised auto-negotiation: Yes
	Advertised FEC modes: Not reported
	Speed: 10000Mb/s
	Duplex: Full
	Auto-negotiation: on
	Port: Twisted Pair
	PHYAD: 0
	Transceiver: internal
	MDI-X: Unknown
	Supports Wake-on: d
	Wake-on: d
        Current message level: 0x00000007 (7)
                               drv probe link
	Link detected: yes
Appendix C: BIOS update for Mellanox ConnectX-3
On my Supermicro X11SSZ-QF mainboard, the Mellanox ConnectX-3 would not
establish a link. The Mellanox Linux kernel driver logged a number of errors:
kernel: mlx4_en: enp1s0: CQE error - cqn 0x8e, ci 0x0, vendor syndrome: 0x57 syndrome: 0x4
kernel: mlx4_en: enp1s0: Related WQE - qpn 0x20d, wqe index 0x0, wqe size 0x40
kernel: mlx4_en: enp1s0: Scheduling port restart
kernel: mlx4_core 0000:01:00.0: Internal error detected:
kernel: mlx4_core 0000:01:00.0: device is going to be reset
kernel: mlx4_core 0000:01:00.0: crdump: devlink snapshot disabled, skipping
kernel: mlx4_core 0000:01:00.0: device was reset successfully
kernel: mlx4_en 0000:01:00.0: Internal error detected, restarting device
kernel: <mlx4_ib> mlx4_ib_handle_catas_error: mlx4_ib_handle_catas_error was started
kernel: <mlx4_ib> mlx4_ib_handle_catas_error: mlx4_ib_handle_catas_error ended
kernel: mlx4_core 0000:01:00.0: command 0x21 failed: fw status = 0x1
kernel: pcieport 0000:00:1c.0: AER: Uncorrected (Fatal) error received: 0000:00:1c.0
kernel: pcieport 0000:00:1c.0: PCIe Bus Error: severity=Uncorrected (Fatal), type=Transaction Layer, (Receiver ID)
kernel: mlx4_core 0000:01:00.0: command 0x43 failed: fw status = 0x1
kernel: infiniband mlx4_0: ib_query_port failed (-5)
kernel: pcieport 0000:00:1c.0:   device [8086:a110] error status/mask=00040000/00010000
kernel: pcieport 0000:00:1c.0:    [18] MalfTLP                (First)
kernel: pcieport 0000:00:1c.0: AER:   TLP Header: 4a000001 01000004 00000000 00000000
kernel: mlx4_core 0000:01:00.0: mlx4_pci_err_detected was called
kernel: mlx4_core 0000:01:00.0: Fail to set mac in port 1 during unregister
systemd-networkd[313]: enp1s0: Link DOWN
kernel: mlx4_en: enp1s0: Failed activating Rx CQ
kernel: mlx4_en: enp1s0: Failed restarting port 1
kernel: mlx4_en: enp1s0: Link Down
kernel: mlx4_en: enp1s0: Close port called
systemd-networkd[313]: enp1s0: Lost carrier
kernel: mlx4_en 0000:01:00.0: removed PHC
kernel: mlx4_core 0000:01:00.0: mlx4_restart_one_up: ERROR: mlx4_load_one failed, pci_name=0000:01:00.0, err=-5
kernel: mlx4_core 0000:01:00.0: mlx4_restart_one was ended, ret=-5
systemd-networkd[313]: enp1s0: DHCPv6 lease lost
kernel: pcieport 0000:00:1c.0: AER: Root Port link has been reset
kernel: mlx4_core 0000:01:00.0: mlx4_pci_resume was called
kernel: mlx4_core 0000:01:00.0: Multiple PFs not yet supported - Skipping PF
kernel: mlx4_core 0000:01:00.0: mlx4_pci_resume: mlx4_load_one failed, err=-22
kernel: pcieport 0000:00:1c.0: AER: device recovery successful
What helped was to update the X11SSZ-QF BIOS to the latest version.
]]><![CDATA[Adding a fiber link to my home network]]>https://michael.stapelberg.ch/posts/2020-08-09-fiber-link-home-network/2020-08-09T14:53:53+02:00Motivation
Despite using a FTTH internet connection since 2014, aside from the one fiber
uplink, I had always used network gear with 1 Gbit/s links over regular old rj45
cat5(e) cables.
I liked the simplicity and uniformity of that setup, but decided it’s time to
add at least one fiber connection, to get rid of a temporary ethernet cable
that connected my kitchen with the rest of my network that is largely in the
living room and office.
The temporary ethernet cable was an experiment to verify that running a server
or two in my kitchen actually works (it does!). I used a flat ethernet
cable,
which is great for test setups like that, as you can often tape it onto the
walls and still close the doors.
So, we will replace one ethernet cable with one fiber cable and converters at
each end:
Why is it good to switch from copper ethernet cables to fiber in this case?
Fiber cables are smaller and hence easier to fit into existing cable
ducts. While regular ethernet cable is way too thick to fit into any of the
existing ducts in my flat, I was hoping that fiber might fit!
When I actually received the cables, I was surprised how much thinner fiber
cables actually can be: there are 0.9mm cables, which are so thin, they can be
hidden in plain sight! I had only ever seen 2mm fiber cables before, and the
0.9mm cables are incredibly light, flexible and thin! Even pasta is typically
thicker:
Preparing a delicious pot of glass noodles ;)
The cable shown above comes from the fiber store
FS.COM, which different people have
praised on multiple occasions, so naturally I was curious to give them a shot
myself.
Also, for the longest time, it was my understanding that fiber connectors can
only be put onto fiber cables using expensive (≫2000 CHF) machines. A while ago
I heard about field assembly connectors so I wanted to verify that those
indeed work.
Aside from practical reasons, playing around with fiber networking also makes
for a good hobby during a pandemic :)
Hardware Selection
I ordered all my fiber equipment at FS.COM: everything
they have is very affordable, and products in stock at their German warehouse
arrive in Switzerland (and presumably other European countries) within the same
week.
If you are in the luxurious position to have enough physical space and agility
to pull through an entire fiber cable, without having to remove any
connectors, you can make a new network connection with just a few parts:
I recommend buying an extra fiber cable or two so that you can accidentally
damage a cable and still have enough spares.
Total cost thus far: just under 100 CHF. If you have existing switches with a
free SFP slot, you can use those instead of the media converters and save most
of the cost.
If you need to temporarily remove one or both of the fiber cable connector(s),
you also need field assembly connectors and a few tools in addition:
With the visual fault locator, you can shine a light through your fiber. You can
verify correct connector assembly by looking at how the light comes out of the
connector.
The fiber cleaning swabs are good to have in general, but for the field assembly
connector, you need to use alcohol-soaked wipes anyway (which FS.COM does not
stock).
The total cost for everything is just under 300 CHF.
Hardware Selection Process
The large selection at FS.COM can be overwhelming to navigate at first. My
selection process went something like this:
My first constraint is using bi-directional (BiDi) fiber optics modules so that
I only need to lay a single fiber cable, as opposed to two fiber cables.
The second constraint is to use field assembly connectors.
If possible, I wanted to use bend-insensitive
fiber
so that I wouldn’t need to pay so much attention to the bend radius and have
more flexibility in where and how I can lay fiber.
With these constraints, there aren’t too many products left to combine. An
obvious and good choice are 0.9mm fiber cable using LC/UPC connectors.
FS.COM details
As of 2020-08-05, FS.COM states they have 5 warehouses in 4 locations:
Delaware (US)
Munich (Germany)
Melbourne (Australia)
Shenzhen (China)
They recently built another, bigger (7 km²) warehouse in Shenzhen, and now
produce inventory for the whole year.
By 2019, FS.COM had over 300,000 registered corporate customers, reaching nearly
200 million USD yearly sales.
Delivery times
As mentioned before, delivery times are quick when the products are in stock at
FS.COM’s German warehouse.
In my case, I put in my order on 2020-Jun-26.
The items that shipped from the German warehouse arrived on 2020-Jul-01.
Some items had to be manufactured and/or shipped from Asia. Those items arrived
after 3 more weeks, on 2020-Jul-24.
Unfortunately, FS.COM doesn’t stock any 0.9mm fiber cables in their German
warehouse right now, so be prepared for a few weeks of waiting time.
Laying The Fiber
Use a cable puller to pull the fiber through existing cable ducts where
possible.
In general, buy the thinnest one you can find. I have this 4mm diameter cable
puller,
but a 3mm or even 2mm one would work in more situations.
I found it worthwhile to buy a brand one. It is distinctly better to handle
(less stiff, i.e. more flexible) than the cheap one I got, and thinner, too,
which is always good.
In my experience, it generally did not work well to push the fiber into an
existing duct or alongside an existing cable. I really needed a cable
puller.
If you’re lucky and have enough space in your duct(s), you can leave the
existing connectors on the fiber. I have successfully just used a piece of tape
to fix the fiber connector on the cable puller, pushing down the nose
temporarily:
Where there are no existing ducts, you may need to lay the fiber on top of the
wall. Obviously, this is tricky as soon as you need to make a connection going
through a wall: whereas copper ethernet cables can be bent and squeezed into
door frames, you quickly risk breaking fiber cables.
Luckily, the fiber is very light, so it’s very easy to fix to the wall with a
piece of tape:
You can see the upstream internet fiber in the top right corner, which is rather
thick in comparison to my 0.9mm yellow fiber that’s barely visible in the middle
of the picture.
Note how the fiber entirely disappears behind the existing duct atop the
door!
Above, you can see the flat ethernet cable I have been using as a temporary
experiment.
Where there is an existing cable that you can temporarily remove, it might be
possible to remove it, put the fiber in, and put the old cable back in,
too. This is possible because the 0.9mm fiber cable is so thin!
I’m using this technique to cross another wall where the existing cable duct is
too full, but there is a cable that can be removed and put back after pulling
the fiber through:
…and on the other side of the wall:
Note how the fiber is thin enough to fit between the socket and duct!
Note: despite measuring how long a fiber cable I would need, my cable turned
out too short! While the cable was just as long as I had measured, with
distances exceeding 10m, it is a good idea to add a few meters spare on each
side of the connection.
Field assembly connectors
To give you an overview, these are the required steps at a high level:
Video: YouTube: Terminate Fiber in 5
Minutes: this video shows a
different product, but I found it helpful to see any field assembly connector
on video, and this is one of the better videos I could find.
Beware: the little paper booklet that comes with the field assembly
connector contains measurements which are not to scale. I have suggested to
FS.COM that they fix this, but until then, you’ll need to use e.g. a tape
measure.
For establishing an intuition of their different sizes, here are the different connectors:
From left to right:
2.0mm fiber cable
cat6 ethernet cable
0.9mm fiber cable (LC/UPC factory)
0.9mm fiber cable (LC/UPC field assembly connector)
The 0.9mm fiber cables come with smaller connectors than the 2.0mm fiber cables,
and that alone might be a reason to prefer them in some situations.
The field assembly connectors are pretty bulky in comparison, but since you can
attach them yourself after pulling only the cable through the walls and/or
ducts, you usually don’t care too much about their size.
Conclusion
Modern fiber cables available at FS.COM are:
thinner than I expected
more robust than I expected
cheaper than I expected
survive tighter bend radiuses than I expected
Replacing this particular connection with a fiber connection was a smooth
process overall, and I would recommend it in other situations as well.
I would claim that it is totally feasible for anyone with an hour of
patience to learn how to put a field assembly connector onto a fiber cable.
If labor cost is expensive in your country or you just like doing things
yourself, I can definitely recommend this approach. In case you mess the
connector up and don’t want to fix it yourself, you can always call an
electrician!
]]><![CDATA[Fiber7 performance]]>https://michael.stapelberg.ch/posts/2014-09-05-fiber7_performance/2014-09-05T12:00:00+00:00
Ever since I moved to Zürich, I wanted to get a fiber internet connection. I’ve
lived with a 6 Mbps DSL line at my parent’s place for about 10 years, so I was
looking forward to a lot more Megabits and a lot less latency. For reasons that
I won’t go into in this article, it took me about a year to get a fiber
connection, and in the end I had to go with Swisscom (instead of init7 on top of EWZ).
But then fiber7 launched. They provide a 1
Gbps symmetrical connection (Swisscom provided a 1 Gbps/100 Mbps down/up
connection) for a lot less money than Swisscom, and with native, static IPv6.
A couple of people are interested in how fiber7 performs, and after being
connected for about 2 months, I think I can answer this question by now :-).
Latency
I started running smokeping to see how my internet connection performs back
when I was with Swisscom, because they had some routing issues to certain
networks. This would manifest itself with getting 50 KB/s transfer rates,
which is unacceptable for image boards or any other demanding application.
So, here is the smokeping output for google.ch during the time period that
covers both my Swisscom line, the temporary cablecom connection and finally
fiber7:
What you can see is that with Swisscom, I had a 6 ms ping time to google.ch.
Interestingly, once I used the MikroTik RB2011 instead of the Swisscom-provided
internet box, the latency improved to 5 ms.
Afterwards, latency changed twice. For the first change, I’m not sure what
happened. It could be that Swisscom turned up a new, less loaded port to peer
with Google. Or perhaps they configured their systems in a different way, or
exchanged some hardware. The second change is relatively obvious: Swisscom
enabled GGC, the Google
Global Cache. GGC is a caching server provided by Google that is placed
within the ISP’s own network, typically providing much better latencies (due to
being placed very close to the customer) and reducing the traffic between the
ISP and Google. I’m confident that Swisscom uses that because of the reverse
pointer record of the IP address to which google.ch resolves to. So with that,
latency is between 1 ms and 3 ms.
Because switching to Fiber7 involves recabling the physical fiber connection in
the POP, there is a 2-day downtime involved. During that time I used UPC
cablecom’s free offering, which is a 2 Mbps cable connection that you can
use for free (as long as you pay for the cable connection itself, and after
paying 50 CHF for the modem itself).
As you can see on the graph, the cable connection has a surprisingly good
latency of around 8 ms to google.ch — until you start using it. Then it’s
clear that 2 Mbps is not enough and the latency shoots through the roof.
Let me say that I’m very happy with the performance of my internet connection.
Some of the measurements where packet loss is registered may be outside of
fiber7’s control, or even caused by me, when recabling my equipment for
example. Overall, the latency is fine and consistent, much more so than with
Swisscom. I have never experienced an internet outage during the two months
I’ve been with fiber7 now.
Also, while I am not continuously monitoring my bandwidth, rest assured that
whenever I download something, I am able to utilize the full Gigabit, meaning I
get an aggregate speed of 118 MB/s from servers that support it. Such servers
are for example one-click hosters like uploaded, but also Debian mirrors (as
soon as you download from multiple ones in parallel).
Conclusion
tl;dr: fiber7 delivers. Incredible latency, no outages (yet), full download speed.
]]><![CDATA[Configuring a Ubiquiti EdgeRouter Lite (Erlite-3) for Fiber7]]>https://michael.stapelberg.ch/posts/2014-08-11-fiber7_ubnt_erlite/2014-08-11T09:55:00+00:00
I immediately ordered a fiber7 internet
connection once it became available, and I’ve been connected since a few weeks.
They offer a 1 Gbps symmetrical fiber connection, with native (static) IPv6 and
no traffic limit — for 65 CHF per month (about 54 €).
In the order form, they let you choose whether you want to order a
pre-configured MikroTik RB2011UiAS-2HnD including fiber optic and fiber patch
cable. I assumed this would be an excellent choice, so I ordered it.
I really like the MikroTik device. Its CLI and web interface are well
thought-out and easy to use once you understand their way of thinking. It’s
small, absolutely silent and just works. However, there’s one shortcoming: it
doesn’t do IPv4 hardware acceleration (they call it “fast path”) when you
enable NAT, which you need for a fiber7 connection. Thus, the top bandwidth
maxes out at 500 to 600 Mbps, so effectively you only use half of your
available bandwidth.
Therefore, I looked around for other routers which can do a full Gigabit
WAN-to-LAN, i.e. with IPv4-NAT enabled. The selection of routers that can do
that is very small, see for example the
smallnetbuilder WAN-to-LAN router charts.
In my first try, I went with the Netgear R7000 (“Nighthawk”) which is the
highest-performing router with regards to WAN-to-LAN bandwidth on
smallnetbuilder. It indeed does hardware acceleration for IPv4-NAT, so you
can reach the full 118 MB/s TCP bandwidth that a Gigabit line
offers. However, the firmware does not do DHCPv6-PD (Prefix Delegation), even
though it’s certified as IPv6-ready. There are alternative firmwares, e.g.
Tomato and DD-WRT. Tomato (v121 as of writing) comes with the kernel module
that enables IPv4-NAT hardware acceleration, but has a nasty bug: the latency
jumps up to 500ms for most of your packets, which is clearly not acceptable.
DD-WRT does not come with such a kernel module because they use a newer kernel,
so the speed maxes out at 400 Mbps (that’s what they claim, I didn’t even
bother testing it).
The EdgeRouter Lite (tested with firmware v1.5.0 and v1.6.0) offers IPv4 and
IPv6 offloading, and in fact reaches Gigabit line rate (118 MB/s measured TCP
performance). An unwelcome surprise is that hardware acceleration only works
when not using bridging at all, so if you want to connect two
devices to your router in the same subnet, like a computer and a switch, you
cannot do that. Effectively, the EdgeRouter needs to sit between the internet
connection and a switch.
With regards to the web interface of EdgeOS: the web interface feels very
polished and modern, but it seems to lack a number of features that are only
accessible in the CLI interface. The MikroTik web interface had a much higher
coverage of features. In general, I like how Ubiquiti does many things right,
though: firmware updates are quick and painless, the model selection and
download on their website is very simple to find and use, and you even get a
link to the relevant GPL tarball without asking :).
Properly disconnecting your old router
First of all, you should disconnect the MikroTik (or your current router) from
the network. I recommend doing that by explicitly disabling both DHCP clients,
so that the fiber7 router knows you are not using the old device any more. This
is important because fiber7 uses a Cisco feature called “IP source guard”,
which will disable any MAC address on your port that does not have a DHCP
lease. Therefore, if you just switch routers, you need to wait for the old
lease to expire before you get a new lease. In my first tests, this worked
relatively well, but then a lease got stuck for some reason and I had to
escalate the problem to their NOC. So, better disable the DHCP:
/ip dhcp-client set disabled=yes numbers=0
/ipv6 dhcp-client set disabled=yes numbers=0
Configuring the EdgeRouter Lite for fiber7
In my configuration, I connect a switch to eth0 and a media converter (the
TP-LINK MC220L) to eth1. Pay attention to configure the media converter to
“auto”, not “force”. In both cases you’ll get a link, but with “force”, you
will not get any replies to your packets.
A general tip: if you mess up your IP configuration, you can always use the
link-local address of the EdgeRouter and SSH into that. Find the link-local
address using ping6 ff02::1%eth0.
After logging into the web interface, set the eth1 address to DHCP and it
should get a public IPv4 address from fiber7. Afterwards, enable NAT by
clicking on NAT → Add Source NAT Rule. Set the outbound interface to eth1 and
select the “masquerade” radio button. You’ll also need to switch to the
“services” tab and enable a DHCP and DNS server. This should give you IPv4
connectivity to the internet.
Now on to IPv6. Since EdgeOS version 1.6.0, DHCPv6-PD is an easily usable
feature. Log into the router using ssh ubnt@192.168.1.1, then run
the following commands:
configure
set interfaces ethernet eth1 dhcpv6-pd pd 0 prefix-length /48
set interfaces ethernet eth1 dhcpv6-pd pd 0 interface eth0 service slaac
set interfaces ethernet eth1 dhcpv6-pd pd 0 interface eth0 prefix-id :0
commit
save
exit
reboot
The prefix-length specifies how big the prefix is that the ISP is
giving us; a /48 in the case of fiber7. The next lines specify
that we want to use SLAAC to
hand out addresses of the delegated prefix on eth0. The
prefix-id is used for the part after the /48, so if you set it to
e.g. ff23, and your prefix is 2a02:168:4a09::/48, the
EdgeRouter will announce 2a02:168:4a09:ff23::/64 on
eth0.
For me, the reboot was necessary after changing settings, so try rebooting if
things don’t work as they should.
When running ip -6 address show dev eth0 you should see that
the router added an IPv6 address like
2a02:168:4a09:0:de9f:dbff:fe81:a905/64 to eth0.
That’s it! On clients you should be able to ping6 google.ch now
and get replies.
Bonus: Configuring a DHCPv6-DUID
fiber7 wants to hand out static IPv6 prefixes based on the DHCPv6 option 37,
but that’s not ready yet. Until then, they offer you to set a static prefix
based on your DUID (a device identifier based on the MAC address of your
router). Since I switched from the MikroTik, I needed to port its DUID to the
EdgeRouter to keep my static prefix.
Luckily, wide-dhcpv6 reads a file called dhcp6c_duid that you can create with
the proper DUID. The file starts with a 16-bit integer containing the length of
the DUID, followed by the raw DUID:
I can see why fiber7 went with the MikroTik as their offer for customers: it
combines a media converter (for fiber to ethernet), a router, a switch and a
wifi router. In my configuration, those are now all separate devices: the
TP-LINK MC220L (27 CHF), the Ubiquiti EdgeRouter Lite Erlite-3 (170 CHF) and
the TP-LINK WDR4300 (57 CHF). The ping latency to google.ch has gone up from
0.6ms to 0.7ms due to the additional device, but the download rate is about
twice as high, so I think this is the setup that I’ll keep for a while — until
somebody comes up with an all-in-one device that provides the same features and
achieves the same rates :-).
Appendix: IPv6 with EdgeOS < 1.7.0
For EdgeOS 1.6.0, you’ll need to add router advertisement settings:
configure
set interfaces ethernet eth1 dhcpv6-pd pd 0 prefix-length /48
set interfaces ethernet eth1 dhcpv6-pd pd 0 interface eth0 service slaac
set interfaces ethernet eth1 dhcpv6-pd pd 0 interface eth0 prefix-id :0
set interfaces ethernet eth0 ipv6 router-advert prefix ::/64
set interfaces ethernet eth0 ipv6 router-advert radvd-options
  "RDNSS 2001:4860:4860::8888 {};"
commit
save
exit
reboot
Appendix: IPv6 with EdgeOS < 1.6.0
IPv6 is a bit harder, since EdgeOS in its current version (1.5.0) does not
support DHCPv6-PD via its Web or CLI interface. The necessary software
(wide-dhcpv6) is included, though, so we can configure it manually.
For the next steps, you need to know the transfer network IP range, which seems
to be different for every fiber7 POP (location). You can get it by either using
DHCPv6 and looking at the address you get, by checking your MikroTik
configuration (if you have one) or by asking fiber7. In my case, the range is
2a02:168:2000:5::/64, but I’ve heard from others that they have
2a02:168:2000:9::/64.
Use ssh ubnt@192.168.1.1 to log into the CLI. In order to set the
proper IPv6 address on the transfer network, run ip -6 address show dev
eth1 and look for a line that says inet6
fe80::de9f:dbff:fe81:a906/64 scope link. Copy everything after the
:: and prefix it with 2a02:168:2000:5: (your fiber7
transfer network range), then configure that as static IPv6 address on eth1 and
set the default route (and enable IPv6 offloading):
configure
set system offload ipv6 forwarding enable
set interfaces ethernet eth1 address 2a02:168:2000:5:de9f:dbff:fe81:a906/64
set protocols static route6 ::/0 next-hop 2a02:168:2000:5::1 interface eth1
commit
save
exit
Now you should be able to run ping6 google.ch and get a reply.
We still need to enable DHCPv6 though so that the router gets a prefix and
hands that out to its clients. Run sudo -s to get a root shell and
configure DHCPv6:
cat >/etc/wide-dhcpv6/dhcp6c-script-zkj <<'EOT'
#!/bin/sh
# wide-dhcpv6-client 20080615-12 does not properly close
# file descriptors when starting the script.
# https://bugs.debian.org/757848
exec 4>&- 5>&- 6>&- 7>&-
# To prevent radvd from sending the final router advertisment
# that unconfigures the prefixes.
killall -KILL radvd
/etc/init.d/radvd restart
exit 0
EOT
chmod +x /etc/wide-dhcpv6/dhcp6c-script-zkj
Now, when running ip -6 address show dev eth0 you should see that
the router added an IPv6 address like
2a02:168:4a09:0:de9f:dbff:fe81:a905/48 to eth0. Let’s enable
router advertisments so that clients get an IPv6 address, route and DNS server:
configure
set interfaces ethernet eth0 ipv6 router-advert prefix ::/64
set interfaces ethernet eth0 ipv6 router-advert radvd-options
  "RDNSS 2001:4860:4860::8888 {};"
commit
save
exit
That’s it! On clients you should be able to ping6 google.ch now and get replies.
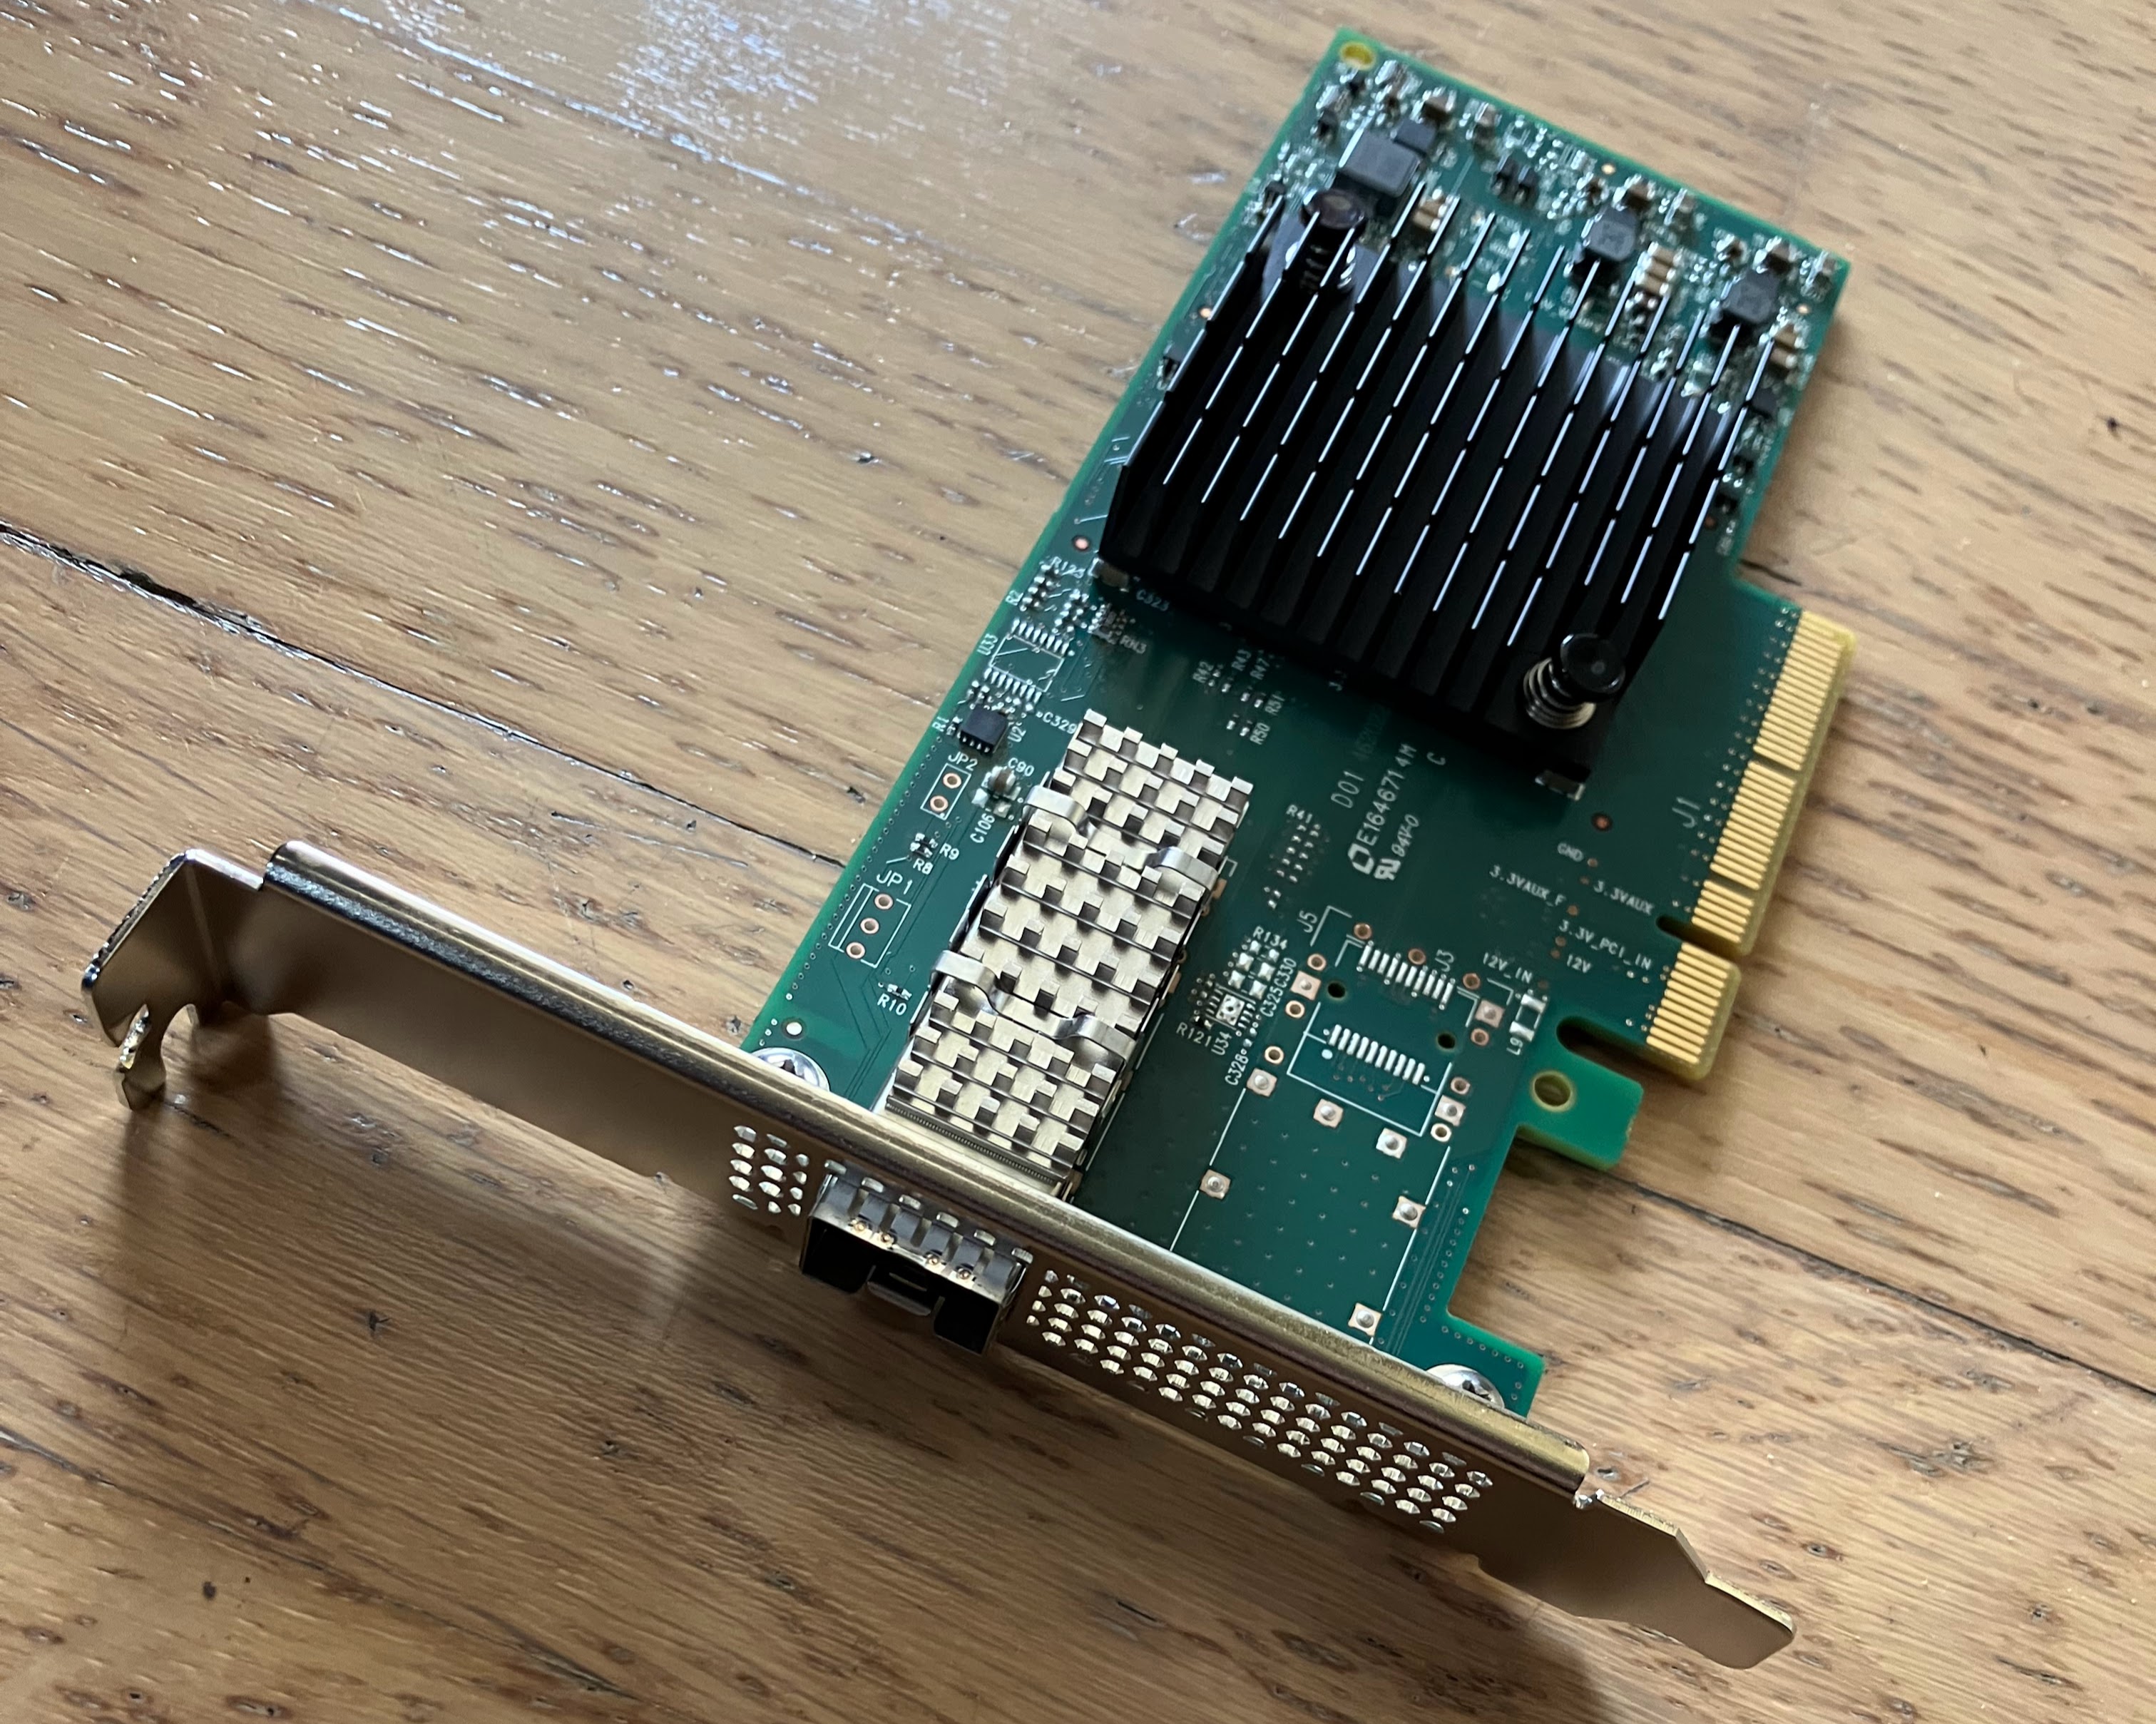
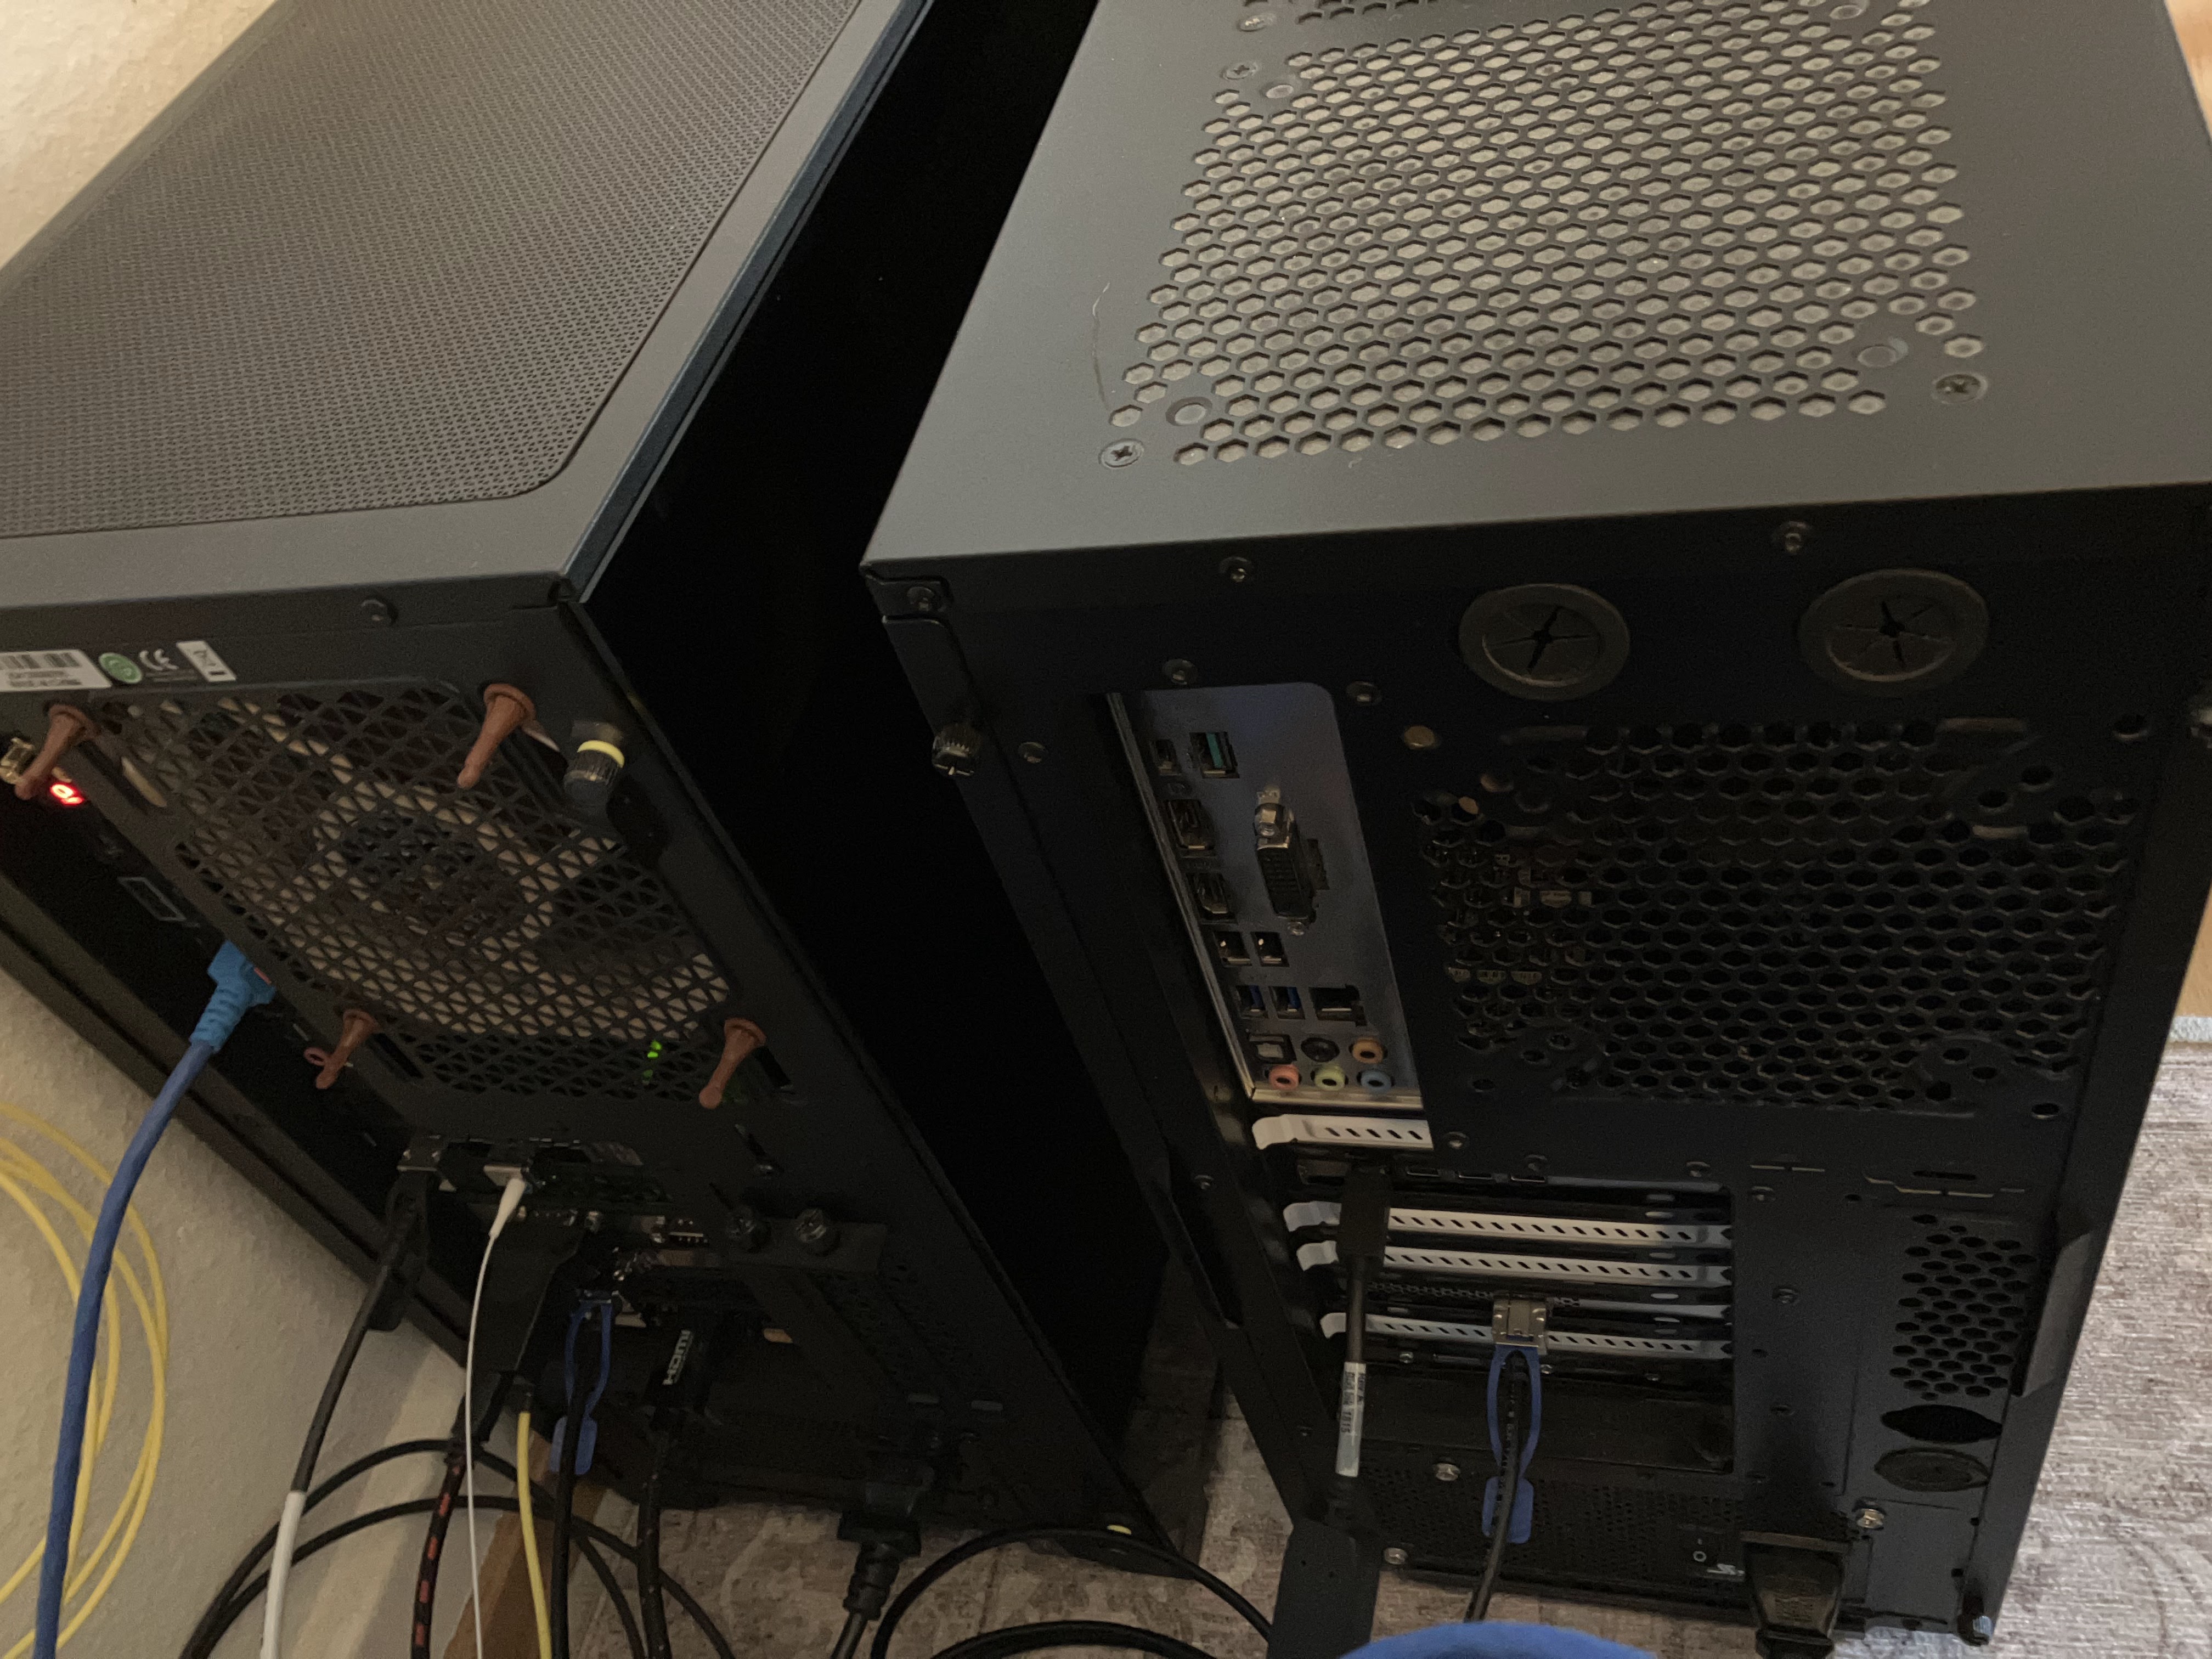
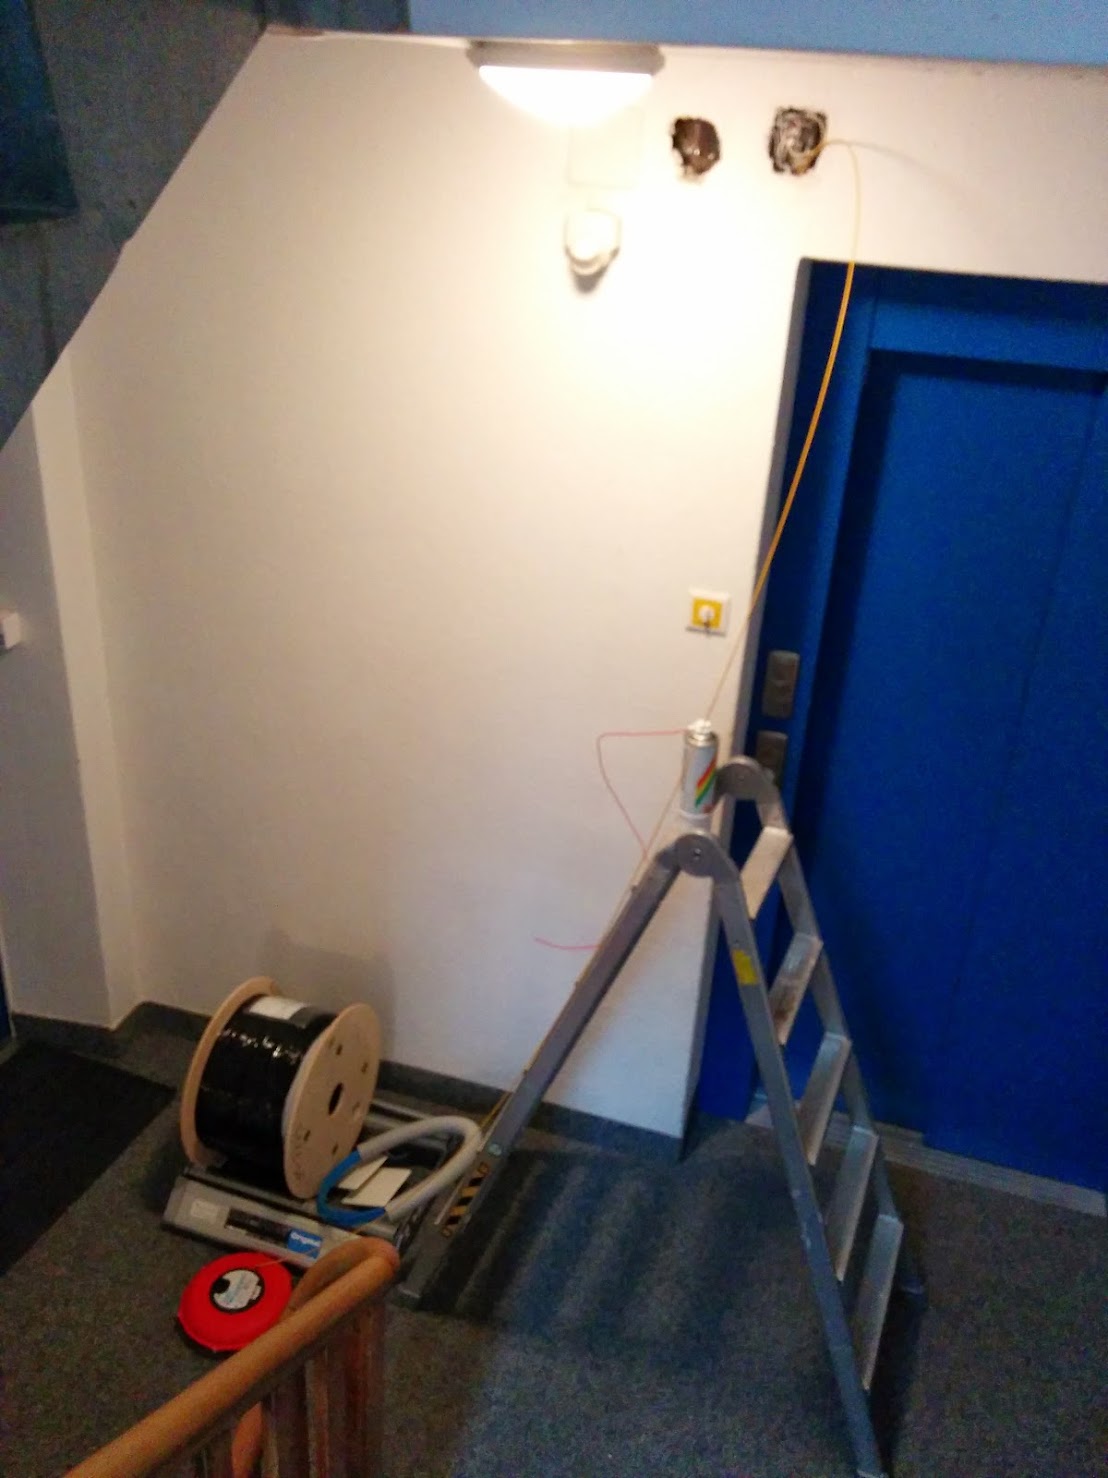
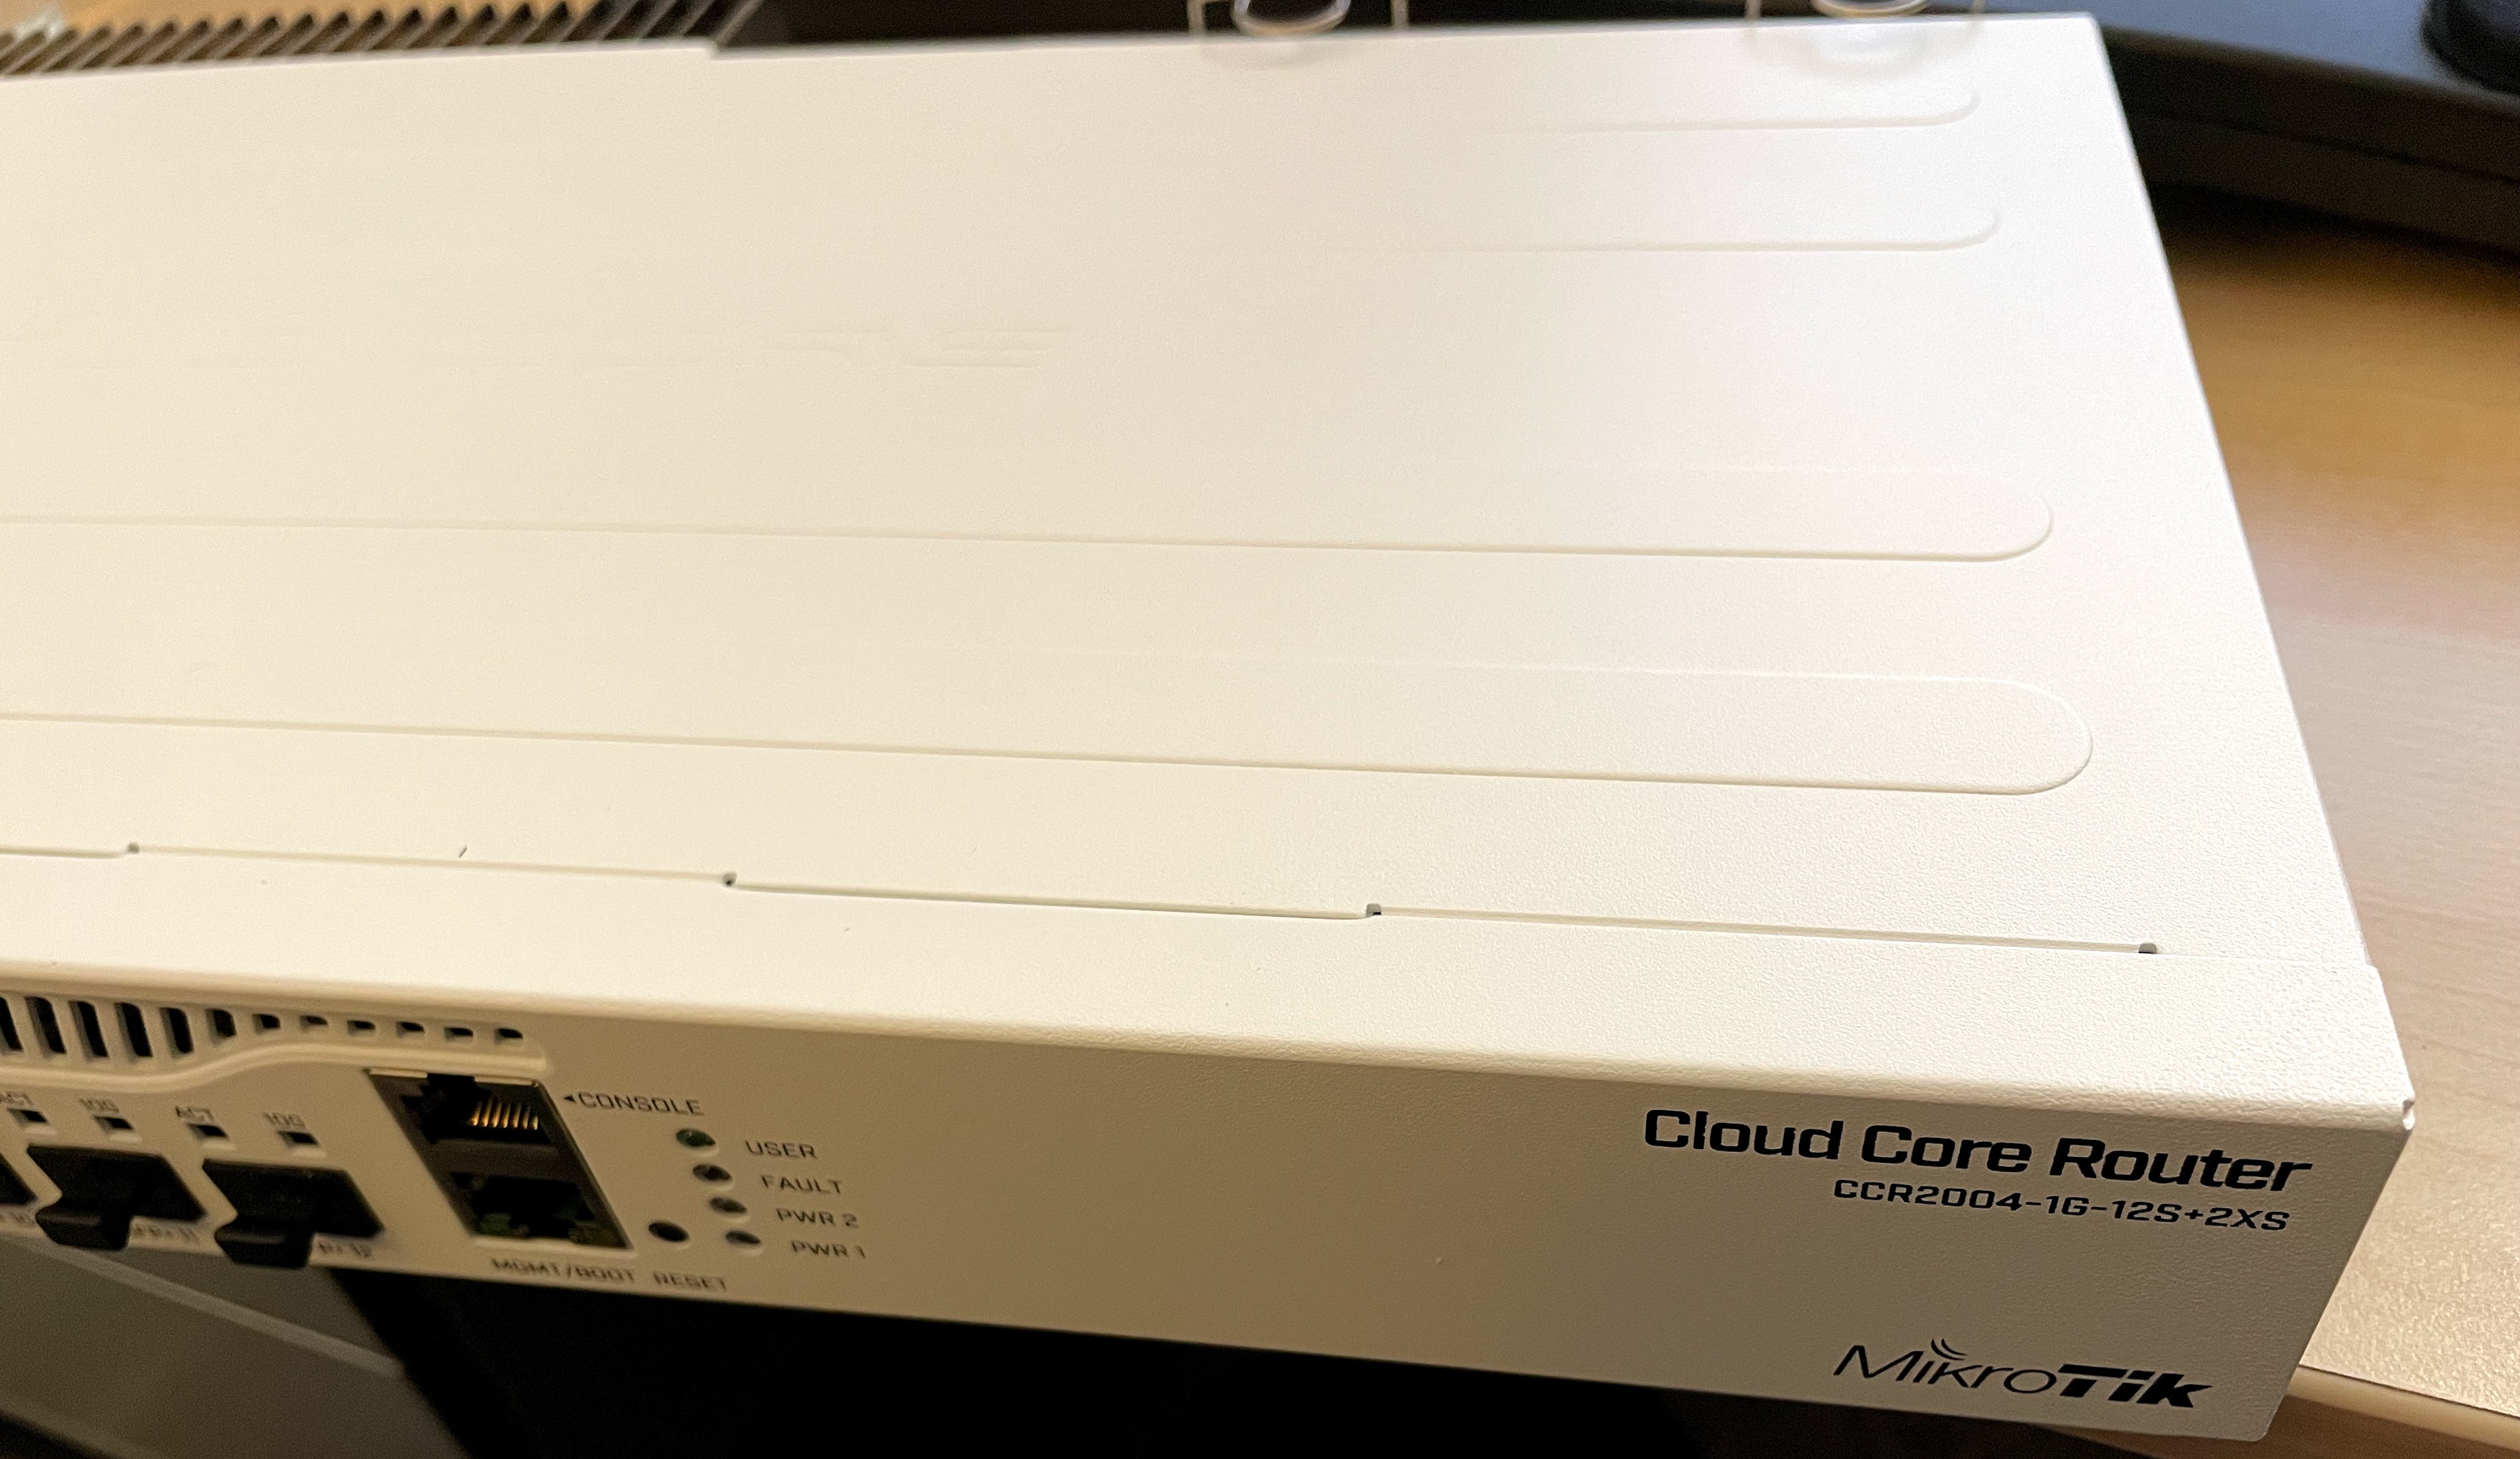
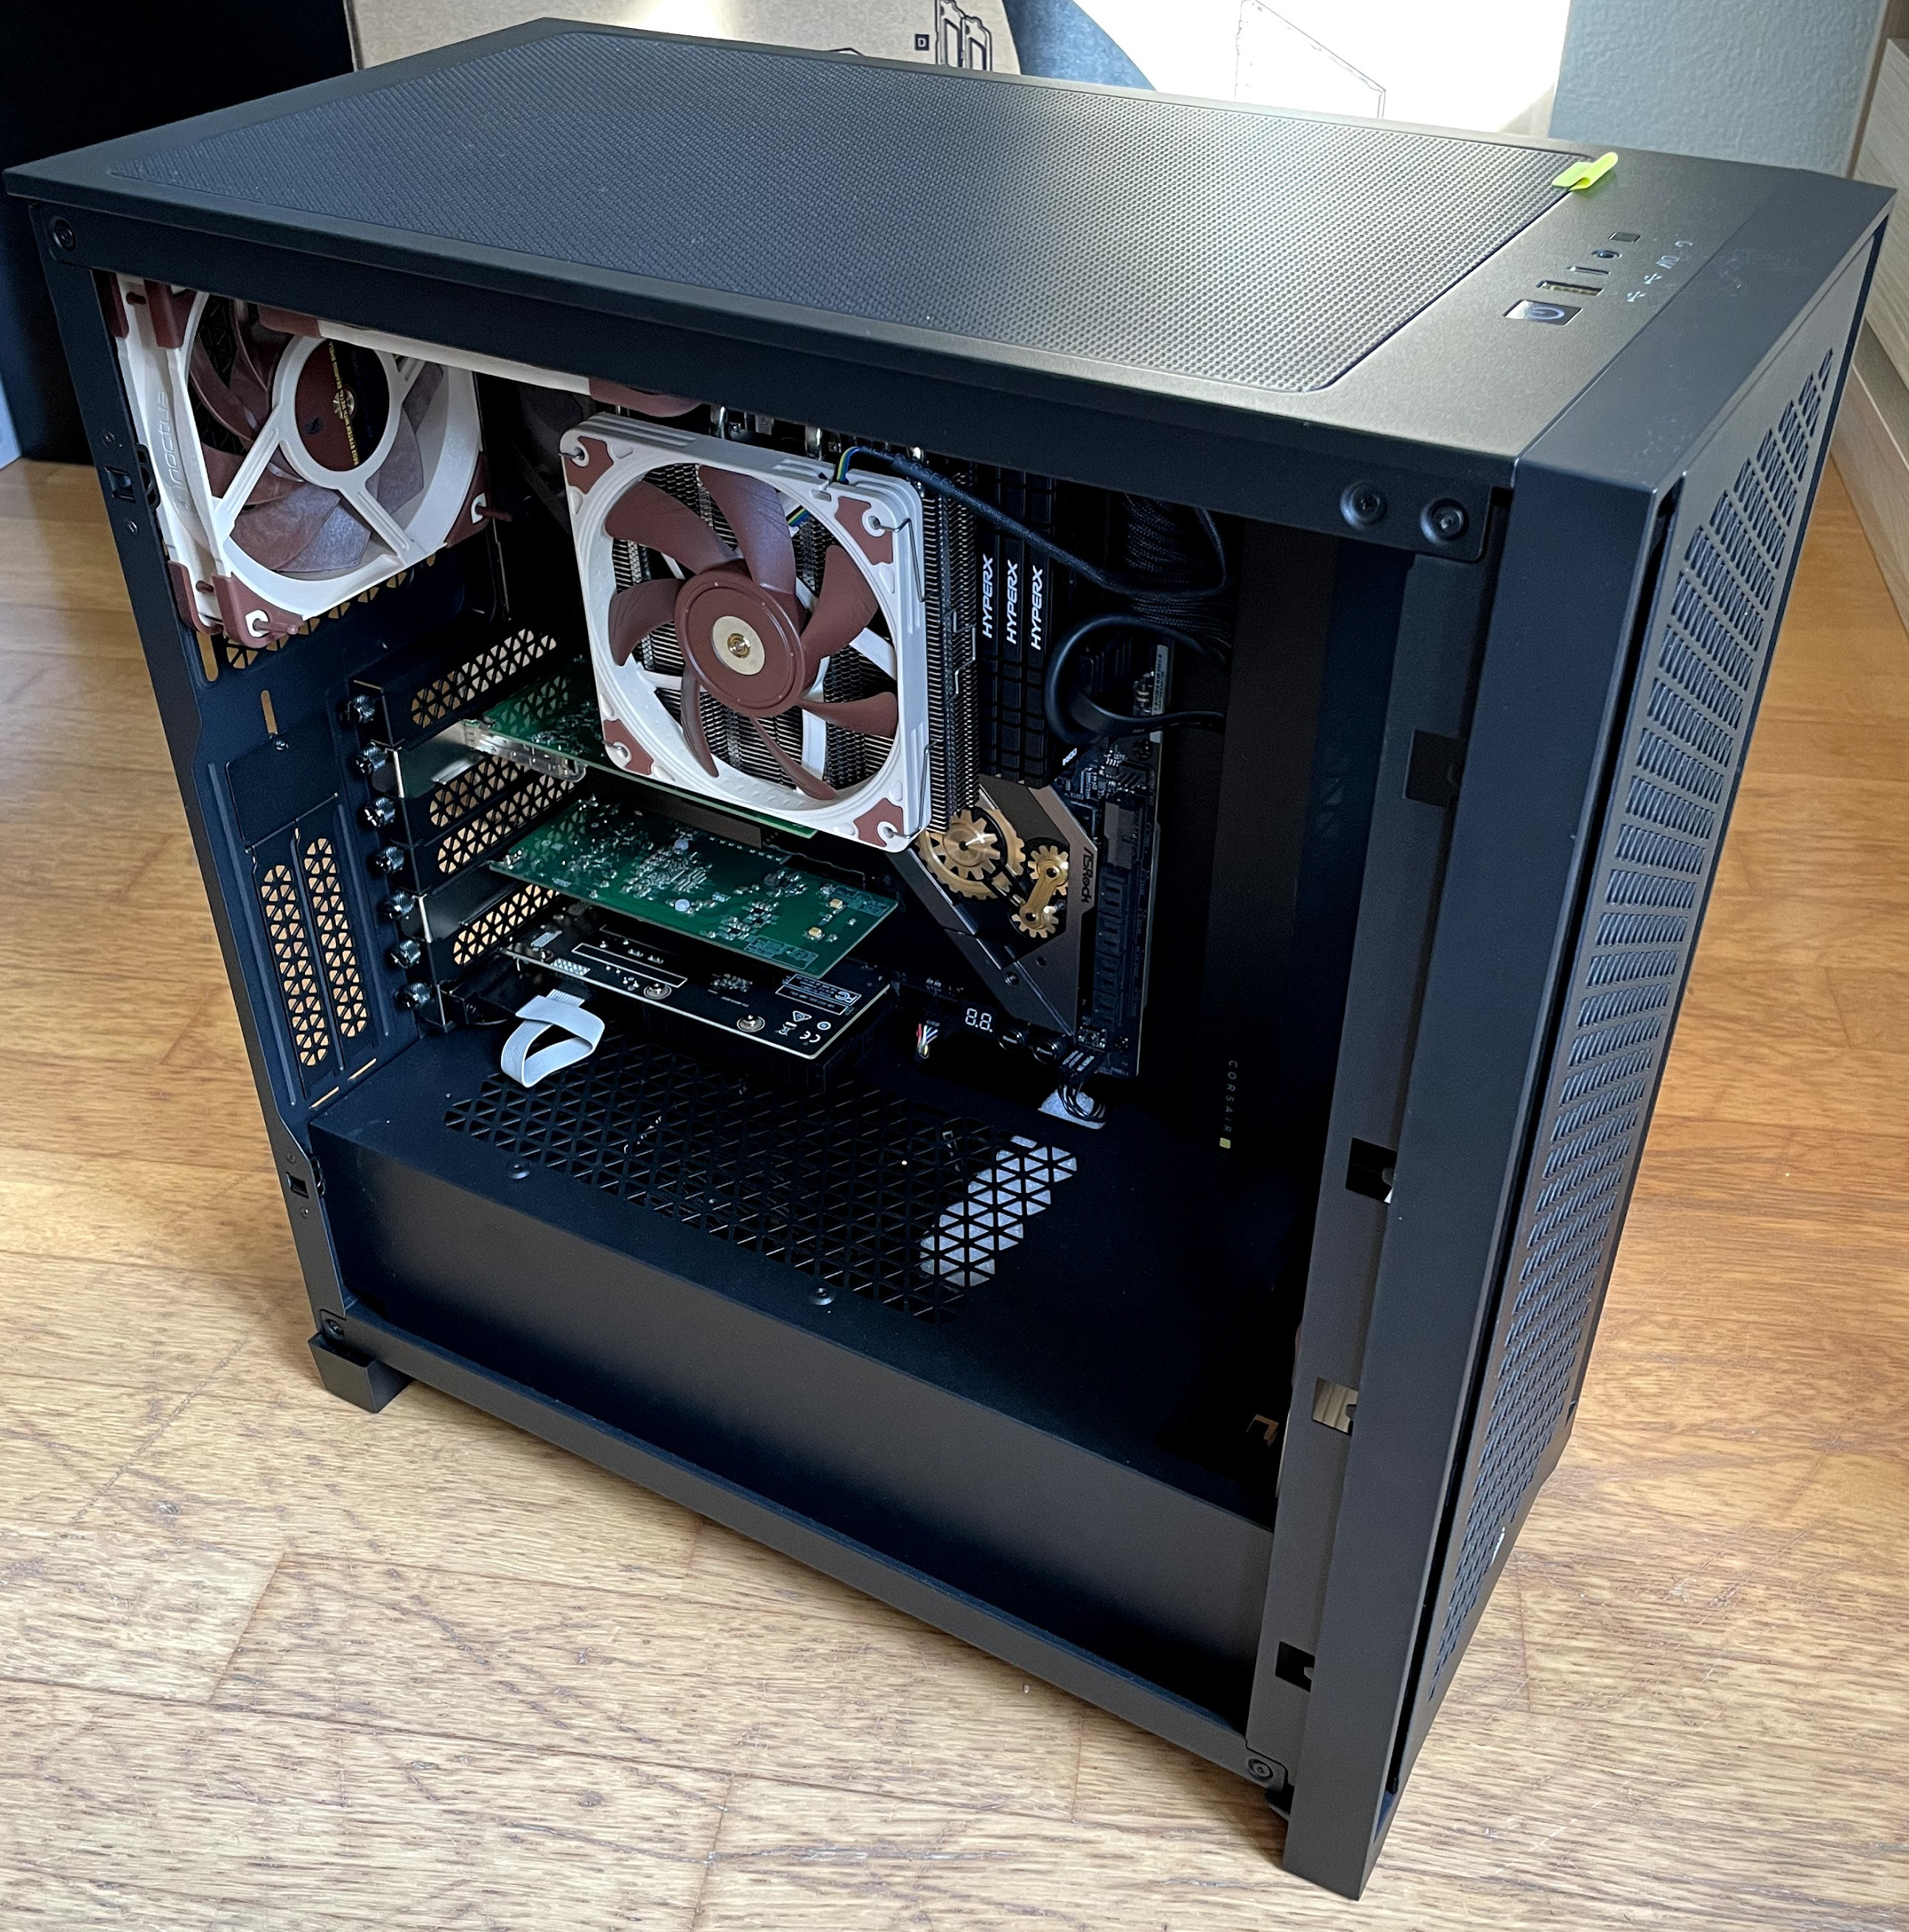
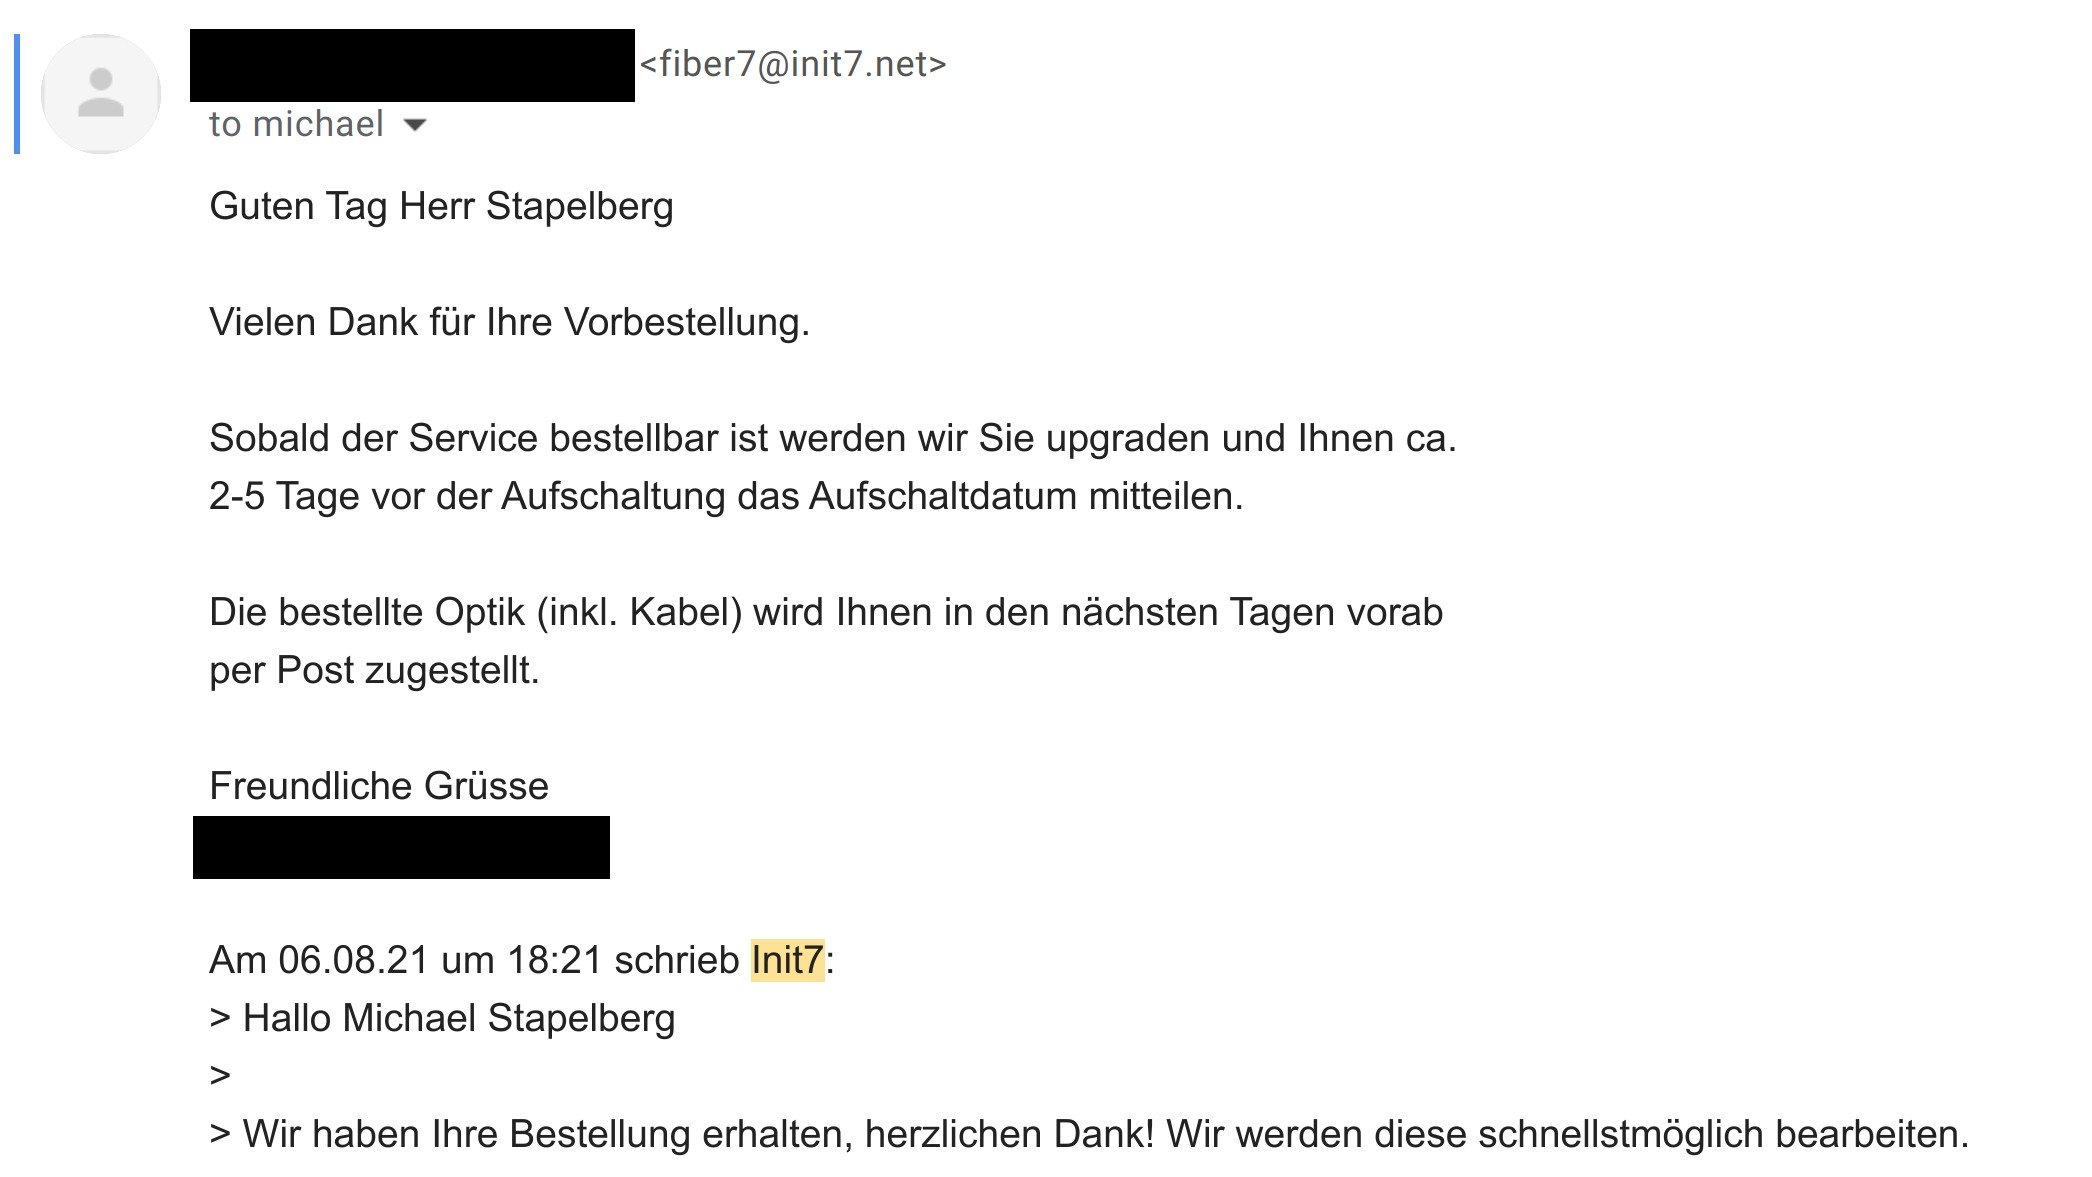

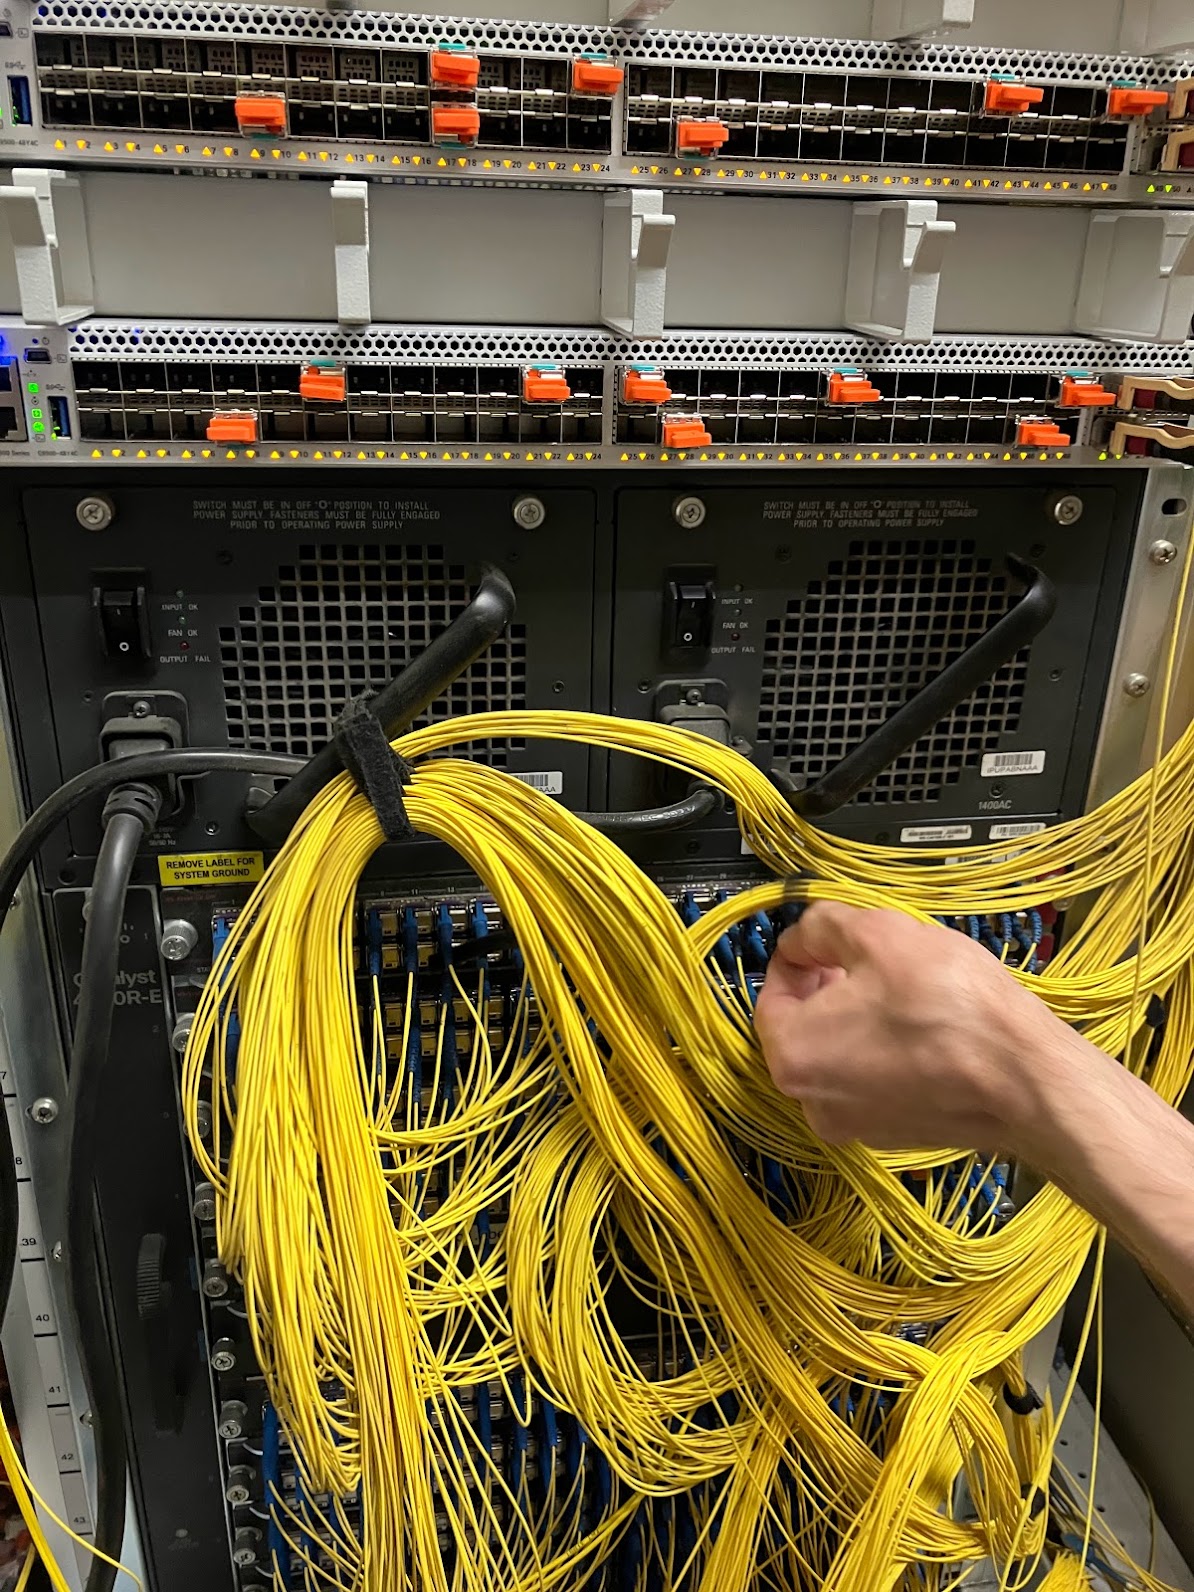


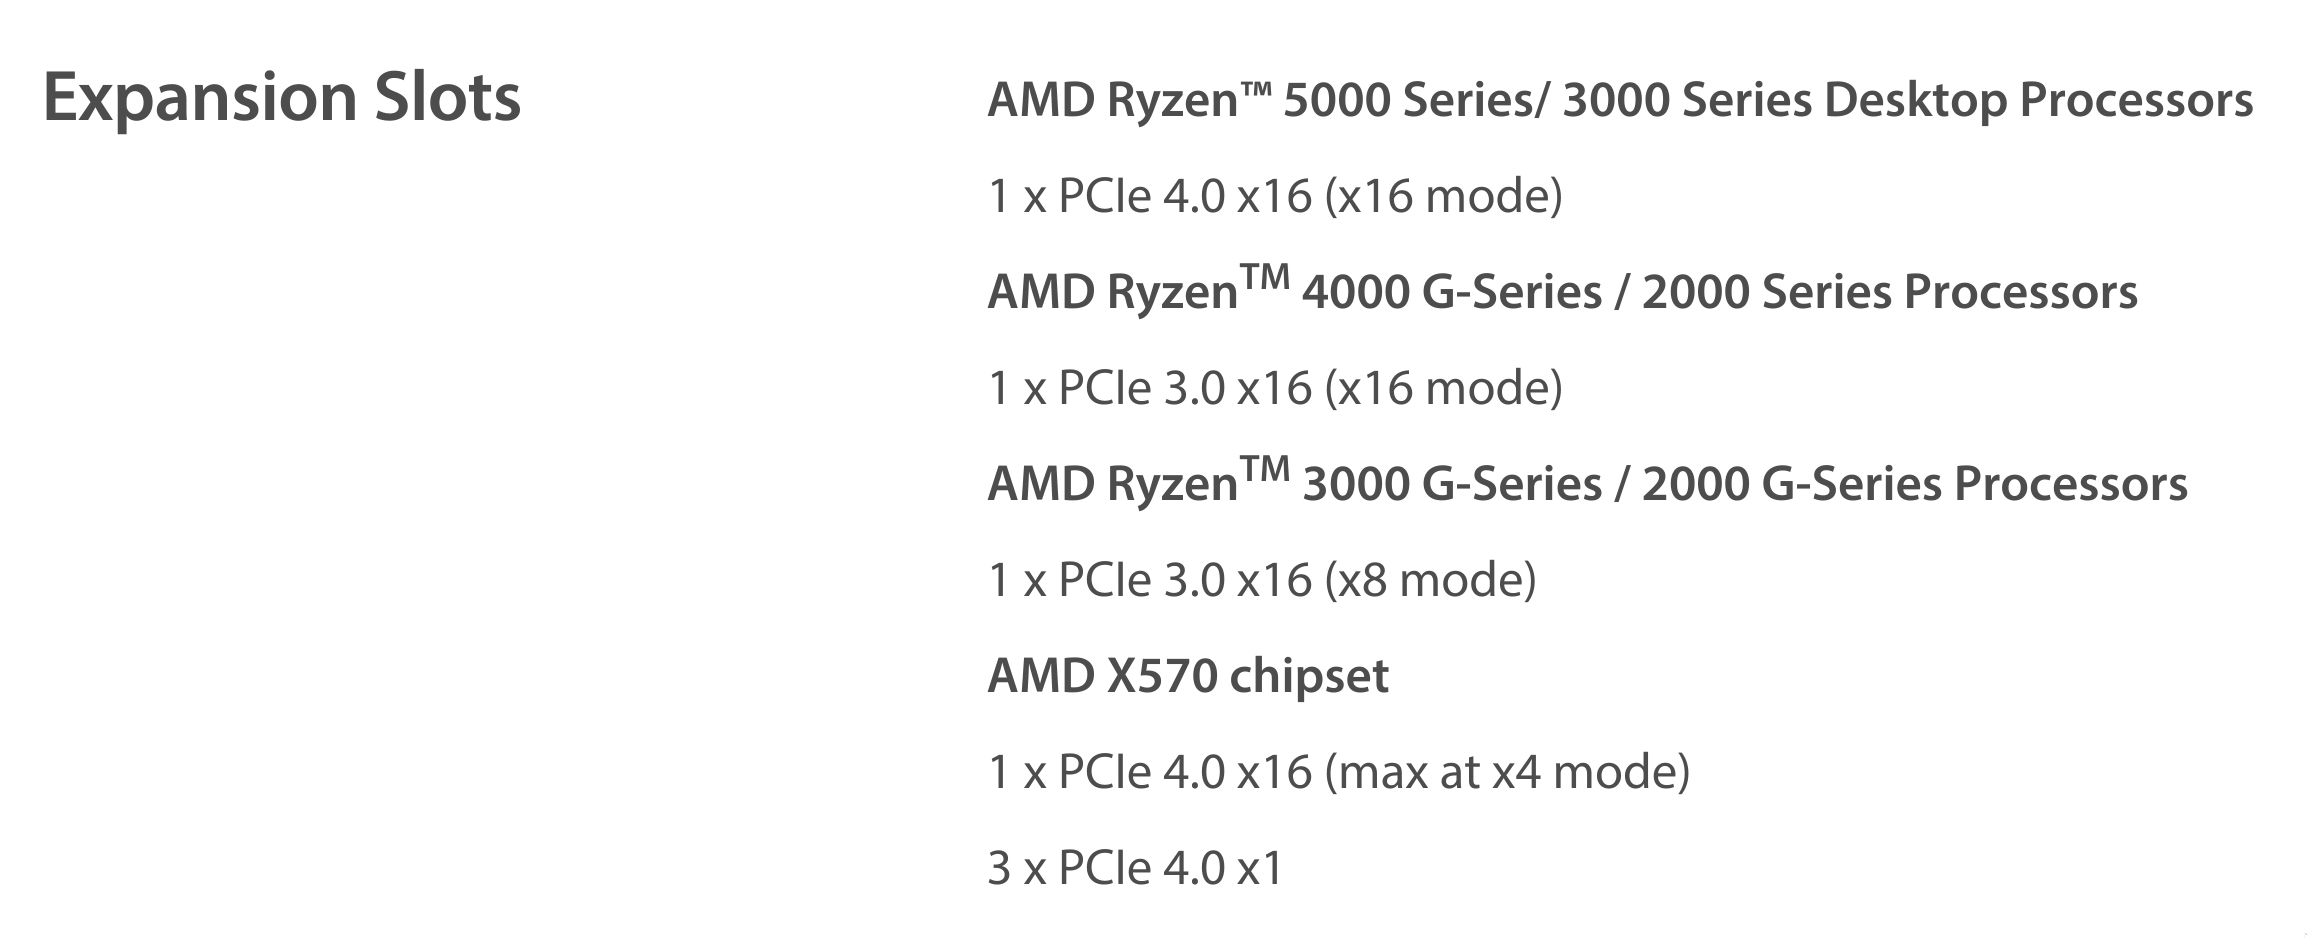
")
")
")


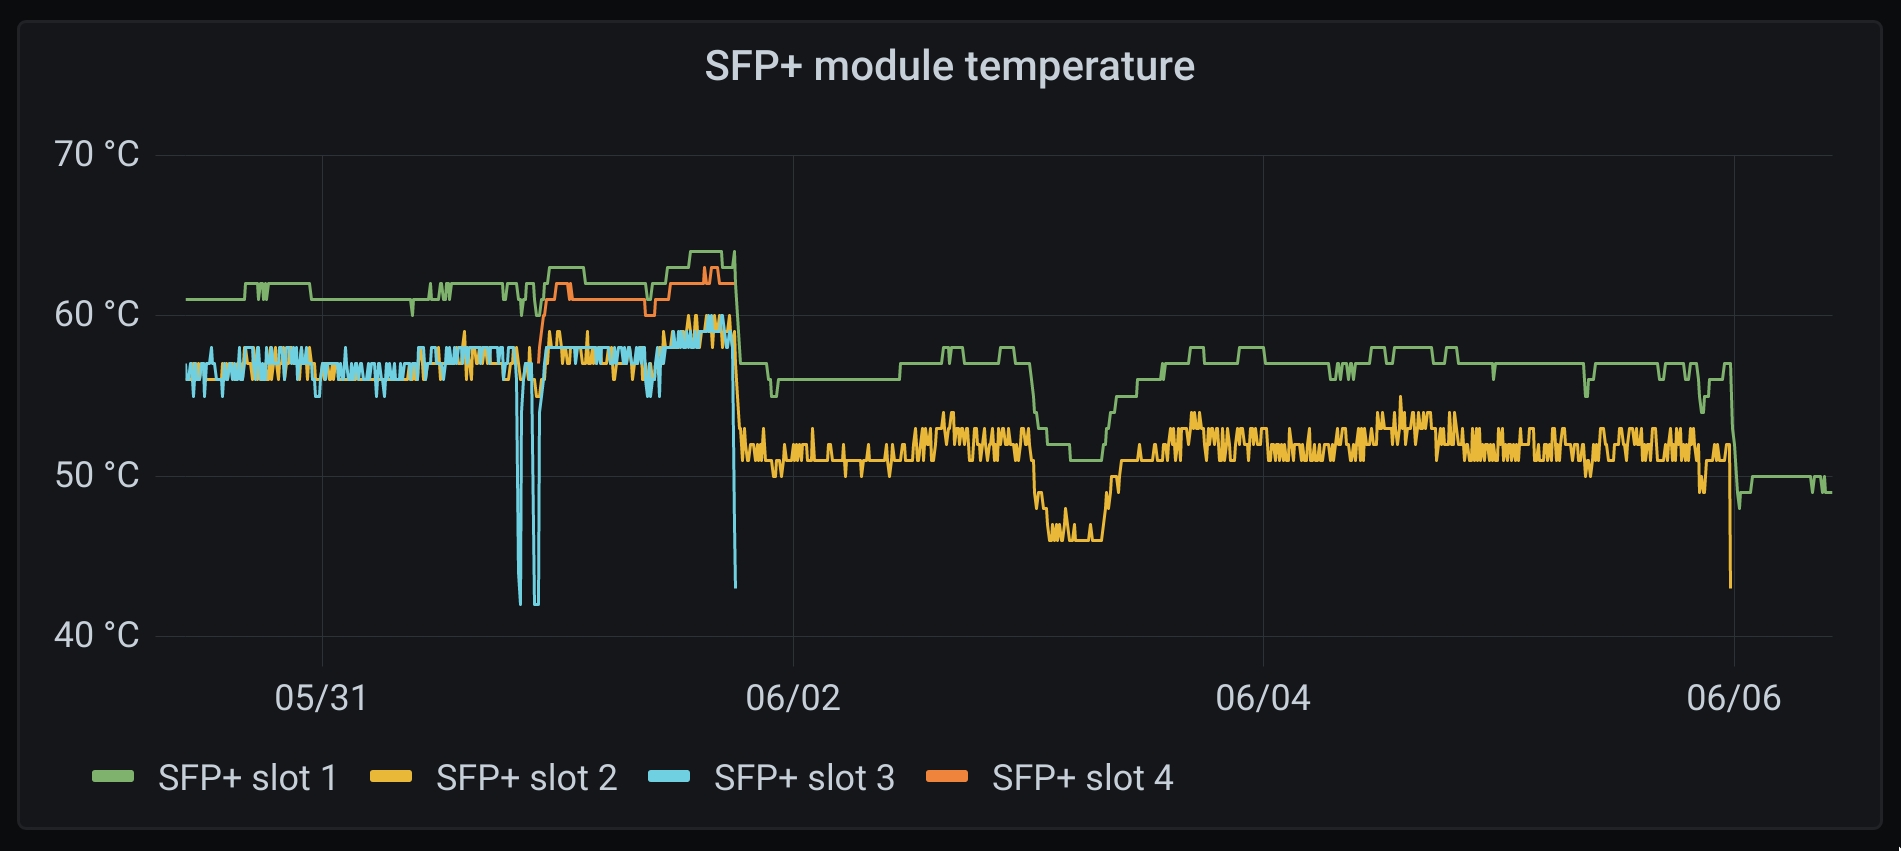

")


